Loading...

Get an Instant Quote or Place an Order

  • logo
  • logo
  • logo
  • logo
  • logo


Need Help?

Contact Customer Service and Support

Monday to Friday: 7am to 6pm MST

We offer the best quality printing at competitive printing prices paired with live personal service and support.

Service & Support
 

Booklet Printing Resources

Customer Ratings & Reviews

Booklet File Specifications

Color for Printed Books

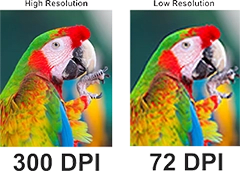
Color Specifications

Save your PDF in CMYK. CMYK (Cyan, Magenta, Yellow, and Key/Black) is the color model used in color printing. This model is recommended over RGB (Red, Green, Blue), which is used for digital displays, as it better aligns with the physical ink colors used in printing, ensuring color accuracy and consistency in your final printed material.

To convert files from RGB to CMYK in Adobe Photoshop: In Adobe Illustrator:

  1. Open your file and go to Image > Mode > CMYK Color.
  2. Review the color shifts and adjust if necessary, using color adjustment tools.
  3. Go to File > Document Color Mode > CMYK Color.
  4. Check your colors and adjust using the color panel if needed.

For a visual guide on checking and changing color settings, here’s a helpful tutorial.

Image Resolution

Image Resolution

PrintingCenterUSA recommends that the resolution of your images and document be 300 dpi or more. High resolution is critical for maintaining print quality, particularly for detailed graphics or high-quality photography. It ensures that the final print is sharp, detailed, and free from pixelation or blurriness.

In Photoshop or Illustrator:

  1. Go to Image > Image Size And set the resolution to 300 dpi or higher.
  2. Ensure Resample is unchecked to maintain current image quality.
  3. When creating a new document, set the resolution under Advanced Options.
  4. For existing images, use Effect > Document Raster Effects Settings And set to High (300dpi).

Troubleshooting Tips: If images look blurry or pixelated after printing, check that the resolution was set before scaling the image and adjust accordingly.

Bleed for Printing

Bleed for Printing

Bleed is an extra 1/8” of image that extends beyond the trim area of your printed piece. The project is printed on an oversized sheet that is cut down to size with the appearance that the image is “bleeding” off the edge of the paper.

In Adobe software: Add bleed during the initial setup of your document:

  1. In Illustrator or InDesign, go to File > Document Setup and add 0.125” (3mm) to each side.
  2. Ensure all critical elements are within the safe area, away from the edges of the bleed zone.
File Format Submission for Printing

File Format and Submission

Besides PDF, acceptable file formats include TIFF for high-quality images and EPS for vector files, due to their lossless compression and excellent color fidelity.

PDF Export: When saving a PDF in Photoshop or Illustrator, choose File > Save As and select Adobe PDF. Choose the preset PDF/X-4:2010 to ensure compatibility with maximum print quality settings.

Submission Checklist:

  1. Ensure all fonts are embedded
  2. Verify images are in CMYK and resolution is set properly.
  3. Flatten all layers to reduce file size and avoid issues during printing.
Advanced Printing Options

Advanced Printing Options

Spot Colors and Special Inks: If spot colors or special inks such as metallics or varnishes are offered, include them as separate layers or specify them in your design software. Label these layers clearly and check with your printer for specific file requirements.

Preparation Guidelines Use spot color palettes available in your design software and consult with the printing company to match the exact color specifications they require.

Login

*