


Adding Bleed & Safety Margins in Microsoft Word for Your Next Print Project
Need to know how to properly add bleed and margins in Microsoft Word? It’s an important step and makes a world of difference for your print. Proper bleed and safety margins ensure your images and text extend to the edge of the page to create a seamless print without borders.
Let’s learn how to do this in Microsoft Word!
Step-by-Step Instructions for Bleed & Safety Margins in Microsoft Word
Adding bleed and margins to your Microsoft Word document is easy! Here’s a quick guide to get print-ready results. For a visual walkthrough, check out our YouTube tutorial at the bottom.
- Start Your Project: From the Microsoft Word document options menu create a new document.
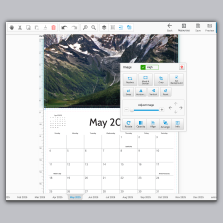
- Layout Settings: Click the “Layout” button in the top menu to open our design options.
- Setting Page Size: Click the “Size” dropdown and select “Custom Size” at the very bottom.
- Length: Final length of your project + 0.25 inch of bleed
- Width: Final width of your project + 0.25 inch of bleed
- Bleed is set✅
- Setting Margins: Click the “Margins” dropdown and select “Custom Margins” at the bottom
- Top: 0.125 inch
- Bottom: 0.125 inch
- Right: 0.125 inch
- Left: 0.125 inch
- Margins are set✅
- Upload Your Image: Drag and drop your images into the page and create text.
- Save Your Print-Ready File:
- Click “File” in the top left corner.
- Select “Save As”.
- Choose “PDF Print” as your file type.
- Name your file
- Click “Save” to download your file to your desktop.
You now have a print-ready file with perfect bleed and safety margins!
See footer for definitions of terms: bleed, safety, margin.
Watch the Video Tutorial
To watch our tutorial on these steps, check out our YouTube video here:
Still can’t picture your final print? Use our free file review tool to get a better idea! Need help turning your design vision into a reality? PrintingCenterUSA offers a variety of printing and design services for any print project.
Quick Definitions:
Bleed:
- Definition: The area of your design that extends slightly beyond the intended final cut line (trim line) of the printed product.
- Purpose: Provides a buffer during the printing and cutting process. Ensures that background colors and images fully extend to the edge of the page, preventing unintended white borders.
Safety Margin:
- Definition: The area within the trim line where important text and visual elements are placed.
- Purpose: Creates a comfortable visual buffer, ensuring key content isn’t accidentally cut off due to slight variations during printing and trimming.
Margin:
- Definition: The general term for the space between your design elements and the edge of the page.
- Purpose: Improves readability and makes your design look balanced and professional.