How to Use Canva for Print: Top 10 Tips for Beginners & Pros
Are you ready to excite your inner creative? These Canva print design tips are sure to spark some ideas. Canva is the next best graphic design platform and has been a player in the industry for over ten years. Canva has really helped me, and it is most known for its user-friendly interface, extensive library of print specific materials, and endless templates. Its free model offers a budget-friendly solution for individuals and businesses looking to expand their professionalism.
In this blog, we will share the top 10 Canva print design tips to help you master Canva for print. From using the design grids to adding bleed marks and exporting print-ready files. These tips will guide both beginners and seasoned designers in creating professional-quality prints.
1. Use Canva’s Design Grids & Guides
First on our list of Canva print design tips is Canva’s design grids and guides are best for creating perfectly aligned, visually balanced layouts. These invisible tools provide a framework for placing text, or images with accuracy.
Human eyes are trained to spot things that are unusual or out of place. Guides and grids can really be the difference between the best and worst designs for print.
- Grids: A series of intersecting lines that divide your canvas for structured placement.
- Guides: Draggable lines that mark specific points for alignment and spacing consistency.
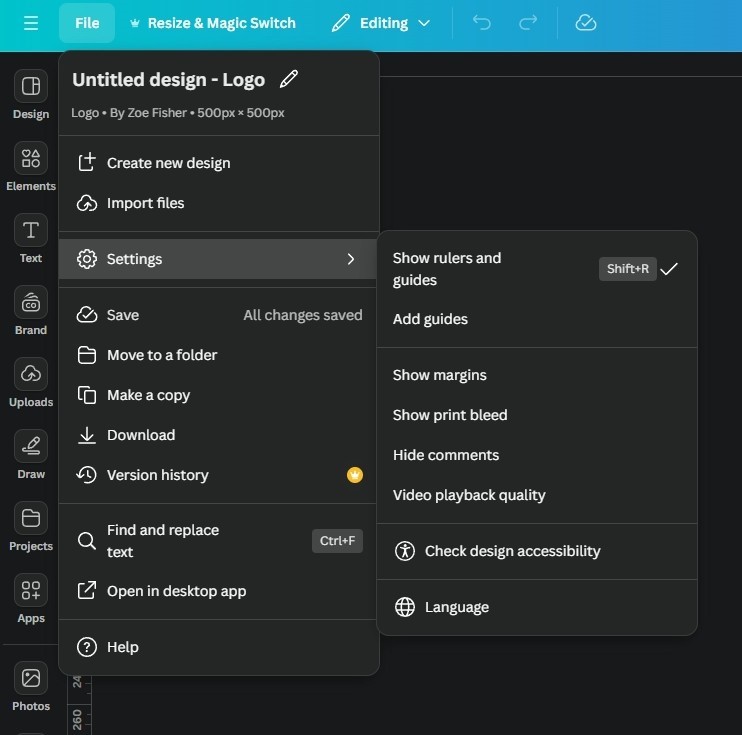
To access them, go to “File” > “Settings” > “Show rulers and guides” or “Show grid.” Enable “Snap to grid” and “Snap to guides” for effortless alignment.
Why use grids?
- Professionalism: Instantly elevate your designs without a designer.
- Readability: Make your content easy to scan and ideal for your target audience.
- Consistency: Ensure visual harmony across your design.
- Efficiency: Save time and frustration during the layout process.
2. Access Canva’s Extensive Library of Elements & Photos
Canva’s library of elements is a giant resource center of endless add-ons. The total list of elements includes shapes, graphics, stickers, photos, videos, charts, tables, frames, grids, audios, and mockups. This library will elevate your designs from amateur to professional with just a few additions.

Use this Canva print design tip to find the perfect visuals, use the search bar with specific keywords and you can even filter the search by style, color, or orientation. Once you’ve found your ideal elements and photos just drag and drop them directly onto your canvas. You can resize and position them to fit your layout and adjust their opacity using the “transparency” tool for layered effects. Experimenting on Canva with different combinations can lead to unique designs that stand out and draw attention.
To access them, just open your design in Canva then click the “elements” tab in the left sidebar and search for any element you’re need.
Why use Canva’s library?
- Variety: Find visuals to suit any project or aesthetic with a wide range of free and paid options.
- Quality: Access high-resolution images and professionally designed elements to save time and keep a clean look.
- Convenience: Reduce the time spent on external resources with Canvas Elements.
- Inspiration: Discover new ideas and trends to enhance your designs.
3. Master Font Pairing & Text Effects
Typography is crucial in design, and Canva’s wide range of fonts helps create professional print materials. Having a solid form of typography includes choosing the right fonts, pairing them effectively, and utilizing text effects throughout each and every design you create for your business.
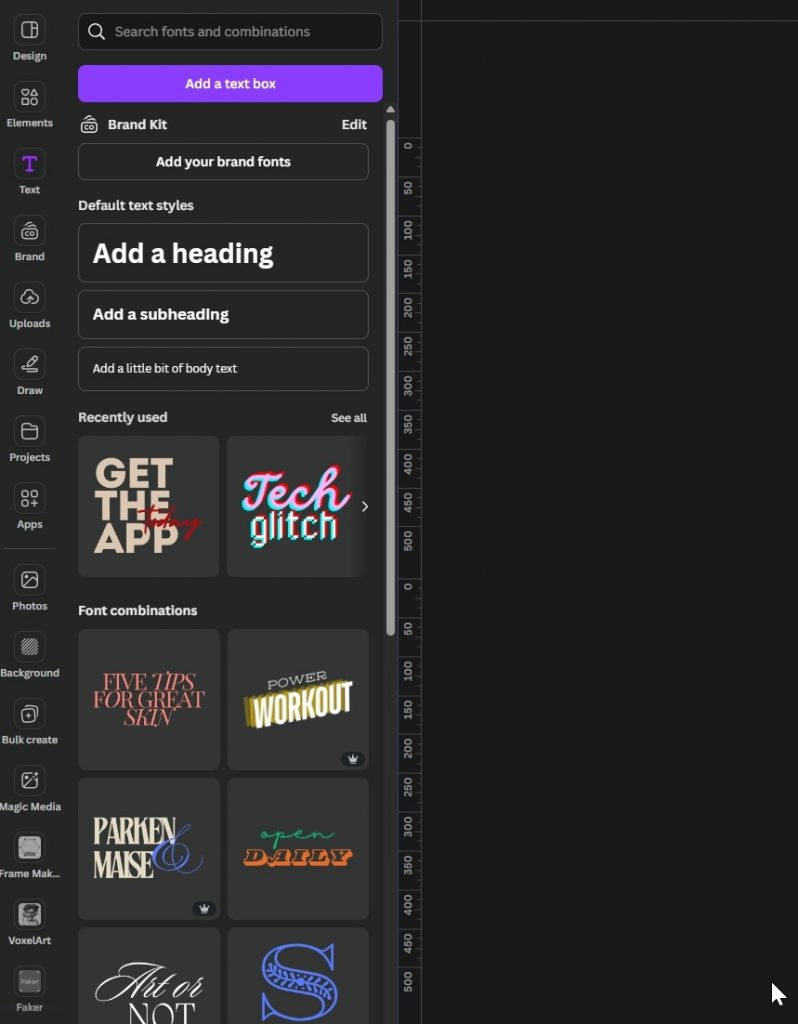
Font Pairing: This is when you combine different fonts that complement each other to create visual harmony and hierarchy within your copy and design. To find fonts, search the “Text” tab or browse categories like “Headlines” and “Body Text.” Add a text box, select a font for your heading, then add another text box for subheadings or body text with a complementary font. Adjust size, spacing, and alignment to fit your layout then you have your paired font and text format
Text Effects: Enhancements such as shadows, outlines, and transformations add depth and interest. Select a text box, click “Effects” and choose options like shadow or outline. Adjust settings like intensity and color to match your design. This comes in handy when you need a specific section to stand out or make way within your print.
Why use effective typography?
- Visual Appeal: Enhance the look and readability of your design.
- Hierarchy: Guide the viewer’s eye through the content.
- Professionalism: Reflect the tone and personality of your brand.
4. Custom Color Palettes to Match The Brand
Using custom color palettes will help your brand consistency and will help you create designs that go hand in hand with your brands look. Canva makes it easy to create and save custom color palettes that match your brand’s colors.
To create a custom color palette, click on the “Colors” tab and select “Custom.” Add your chosen colors and save the palette for future use. Apply these colors consistently across all your design elements, including text, backgrounds, and graphics. You can use your brand’s existing colors or create a new palette using Canva’s color wheel or enter specific hex codes to get your existing brand colors. When you use these custom color palettes it helps your brand get recognized and with the help of a professional layout you won’t just get seen, you will stand out.

Why Should You Use Custom Color Palettes for Your Brand?
- Brand Consistency: Helps all your designs align with your brand’s identity to help viewers recognize you.
- Professional Appearance: Creates a polished and cohesive look across all digital media and print media used.
- Enhanced Brand Recognition: Helps your audience easily recognize your brand with just a quick glance.
- Visual Cohesion: Maintains a harmonious and balanced design which professionally elevates your overall brand.
- Efficient Design Process: Saves time by having pre-selected colors readily available and saved to your account.
5. Use Transparency & Layering to Add Depth
Using transparency and layering in your designs can add depth and visual interest to make your prints different from the rest and really stand out to your audience.
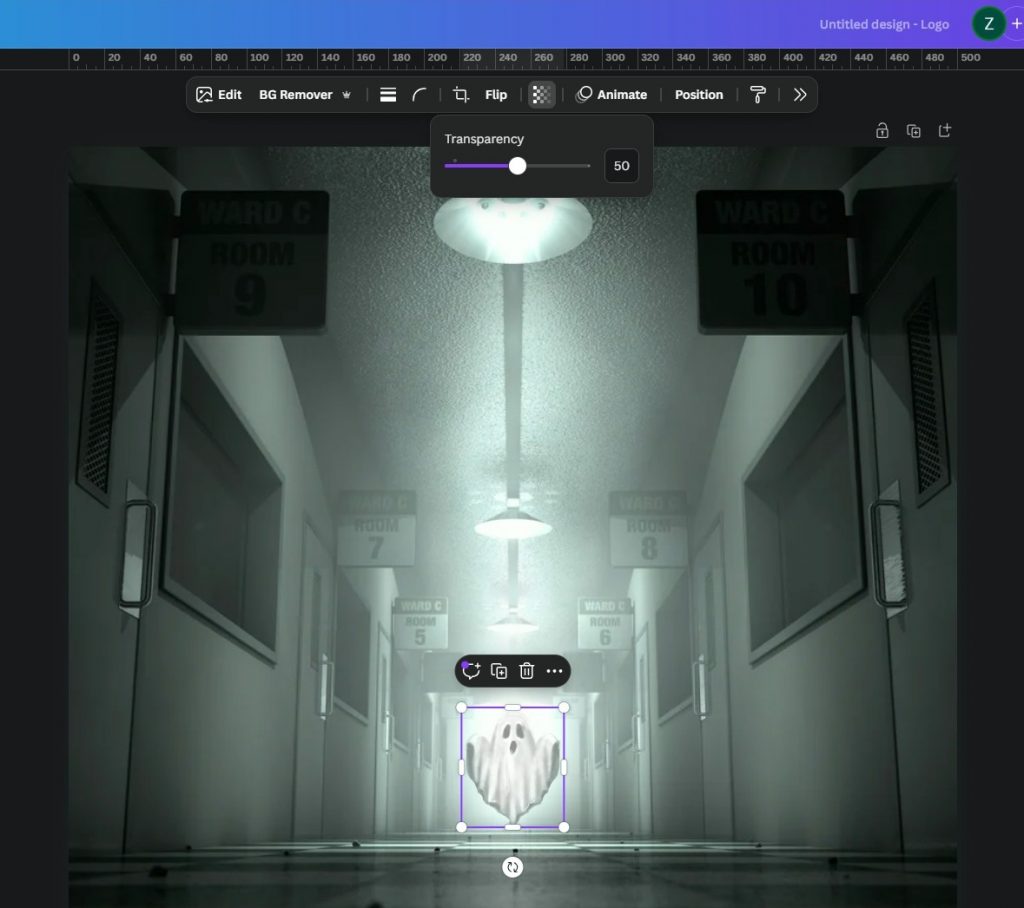
Transparency is when you to adjust the opacity of elements, creating a sense of layering and complexity. For example, this means you could put a ghost that is actually see through on one of your designs for Halloween. But this technique is particularly useful for backgrounds, overlays, and highlighting key elements without overpowering the overall design.
To use transparency in Canva, open your project in Canva, select the element you want to adjust, click on the transparency icon (a checkerboard icon) in the toolbar, and move the slider to achieve the desired opacity.
Layering involves stacking different elements on top of each other to create a multi-dimensional effect. You can layer elements by dragging them into position and using the “Arrange” tool to move them forward or backward in the layers as needed. I use this all the time and prefer the hot keys which are “ctrl [” to send back and “ctrl ]” to bring forward.

Why Use Transparency and Layering Within Your Designs?
- High Visual Interest: Adds complexity and depth to your designs to grab attention of viewers.
- Highlighting Key Points: Emphasizes important elements you want noticed without overwhelming the viewer.
- Professional & Uniform Look: Creates a sophisticated and polished appearance which is what we want in a trusted brand.
- Creative Opportunity: Allows for creative experimentation with different design effects that have endless combinations.
- Focus & Direction: Guides the viewer’s attention to specific areas of the design to create cohesive and digestible content.
6. Add Bleed & Crop Marks for Professional Printing
When it comes to professional printing standards adding bleed and crop marks to your designs could be the difference between a print-ready file and one that still needs help.
Bleed is the extra space around your design that gets trimmed off after printing, preventing any white edges and sizing the sheets to the size of your desired design. Crop marks indicate where the paper should be cut.
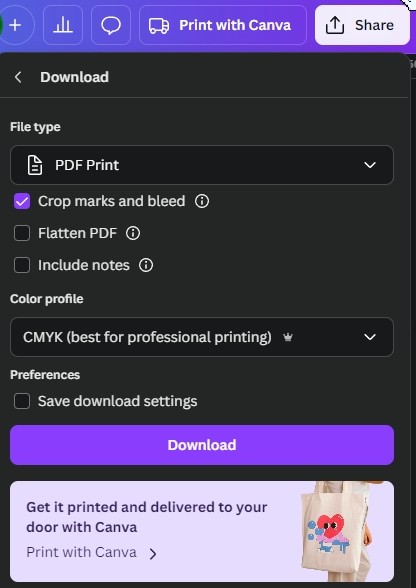
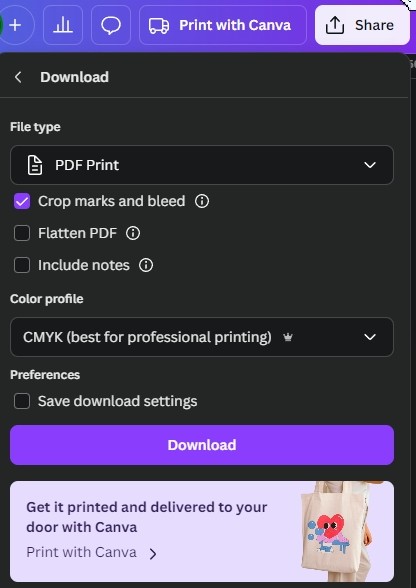
To add bleed in Canva, create your design with an extra margin 0.125 inches around all sides. Canva automatically includes this bleed area when you download your design with the “PDF Print” option. To add crop marks, ensure the “Crop marks and bleed” option is selected when exporting your file.
This Canva print design tip is only used for printing. Digital versions of a PDF Print document will look washed and different from the digital versions. So, if you are using your design for print be sure to select “PDF Print” for your file type as well as “CMYK” for your printed design’s color profile.
Why Use Bleed and Crop Marks?
- Prevent White Edges: Ensures your design extends to the edge of the paper.
- Professional Finish: Meets industry standards for print quality.
- Accurate Cutting: Guides printers on where to trim your design and leaves no white edges once trimmed.
- Consistency: Maintains the integrity of your design after trimming.
- Print-Ready: Prepares your design for seamless printing and binding without additional adjustments.
7. Create & Save Brand Kits for Consistency Across Designs
When you use Brand Kits in Canva you can keep a cohesive and professional look across all platforms and printed materials. This is super easy to implement using Canva and is one of our best Canva print design tips.
A brand kit on Canva includes your brand’s colors, fonts, and logos. All you have to do is select your brand’s look and save it to the kit then you are ready to easily add them into any design. This Canva print design tip can save you and your team countless hours and will ultimately improve your look when used properly.
To create a brand kit in Canva, navigate to the “Brand Kit” section under the “Brand” tab. Here, you can upload your brand logos, select your brand colors, and choose your brand fonts. Once set up, these elements are readily accessible when designing. After you do this once it Canva will save your brand kit for next time which is super helpful if you are scheduling content daily.

Why Use Brand Kits?
- Brand Consistency: All designs align with your brand’s visual identity from digital to social.
- Efficiency: Saves time by having brand elements readily available 24/7 from Canva.
- Professionalism: Creates a cohesive and polished look across all materials by incorporating your brand kit into each design.
- Ease of Use: Simplifies the design process, especially for teams because every member of the team can access the kit when shared.
- Brand Recognition: Strengthens brand recognition through consistent use of visual elements.
8. Collaborate & Team Members in Canva
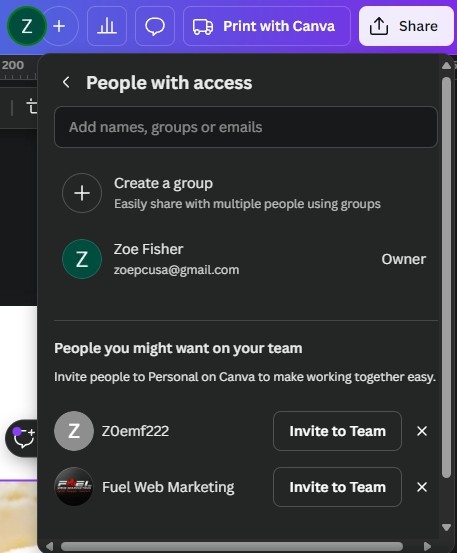
The Teams portion is a part of the paid version of Canva but you can share your brand kit with your team so everyone is in the know and can simultaneously use the brand kit. Canva’s collaboration feature make it easy to work with team members on your print designs because you can share any part of your design or project with the team or others to help and brainstorm on. These Canva print design tips are particularly useful for larger businesses and organizations that need to maintain consistency and efficiency in their design process but can also be useful for teams as big as 2. You can leave notes for others, request edits, and work together with the paid Teams version.
To collaborate in Canva, upgrade your account, invite your teammate to your team with the + at the top of your page, open your design and click on the “Share” button. You can invite team members by entering their email addresses or by sharing a link. Assign permissions to ensure control over who can view, edit, or comment on the design. Collaboration in real-time allows for seamless teamwork, feedback, and revisions, ensuring that everyone is on the same page. You can also copy and paste anything directly from your work into another teammates design exactly by selecting the entire page on your Canva design.
Why Collaborate in Canva?
- Efficiency: Streamlines the design process with real-time collaboration.
- Consistency: Ensures all team members adhere to brand guidelines.
- Feedback: Allows for instant feedback and revisions.
- Accessibility: Team members can access designs from anywhere.
- Productivity: Enhances productivity by enabling multiple people to work on the same project simultaneously.
9. Use Canva’s Resize Tool to Adapt Designs for Various Print Formats
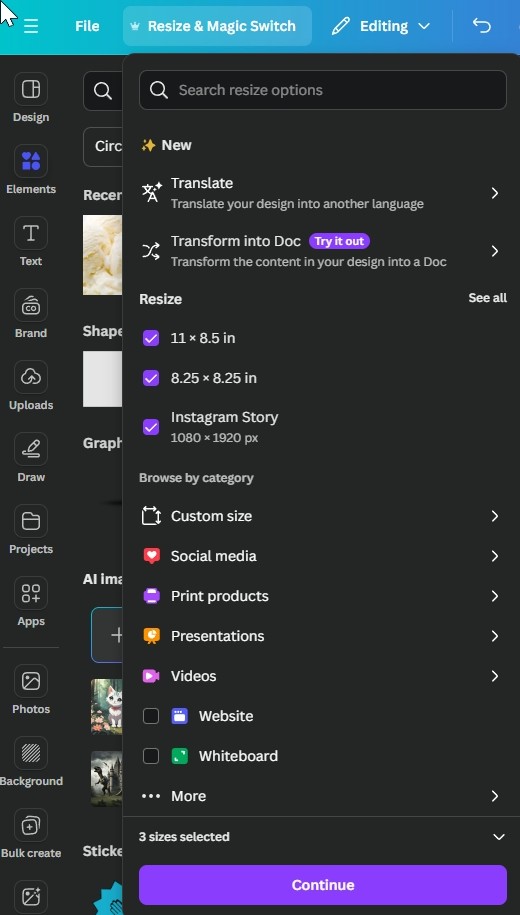
Canva’s resize tool helps you quickly change the size of your designs for different print formats. This Canva print design tip can save you time and keeps consistency across all your business materials. These Canva print design tips are most useful when you need to create multiple versions of the same design for various purposes, such as business cards, posters, and flyers.
This Canva print design tip can make changing these from one format to another super-fast and very easy. To use the resize tool and edit the size of your design, open your design and click on the “Resize” button in the toolbar on the top. Choose the new size for your design or choose from Canva’s preset sizes for different print formats. This will include any custom size as well as formal sizes like A4 and A5 in Canva. Canva will automatically adjust the elements in your design to fit the new dimensions. You may need to make minor tweaks for the best layout because most but not all elements within Canva are vector graphics. Vector graphics are images made from shapes and lines that can be resized without losing quality. They’re perfect for printing because they always look sharp and crisp no matter the size or resize.
This is a part of the paid version of Canva but is definitely worth it. This will save you lots of time and can really help when it comes to making quick changes or additions.
How to Check the Size of Your Design in Canva
Checking the current size of your project is good to know for printing and file specifications. So how do you find that information on Canva? To find the size go to the Download settings and you will see the size of your project in pixels. To increase or change the size just drag and slide the bar to be the correct size you’d like your project. This Canva print design tip is a common question and is hard to find but once you know where it is you’ll never forget.
How to Change the Pixel Size in Canva
To find the size of your project in inches select the file button and view your project details where it says the title of your design and the total length and width of the file. You can edit the name of the file here, but you must visit the resize button to change your dimensions and the download button to change the file size.
Why Use the Resize Tool?
- Versatility: Quickly adapt designs for multiple print formats to look similar to create a cohesive look for your brand.
- Consistency: Maintain a cohesive look across all print materials to help your audience recognize you.
- Efficiency: Save time by resizing designs without starting over. This time saver will be your next best printing friend.
- Flexibility: Easily create variations of your design for different uses and purposes.
- Professionalism: Ensure all print materials meet specific size requirements and look polished.
10. Export Your Designs in the Correct Formats for Printing
Exporting your designs in the correct format is best for achieving high-quality prints. Canva offers several file formats, but for print, you should focus on ensuring your design is in a print-ready format such as PDF, with the appropriate resolution and color settings.
A file that is print ready will always print better than one that is not print ready. Let’s talk about what print ready is.
To export your design, click on the “Download” button and select “PDF Print.” This option ensures your design is high resolution (300 DPI) and includes crop marks and bleed. Double-check that your color settings are in CMYK, which is the standard for printing, rather than RGB, which is used for digital screens.
These Canva print design tips help professional printers identify your project in the correct format so they can transfer your file into the printer’s format for professional industrial printers.
To learn more about print ready files and how to make your design print ready click here to read our blog post all about print ready files.
Why Export in the Correct Format?
- Print Quality: Ensures your design is high resolution and looks sharp.
- Professional Standards: Meets industry standards for printing.
- Accuracy: Preserves the colors and details of your design.
- Efficiency: Reduces the likelihood of printing errors.
- Consistency: Ensures your printed materials match your digital designs.
Visit Canva for Your Printed Designs
Now that you have all the Canva print design tips and secrets you are ready to download Canva and start your first design! Using the top 10 tips above your designs will be effective and efficient. For more information on Canva and how to use Canva for print check out the Canva Design School. Check out the endless options on Canva that we can professionally print for your business. Give us a call today at 1800-995-1555 or place your order today!

