File Preparation
File Preparation
Print-Ready File Creation
What design applications do you accept/prefer?
The best projects we produce are generally designed in the following applications: InDesign, Illustrator, and Photoshop.
Which file formats do you support?
We prefer PDF over all other file formats.
Do you accept Microsoft Word documents?
The best projects we produce start with a Print-Ready PDF. If you are unable to save a PDF, then please be aware that fonts within Word documents can shift from one computer to another. This may create issues with your order in prepress and delay your print production timeline. Please refer to the rest of our File Preparation guides for more information.
Do you have tutorials for file creation?
Do you have blank templates for each product?
We have blank templates for all of our main products using Photoshop, Illustrator, InDesign, and Acrobat. These templates can be found here but are also listed in our “All Products” navigation dropdown. If we do not have templates for your desired product, then follow our File Preparation tutorials for your design program and give us a call at 800.995.1555 with any questions.
Do you have templates available?
We have blank templates for all of our main products using Photoshop, Illustrator, InDesign, and Acrobat. These templates can be found here but are also listed in our “All Products” main navigation dropdown. If we do not have templates for your desired product, then follow our File Preparation tutorials for your design program and give us a call at 800.995.1555 with any questions.
We also have an easy-to-use online design tool for Books, Booklets, Photo Books, Greeting Cards, and Calendars.
We also have an easy-to-use online design tool for Books, Booklets, Photo Books, Greeting Cards, and Calendars.
Can I create a multi-page product in Illustrator or Photoshop?
To create a catalog in Illustrator, you can either:
- Use multiple Artboards to represent your pages, then export as a PDF with all artboards after design completion, or
- Use well-organized layers on one Artboard. You would export the pages of your Catalog one at a time as PDFs, then combine all of those individual PDF pages into one PDF file.
To create a catalog in Photoshop, you can:
- Organize your layers and groups in Photoshop well enough for you to easily know how to locate page one, page two, etc. You must save each one of those pages individually as PDFs, then combine all of those individual PDF pages into one PDF file.
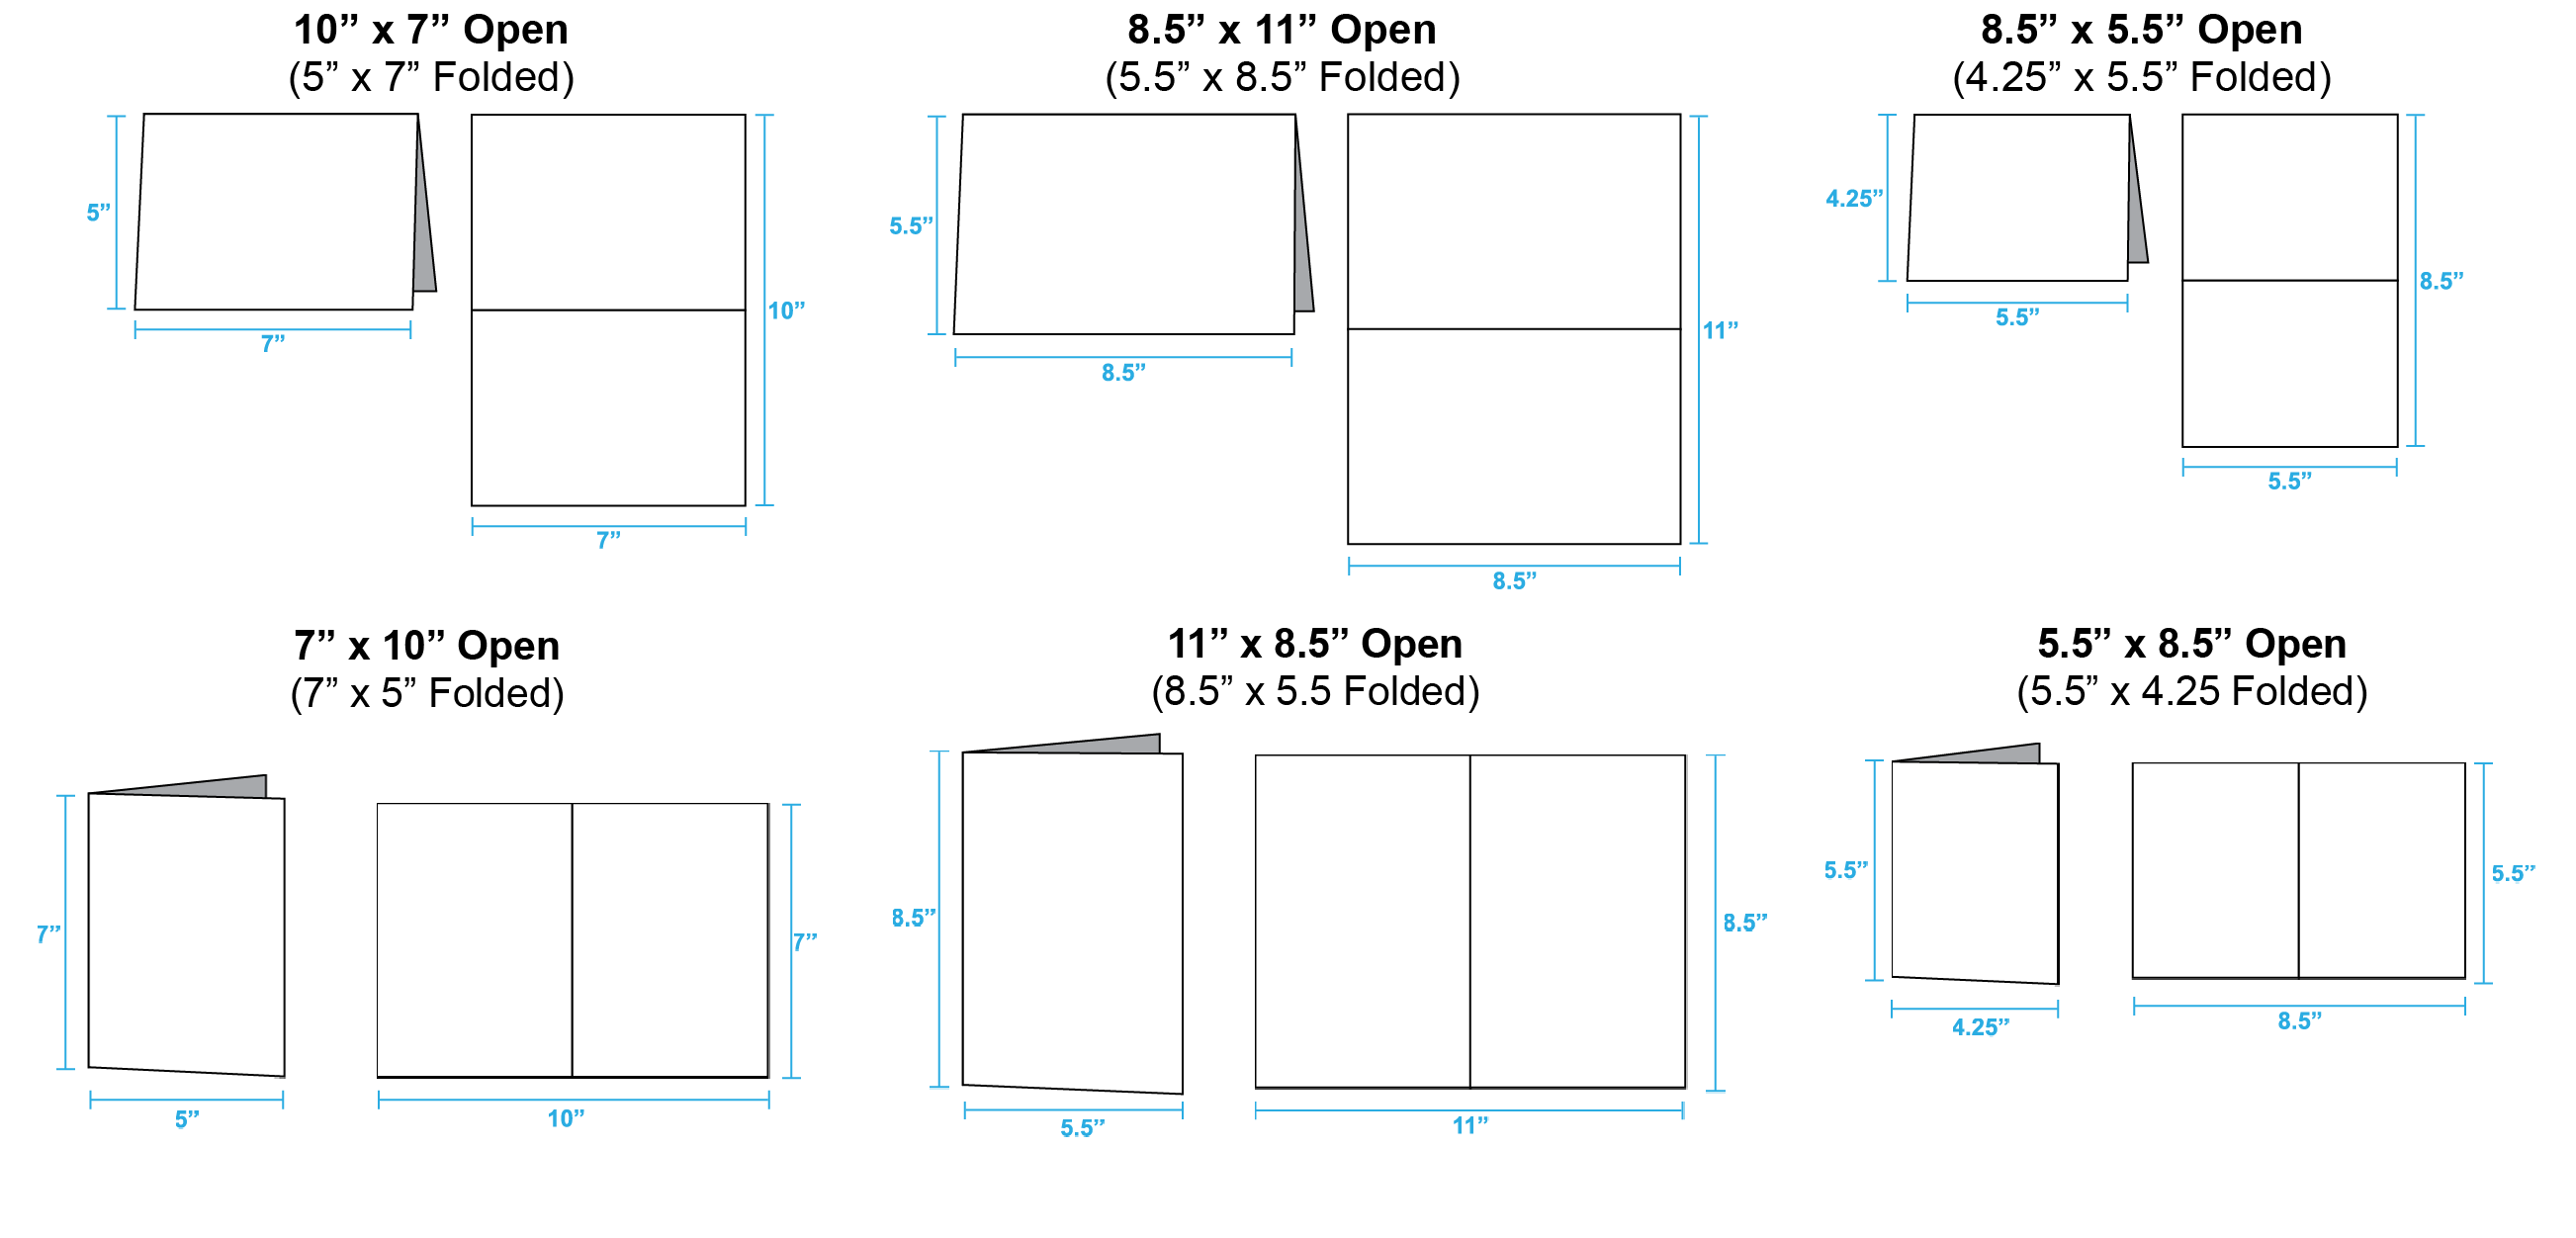
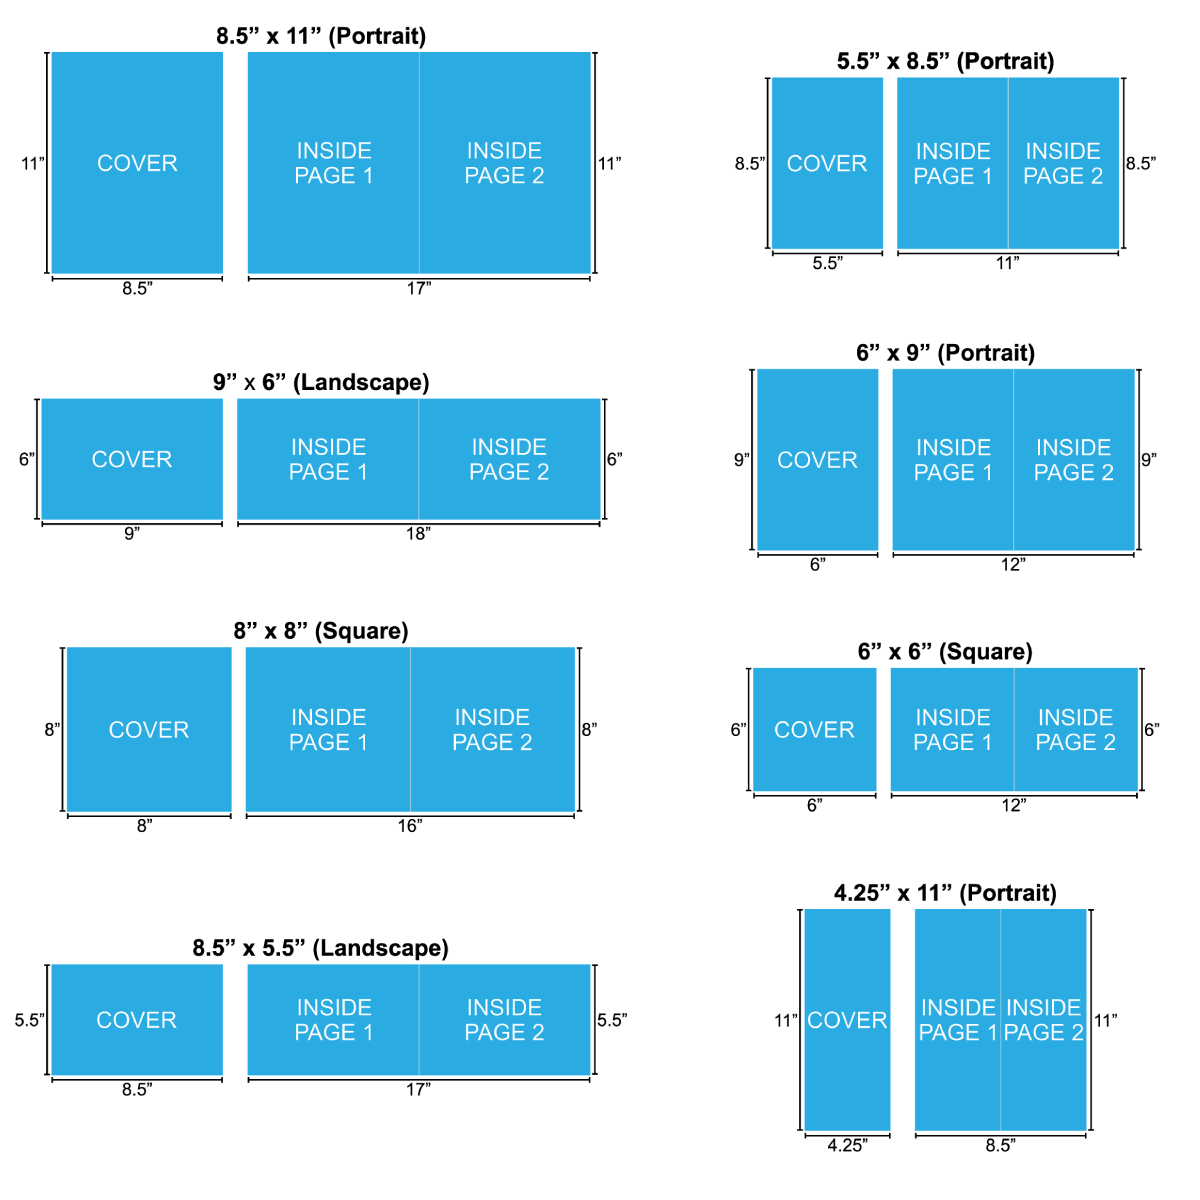
How do I determine which direction to orient the pages for my greeting cards?
What is compression?
Compression is the process of converting an image or file in a way that reduces size of a file without lessening the quality.
What are my content limitations?
Please refer to our Terms and Conditions: Adult Content.
I have my print files designed in Word/Publisher. What do I do now?
Can I print QR codes or barcodes?
Yes, however PrintingCenterUSA is not responsible for issues with scanning QR codes and/or barcodes after it has been printed. To optimize your codes for print, make sure that the code image is placed on a white background, is set up using black only (not a black build), and is at 300 ppi. Test the code before submission.
We do not have the software to generate barcodes for your print project.
We do not have the software to generate barcodes for your print project.
What is automated preflighting?
Preflighting is the process used to evaluate all digital components of an art file (usually a PDF) before it is sent to print. The preflighting process will ensure your color, bleed, resolution, fonts, etc. will all print as expected. Automated preflighting is a streamlined program that does the majority of this process automatically upon file upload. The more automated the preflighting process can become, the less time a prepress technician will have to spend editing your art file. This not only saves us time, but it speeds up the time it takes for you to receive a proof.
Bleeds
What is Bleed?
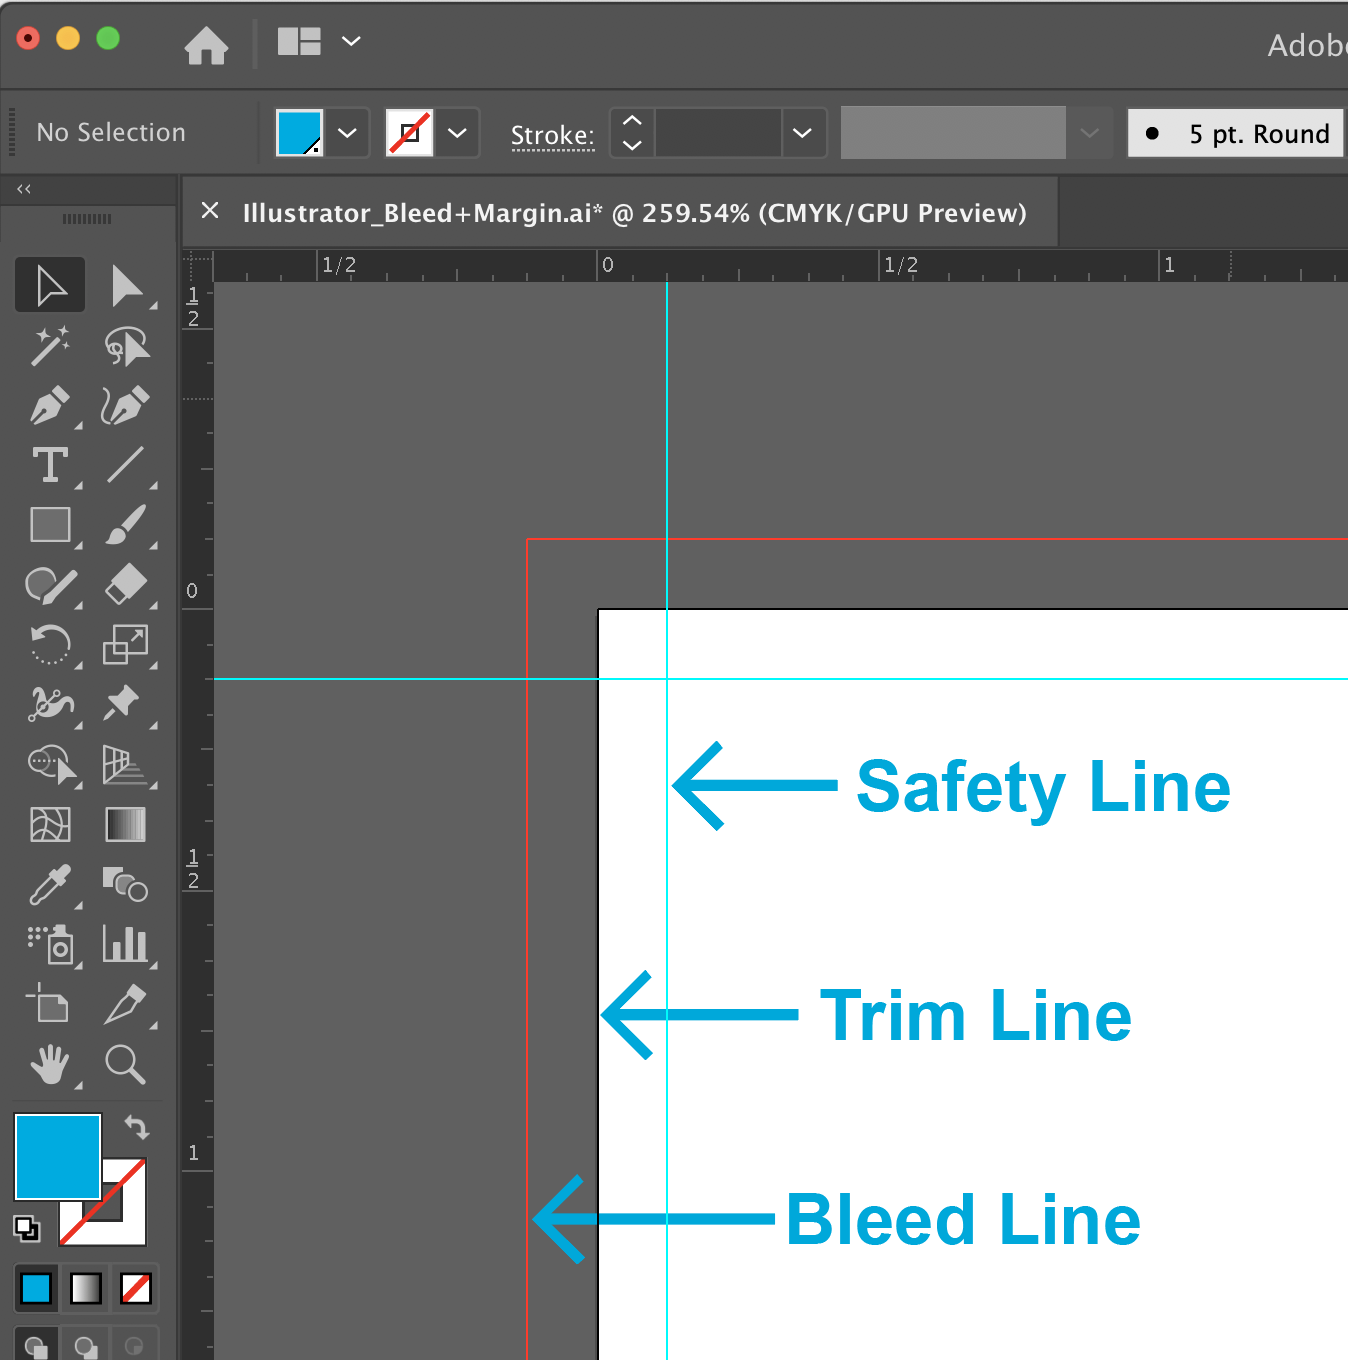
Bleed refers to an extra 1/8″ of image that extends beyond the trim area of your printing piece. The project is printed on an oversized sheet that is cut down to size with the appearance that the image is “bleeding” off the edge of the paper.
Learn how to set up your bleed for: InDesign, Illustrator, Photoshop, Canva, Publisher, and Word.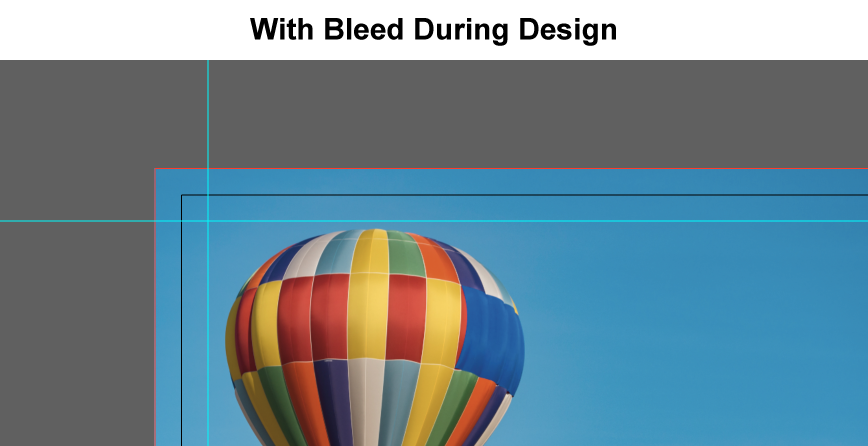

Learn how to set up your bleed for: InDesign, Illustrator, Photoshop, Canva, Publisher, and Word.
What is your safe area?
Cutting of your printing piece is done in large stacks and may vary from the top and the bottom of the stack. The safe area or inner margin in which to keep all important elements within to prevent them from trimming off, should be at least 1/8″ inside the edge of the final trim size.
What is trim size?
The final size of the document after the last cut is made.
Refer to the Size section in our Help Center for more information.
Refer to the Size section in our Help Center for more information.
How can I check if my art file has bleeds properly set up after saving?
To double check the final dimensions of your PDF, open it in Adobe® Acrobat.
In the top menu bar, select File > Properties. You can view the dimensions of your document in the Properties window. Your dimensions in the PDF should be .25 inches (length and width) larger than your chosen size on the Online Pricing Tool (final trim size).
In the top menu bar, select File > Properties. You can view the dimensions of your document in the Properties window. Your dimensions in the PDF should be .25 inches (length and width) larger than your chosen size on the Online Pricing Tool (final trim size).
Do you have tutorials for bleeds, cutline and safety setup?
Resolution
Why is resolution important?
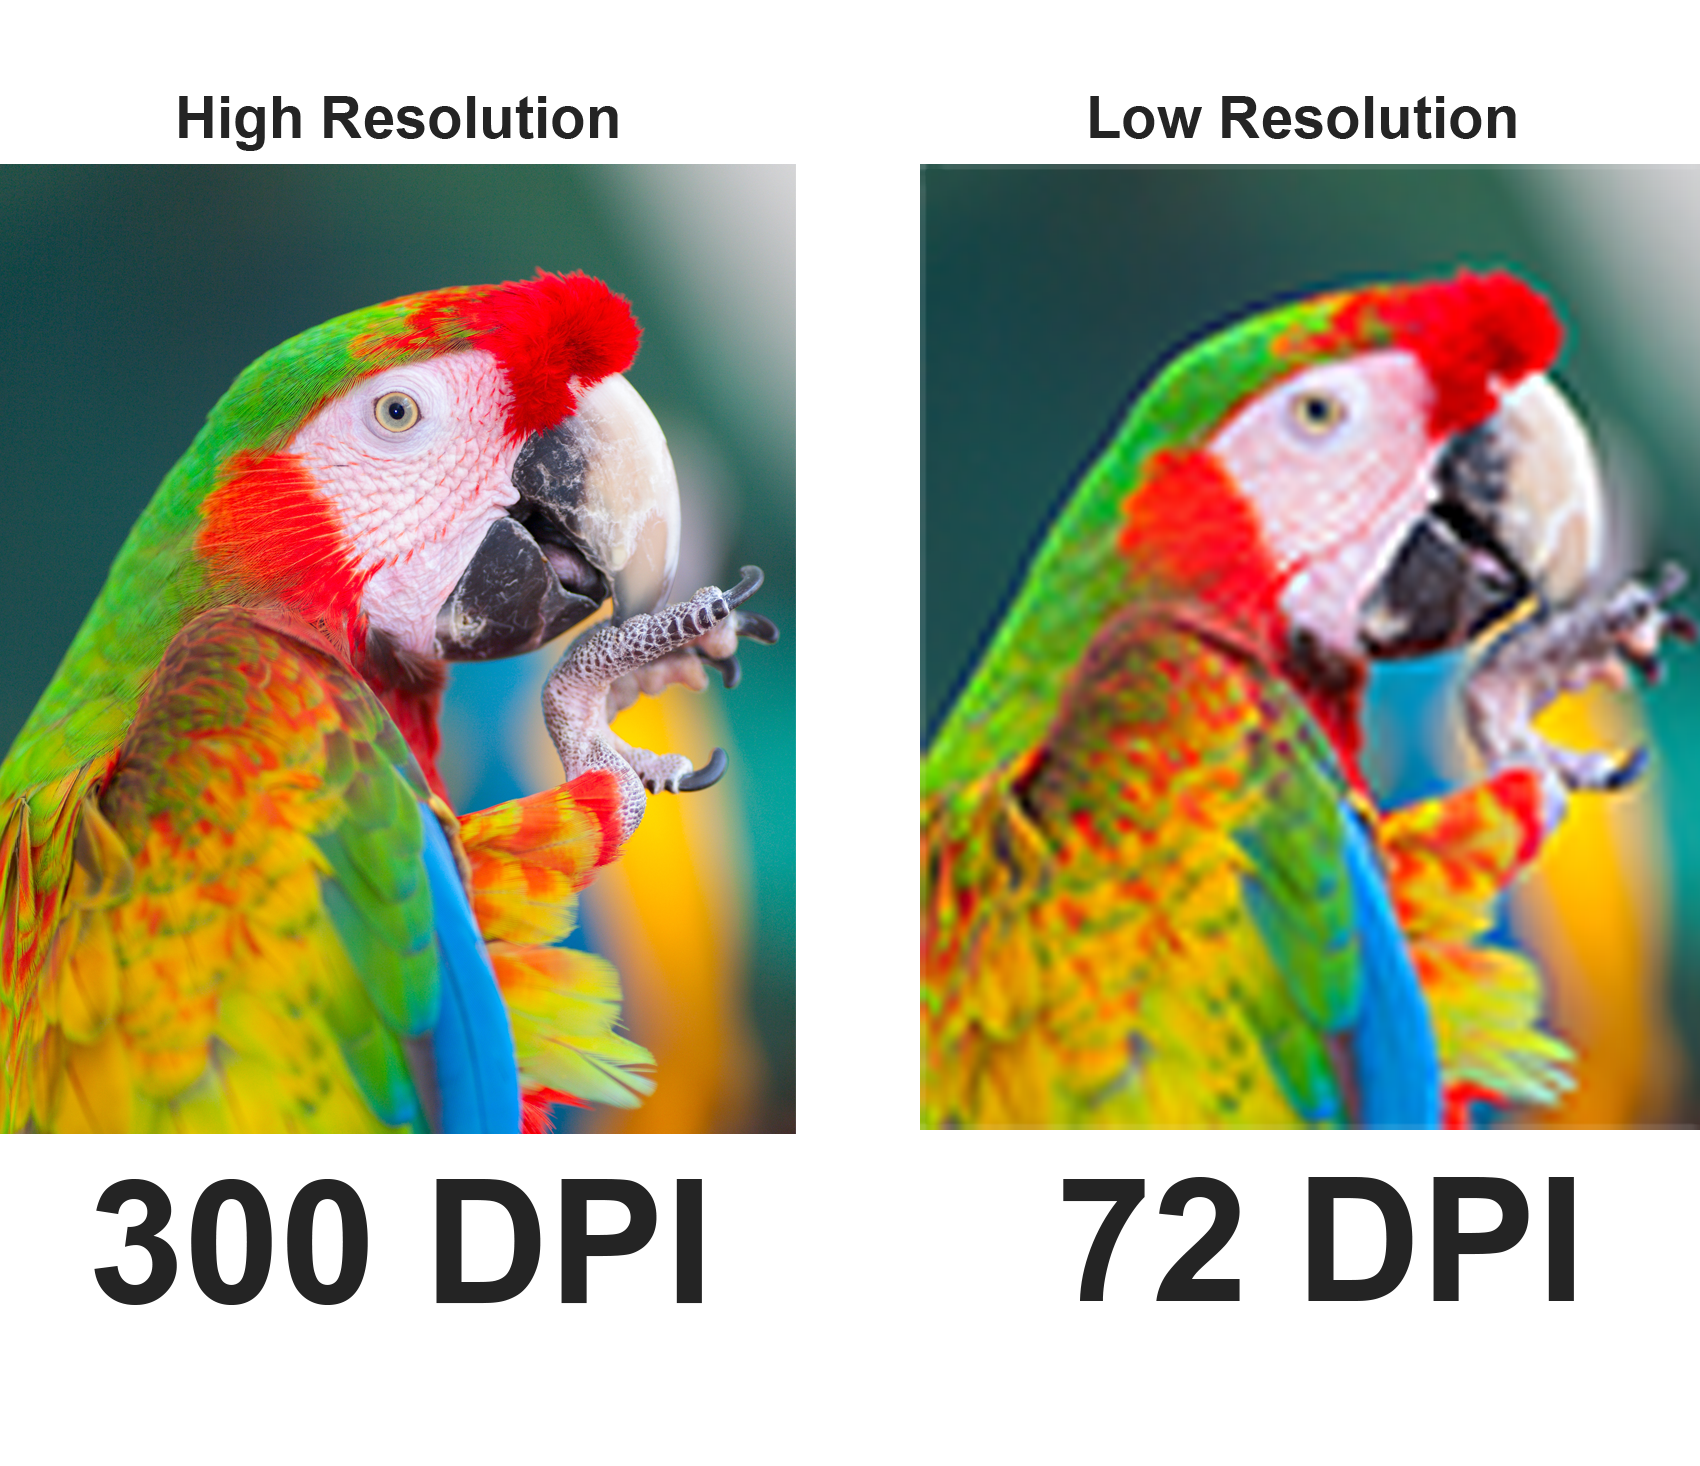
Optimal print resolution is 300 dpi or above; however, if your images are 180 dpi or higher the printed product will generally appear acceptable. Below 180 dpi, images will start to appear pixelated or blurry.
Learn how to check or change your resolution for the following design programs: InDesign, Illustrator, Photoshop, Canva, Publisher, and Word.
Learn how to check or change your resolution for the following design programs: InDesign, Illustrator, Photoshop, Canva, Publisher, and Word.
What is PrintingCenterUSA’s optimal file resolution?
Can I use images from the internet?
Files off the Internet usually do not provide a good quality image for printing. Images from the Internet or websites are generally 72 dpi and are not intended for print. Color and resolution are removed from these images to allow for rapid transfer on the Internet. These images will appear fuzzy and dull when printed. We recommend at least 300 dpi. Click here for a list of websites that provide high-quality images.
What is downsampled?
What should I know about Image Resolution?
Image resolution should be set at 300 dpi. Enlarging an image will lower the resolution while shrinking an image will increase the resolution.
- Enlarging an image in a layout program is not recommended. Images less than 300 dpi may print appearing fuzzy or pixilated.
- Images from the Internet are not recommended, as most images are only 72 dpi.
Why does my PDF Proof look blurry?
The prepress department downsamples proof files to make them easier to send over the internet or through email. This may cause your project to appear less crisp than it will when printed.
Where can I obtain high quality images?
Image Resolution vs. File Resolution
PrintingCenterUSA recommends both your images and your file resolution be 300 dpi or above. However, some customers find resolution 180 dpi and above to be acceptable. This means that you must be sure to place high resolution images into your document as well as saving your document at a high resolution. Please refer to our tutorials for your program InDesign, Illustrator, Photoshop, Canva, Publisher, and Word.
Page Count
How do I count my pages?
We require that any multi-page PDF files be sent as single page images, not spreads. In the files, page 1 should be the front cover and the last page should be the back cover. Click the appropriate binding type for your order to learn more.
Saddle Stitch, Perfect Binding, Spiral, and Wire-O
Saddle Stitch, Perfect Binding, Spiral, and Wire-O
Does my cover count as a page?
Do I count double-sided pages as 2 pages?
Size
Booklets, Books, Magazines, Catalogs, Booklet Brochures, Programs, and other Multi-Page Products:
Calendars:

Greeting Cards
Brochures and Flyers:
What is Trim Size?
The final size of the document after the last cut is made.
Color Quality
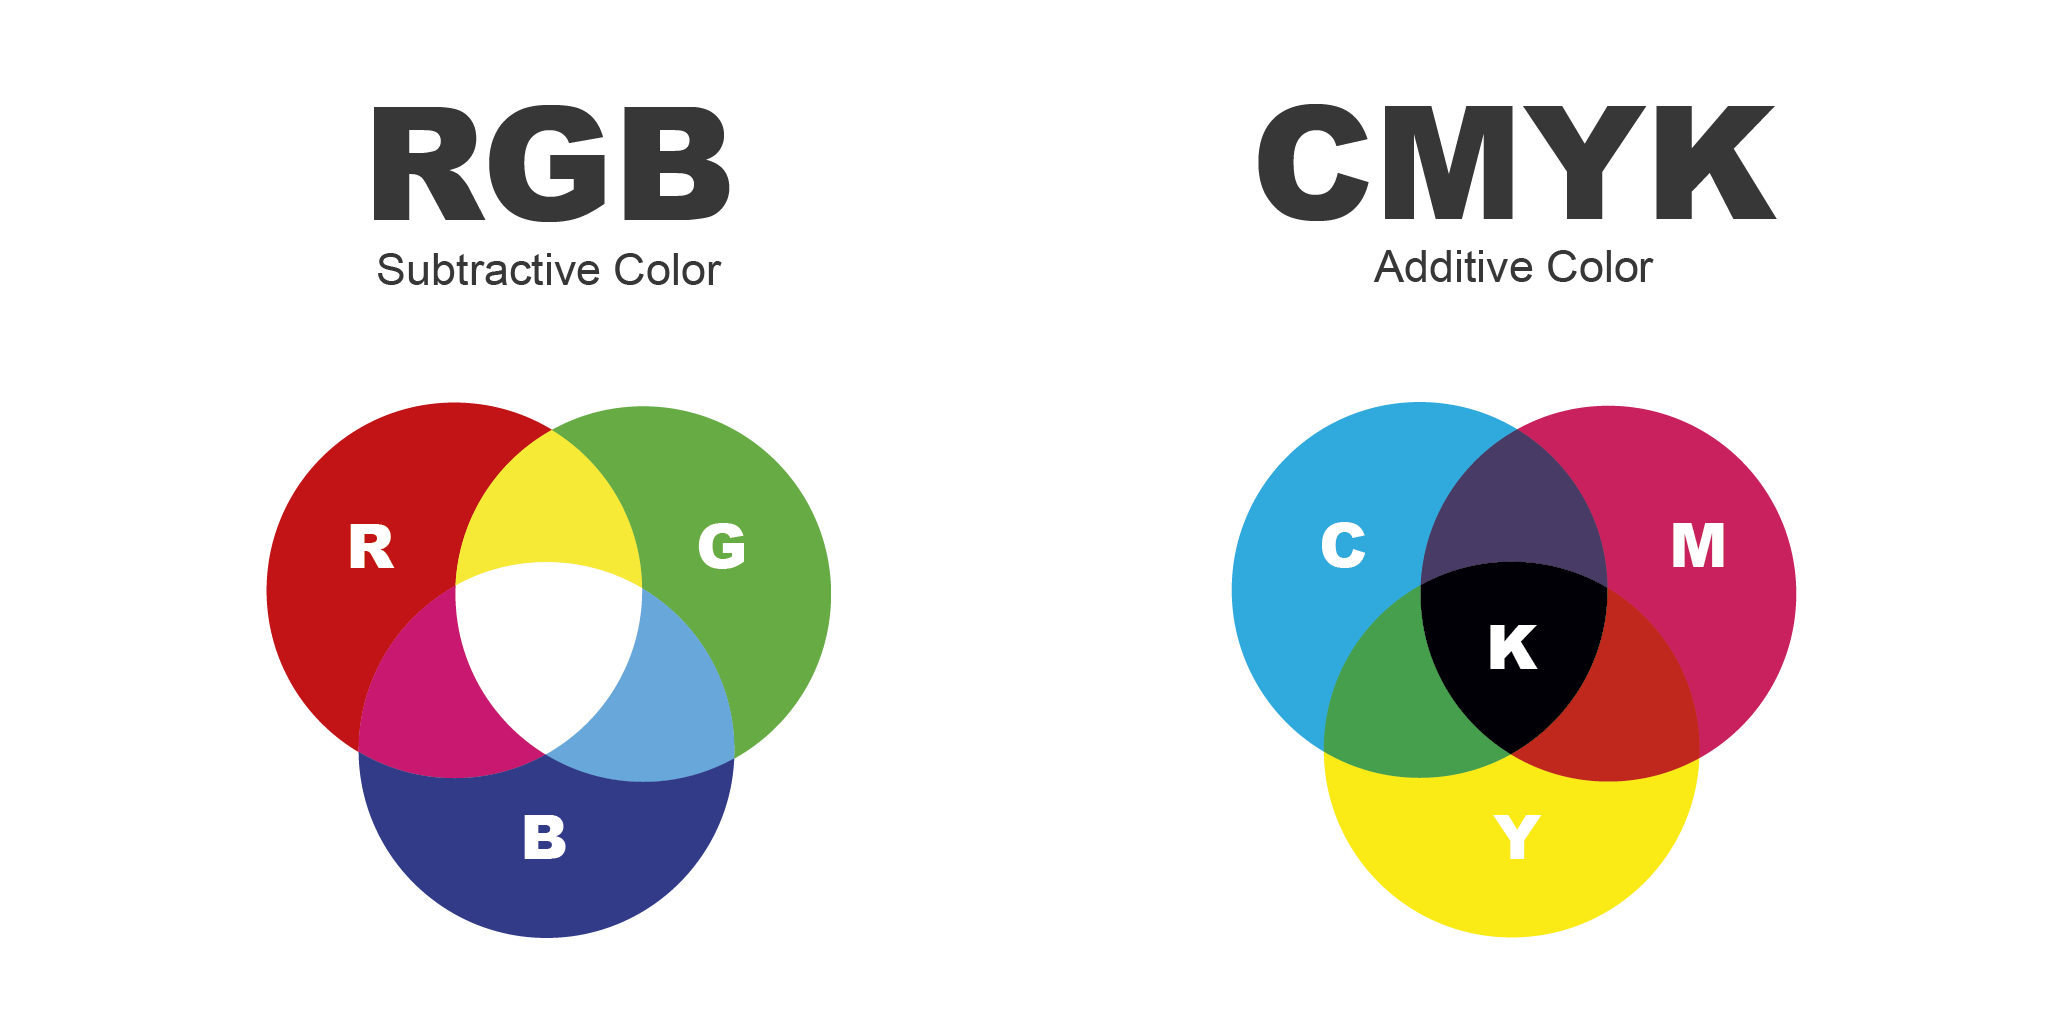
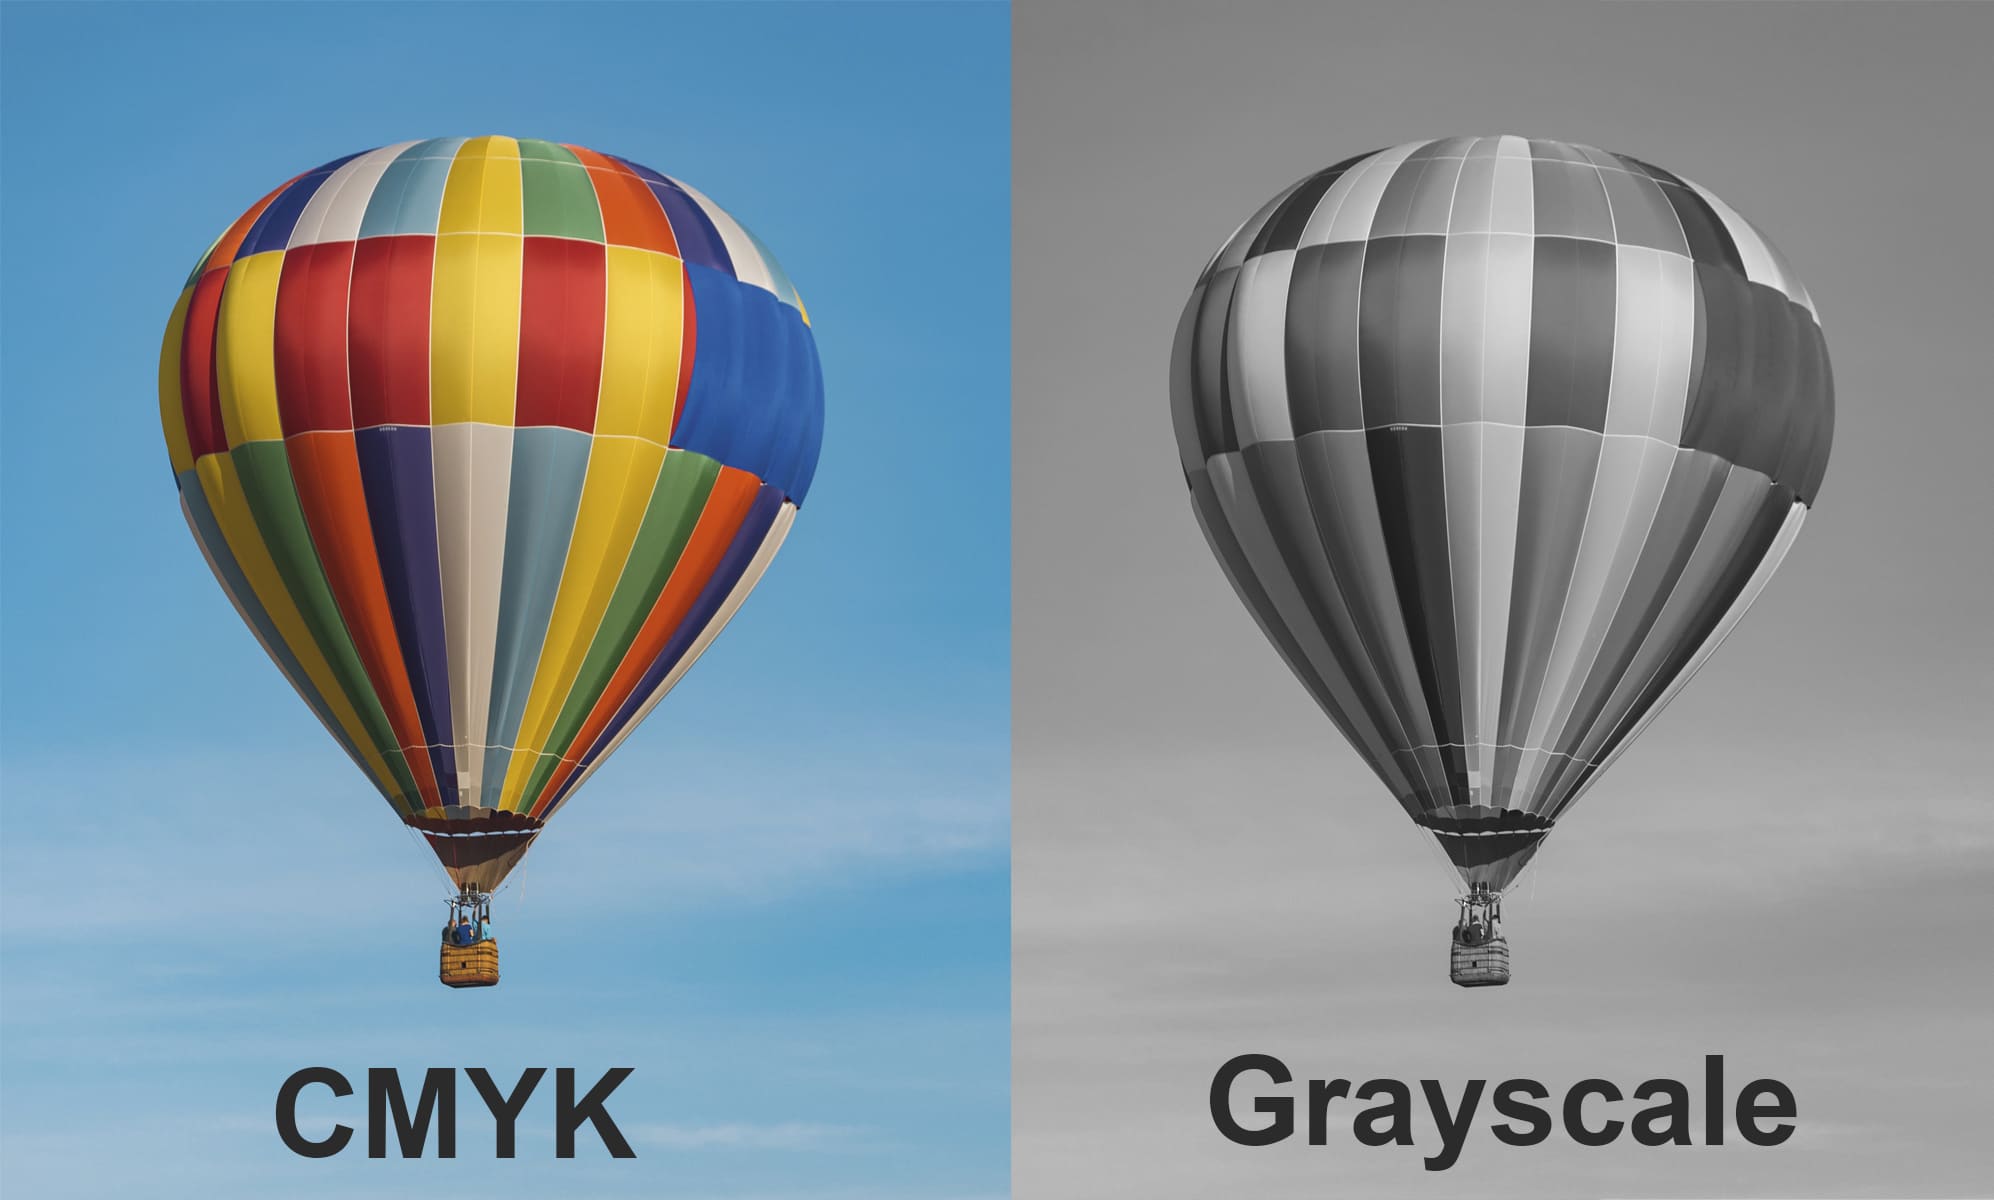
What is CMYK?
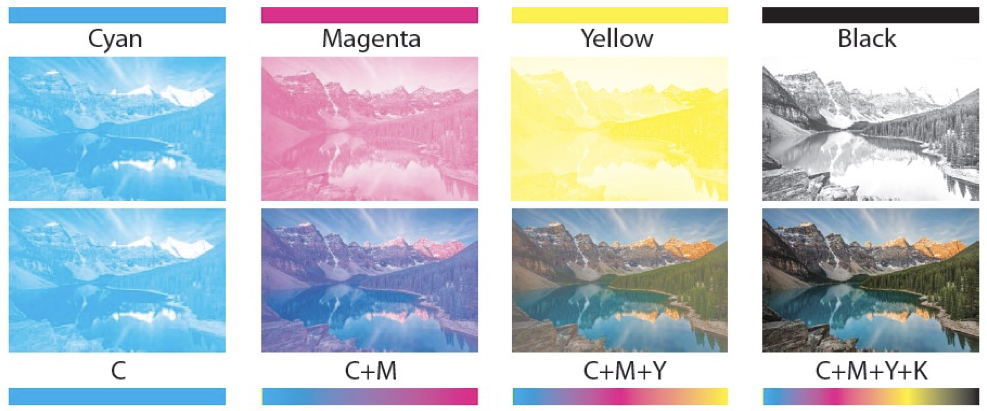 CMYK stands for Cyan, Magenta, Yellow and Key (Black). Printing with these four colors is often referred to as full color or 4-color printing. Any file that is printed on a printing press must be converted to CMYK. Many images or files designed for web use are in RGB (red, green and blue) color space. These images may shift color when converted to CMYK before printing. If your project is color sensitive, it is recommended that you request a hard copy proof to ensure the end result is to your specifications.
What CMYK color profile does PrintingCenterUSA use?
PrintingCenterUSA uses the color profile GRACoL2013_CRPC6.icc. Click here to download. To learn more about how to install our color profile into your design program, please refer to our Color Quality tutorials for InDesign, Illustrator, and Photoshop.
Can I guarantee color accuracy? It is impossible to guarantee 100% color accuracy. However, you can maximize color quality by ensuring that all submitted files are in CMYK color mode and the PrintingCenterUSA Color Profile and PDF Presets are used.
When color accuracy for your product is critical, we recommend you order a hard copy color proof.
What are color / ink separations?

- 4/4 Full color on the front and full color on the back
- 4/1 Full color on the front and black on the back
- 4/0 Full color on the front and no printing on the back
- 1/1 Black on the front and back
Does lighting impact color quality?
We guarantee pleasing color and quality printing, however there is no way for us to know the exact colors you see on your computer monitor. If you are looking for a precise color match we recommend you request a hard copy proof. This is an additional charge, but allows you to see the accurate color on your project. This will slow down the proofing process, setting back the start of your turnaround time. Call 800-995-1555 to request your hard copy proof if you are concerned. Hard Copy Proofs take additional time that you must allow in your schedule, but they are the best representation of the color of your project.
What should I know about viewing files on my monitor?
You might notice that the colors on the printed piece may not exactly match the colors you see on your monitor. The age and or calibration of your monitor can affect the colors in comparison to the printed product. It is recommended to not rely on monitor color as a predictor for your final product, because it is an inaccurate representation.
Do you match and print PANTONE® colors?
We do not print match or print PANTONE® colors for any product except for envelopes. You are responsible for providing us with CMYK files. To learn about how to install PrintingCenter-USA’s color profile, click which program you are using: InDesign, Illustrator, and Photoshop.
What is RGB?
What should my image color be?
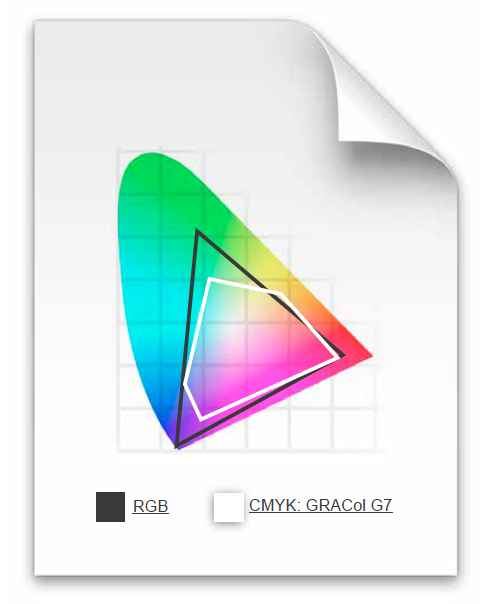
What is Gamut?
Gamut refers to the maximum range of colors for a color space. RGB has a much larger gamut than CMYK. This can lead to color shifts when converting from RGB to CMYK.
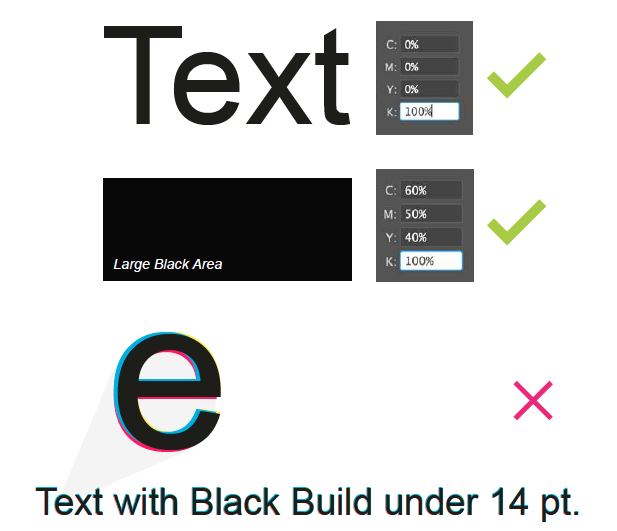
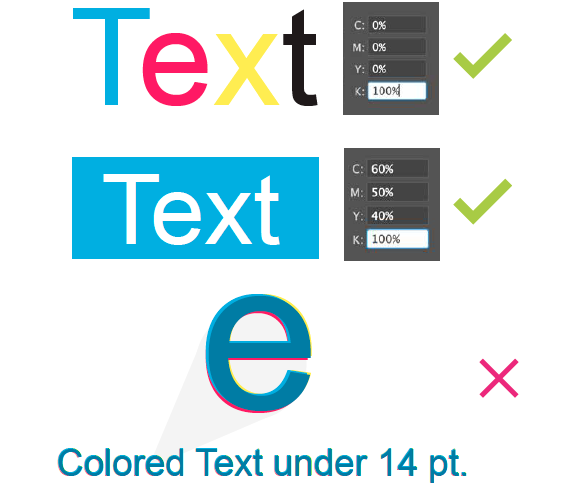
What are rich blacks?
Our rich black build is 60 Cyan, 50 Magenta, 40 Yellow and 100 Black. Please use this build for large black areas. DO NOT use this build for the body text of your job. Any text under 14pt will have this build automatically removed if possible.
File Saving
How do I load the PrintingCenterUSA PDF Preset?
You can download and install our PrintingCenterUSA PDF Preset for Adobe programs only. Select your program for a step by step tutorial on how to load our preset: InDesign, Illustrator, and Photoshop.
Should I save my PDF with Crop Marks?
What should be my final number of pages?
What is registration color?
Are thin lines and small text going to print okay?
Thin lines (.25 pt or smaller) and small text (smaller than 8 pt) may not print as clearly as desired. There are two solutions to this problem:
- Use larger text and heavier strokes for line art
- Support small text and thin lines with additional color. For example, small black text could be made into a CMYK color build of C: 50% M: 40% Y: 30% K: 100%.
How do I send my files without missing fonts and other components?
Please refer to our File Saving section for your program for a step-by-step tutorial on how to save your files: InDesign, Illustrator, and Photoshop.
What about colored text?
Minute misalignment can cause the 4 separate CMYK inks to not line up perfectly in small text (14pt or smaller), as well as in white text on a colored or black background (knock-out text). This misalignment can make small text look blurry. If you need to do this anyway, it is best to keep the colored text one of the true CMYK colors; black is always an excellent choice.
What should I do for fonts and transparency problems?
We recommend that all transparencies be flattened before file submission. We also ask that you set your fonts to outlines prior to file submission.
Transparency on PDF documents can sometimes change during processing. If your document has transparencies, please take extra care during the proofing process to review the content in your proof. If your document has font issues, the prepress department will contact you directly.
Transparency on PDF documents can sometimes change during processing. If your document has transparencies, please take extra care during the proofing process to review the content in your proof. If your document has font issues, the prepress department will contact you directly.
Folds, Creases, Die Cutting
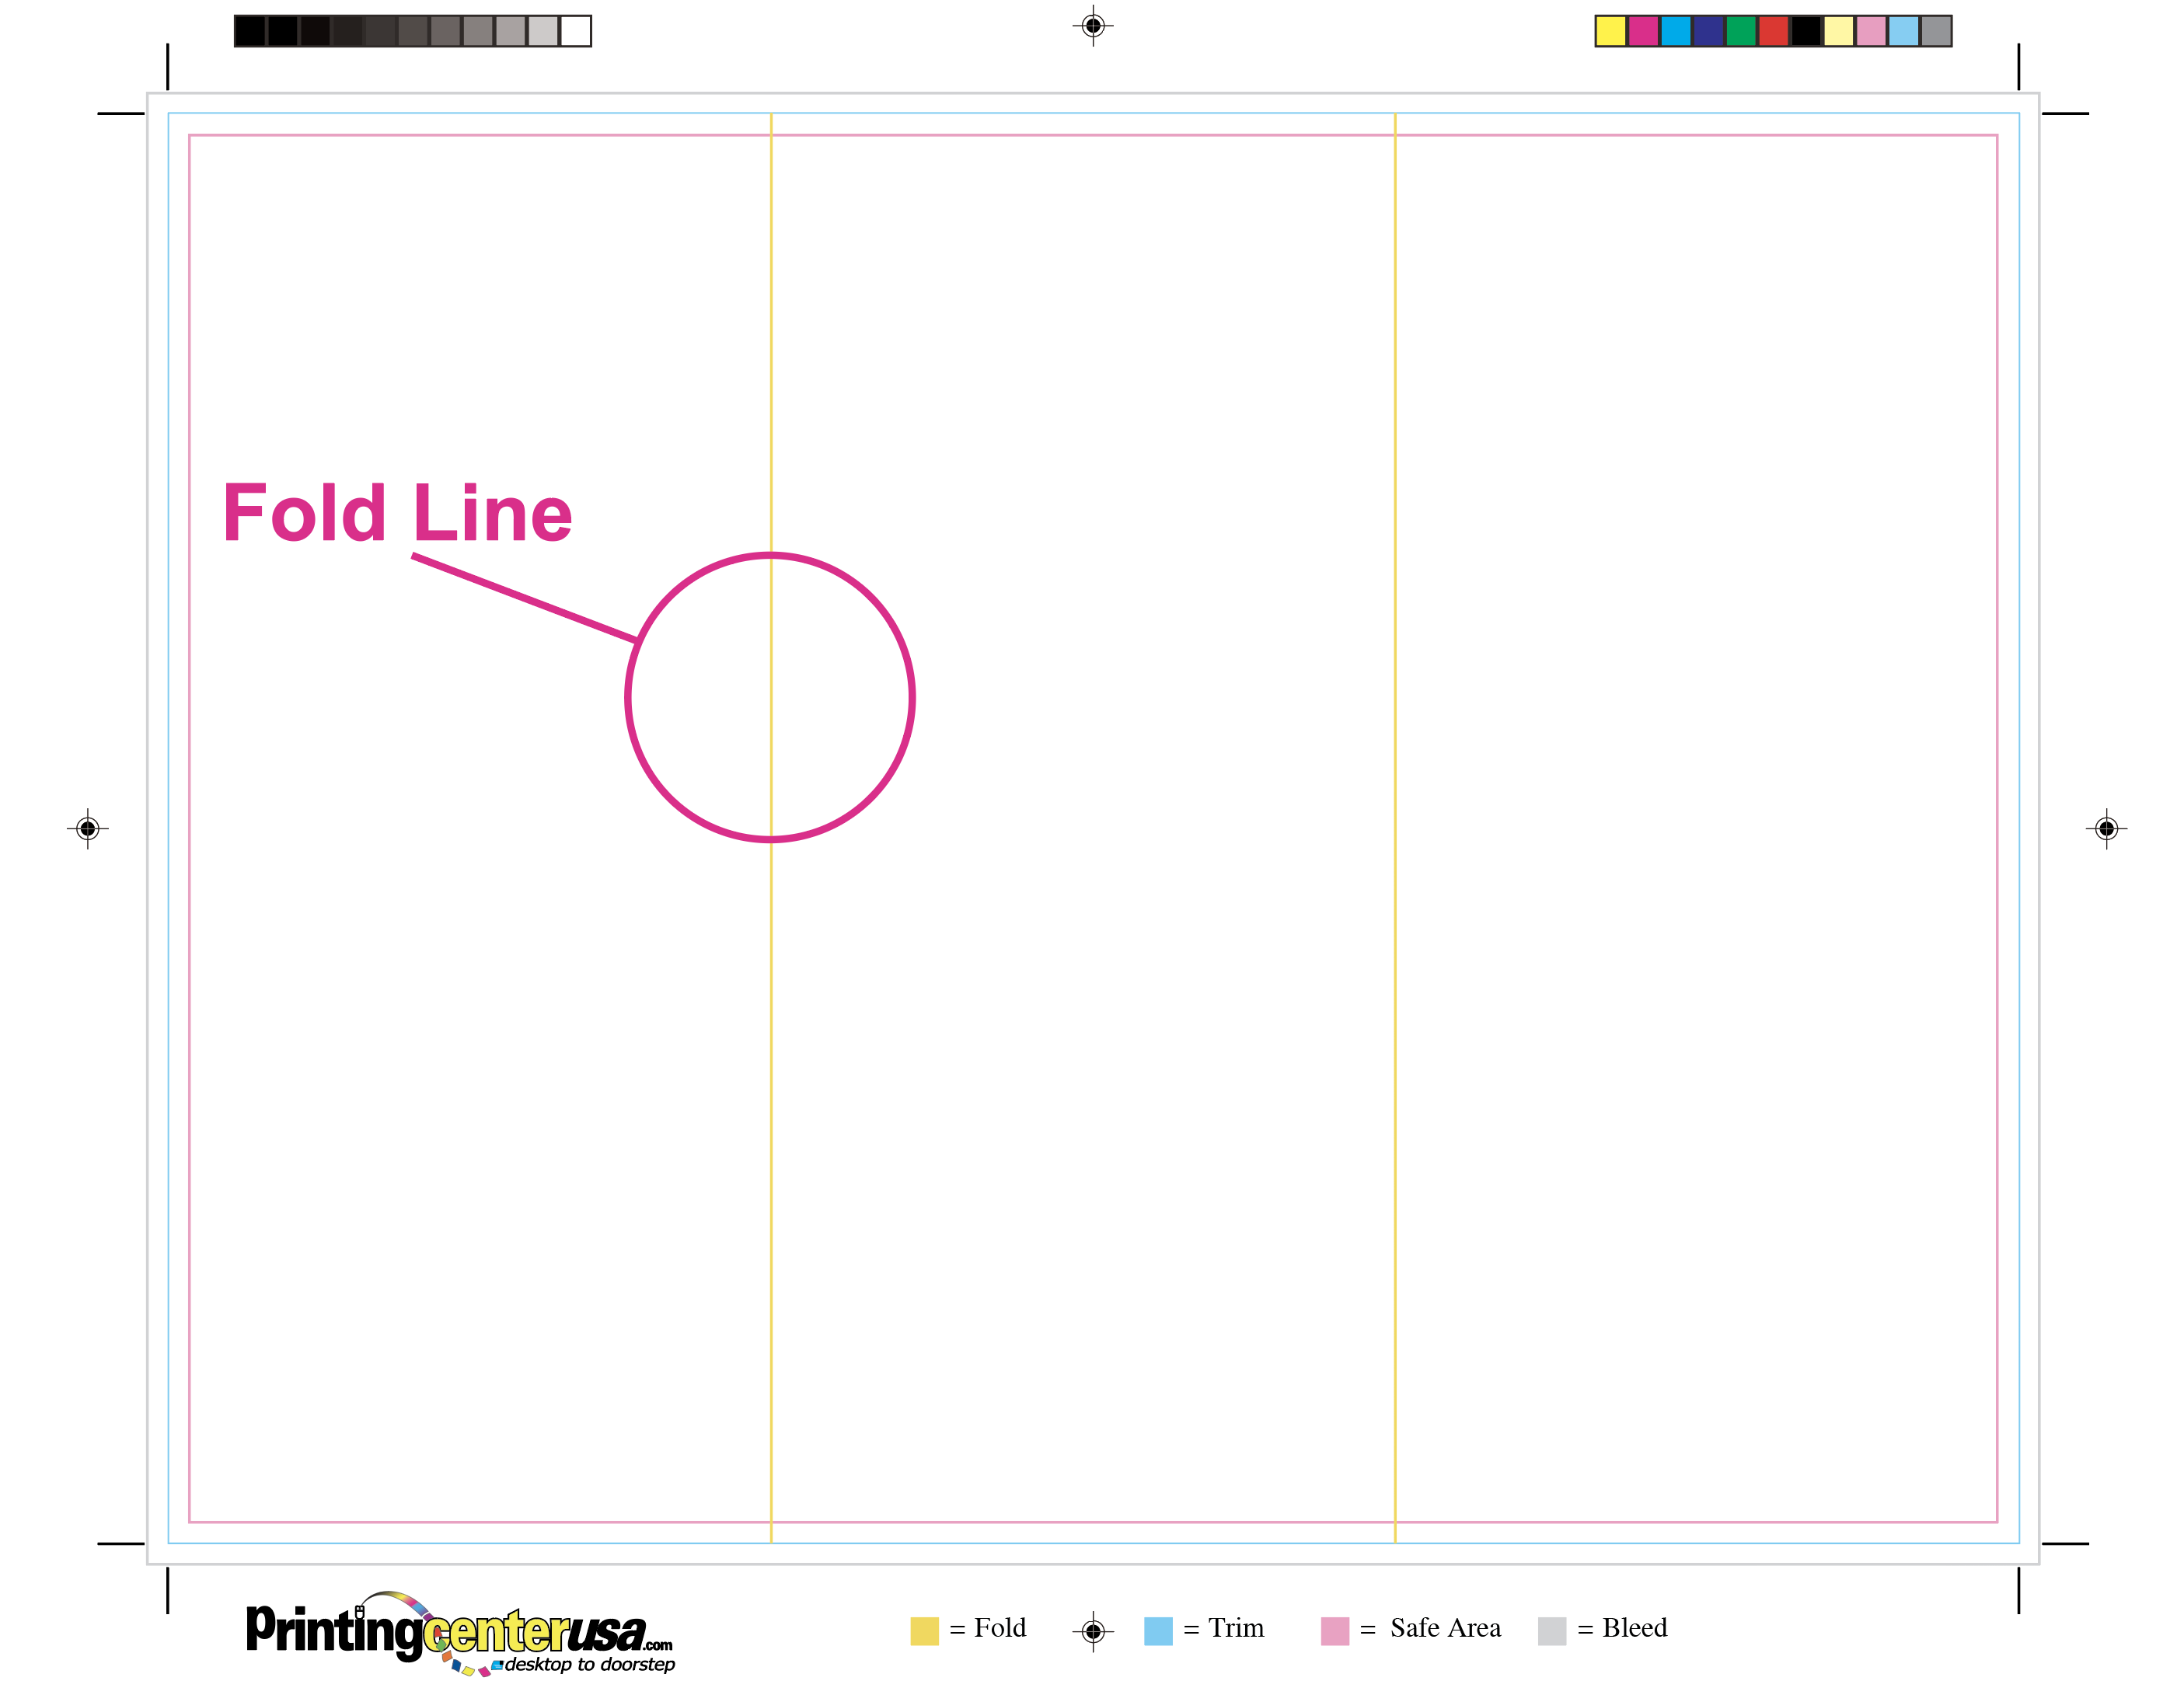
Where do I put my fold line?
Templates and proofs include fold marks that indicate where the fold will be. It is best to line up your panels with the fold marks to ensure that the fold is in the correct spot during production. Click here to view our list of available templates.
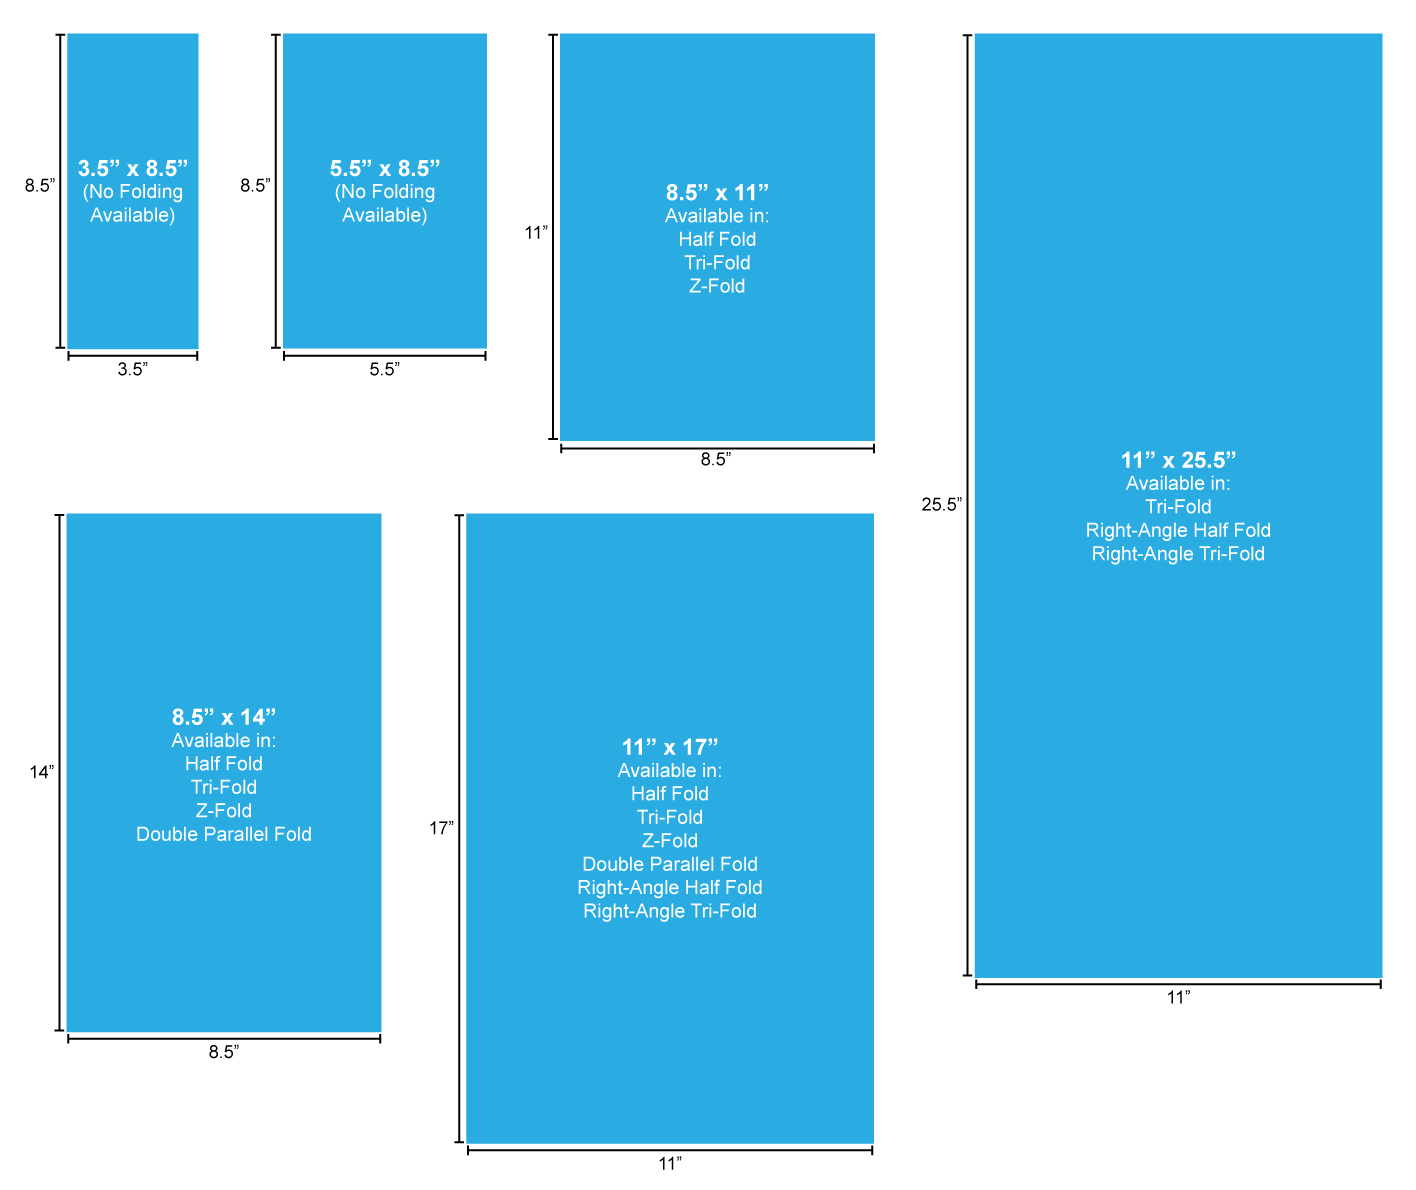
What products have a folding option?
Brochures, Greeting Cards, Notecards, Flyers, Posters and Newsletters. Select your desired product for more information and free downloadable templates.
How do I make sure my brochures fold correctly?
PrintingCenterUSA provides free downloadable templates on the Brochure Templates Page. These templates include our fold lines.
Do you charge for folding?
Yes, it is an additional step in production.