Online Design Tools
Online Design Tools
Photo Booklet Maker
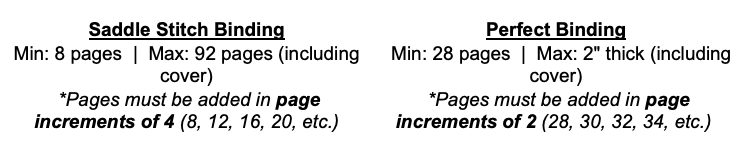
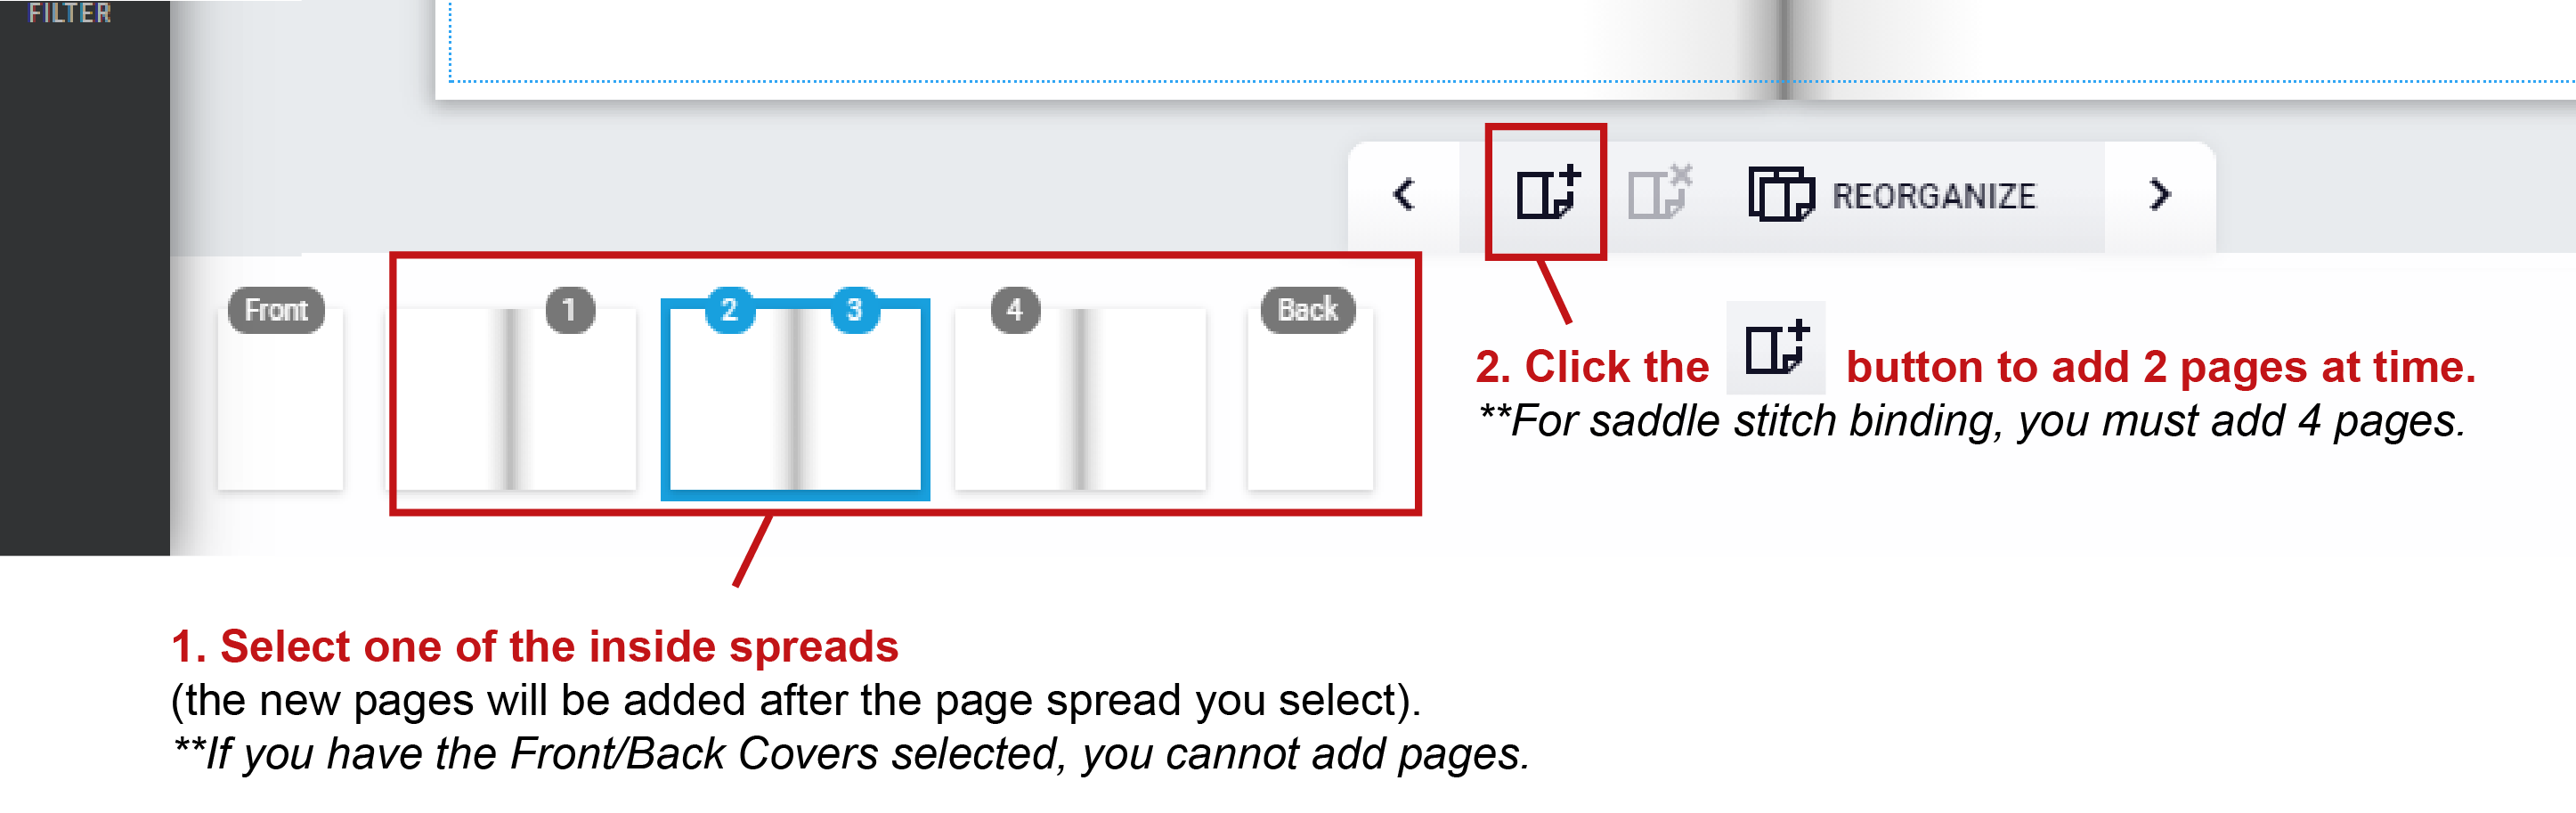
How many pages can I add to my booklet?
Page count depends on the type of binding you selected.
How do I add pages?
What type of images should I use?
Please use images saved as RGB images for best result. CMYK images can have some color shifts during rendering FULL COLOR FILES ONLY. NO BLACK AND WHITE. All black and white files will render as full color builds. There is no option for black ink only when using our online design tool.

If you are starting a design before creating an account please note that the pictures that you upload and use in your design will be saved to your design. Any pictures that are uploaded that are not used in the design are not saved because there is no account to save them to.
Be sure to register an account when working on a design and save your design to your account (if you’re in the design tool and want to save or login: Click SAVE > Name Your Design > Login or Create an Account and after you will be redirected back to your design).
How do I upload my photos?
From My Device:

From Facebook:

- Click PHOTO > At the top of the Choose photo window, click the UPLOAD button > Either drag and drop your image(s) or click on the box to search your device. Once your image(s) are uploaded, click DONE. You can find all your previously uploaded images under My Uploads > Recent uploads.
From Facebook:
- Click PHOTO > Click “Connect to Facebook” > Login to your Facebook account > now you will have access to all your Facebook profile’s photo albums.
Where can I find my previously uploaded photos?
All previously uploaded files can be found by clicking PHOTO > My Uploads > Recent uploads.

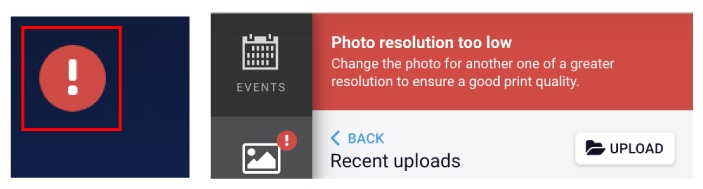
What do I do if my picture is low resolution?
You can shrink the image to try and make it smaller or find a higher resolution version of that image. If those options don’t work, you will need to find a new image. If you use a low resolution photo, be aware that the image may print fuzzy/pixelated.
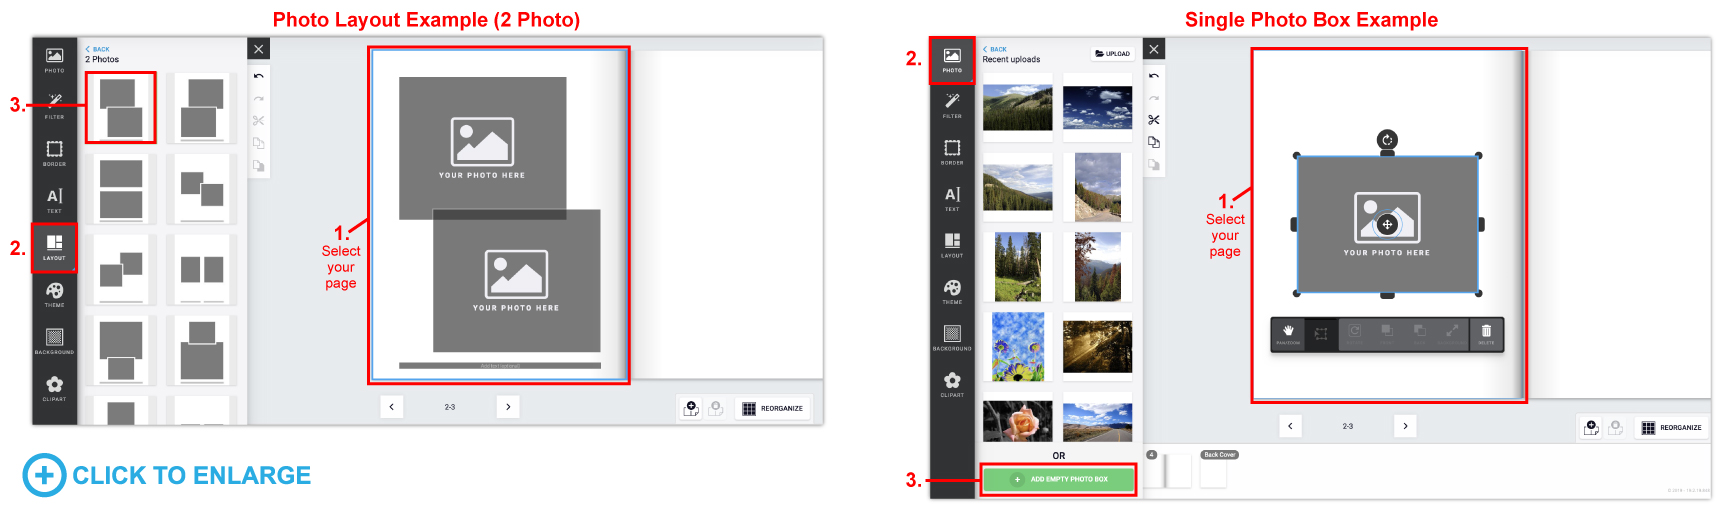
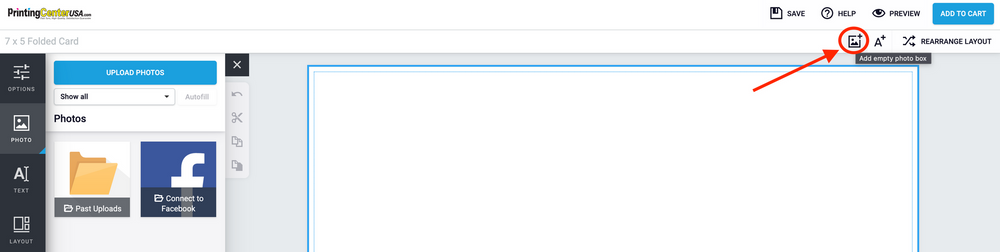
How do I add photo boxes?
- Photo Layouts: Select your page > Click LAYOUT > choose between a Page layout and Spread layout > select the photo layout you want to use and it will fill the page(s).Single Photo Box: Select your page > Click PHOTO > ADD EMPTY PHOTO BOX
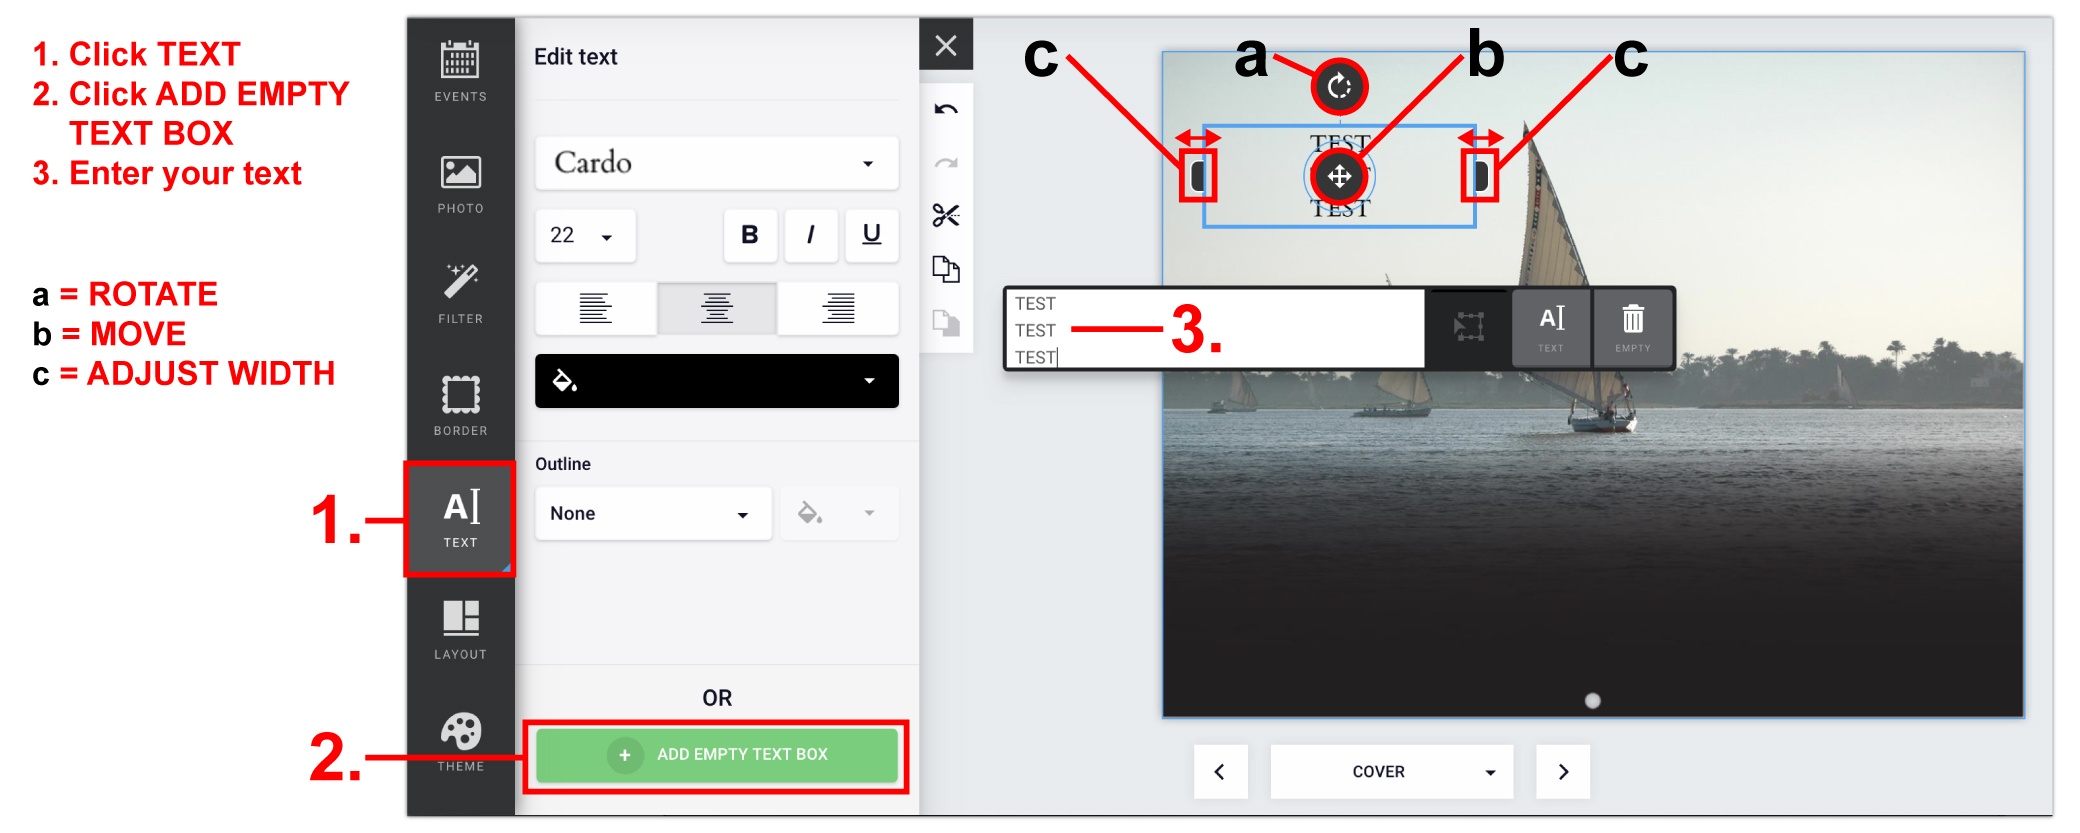
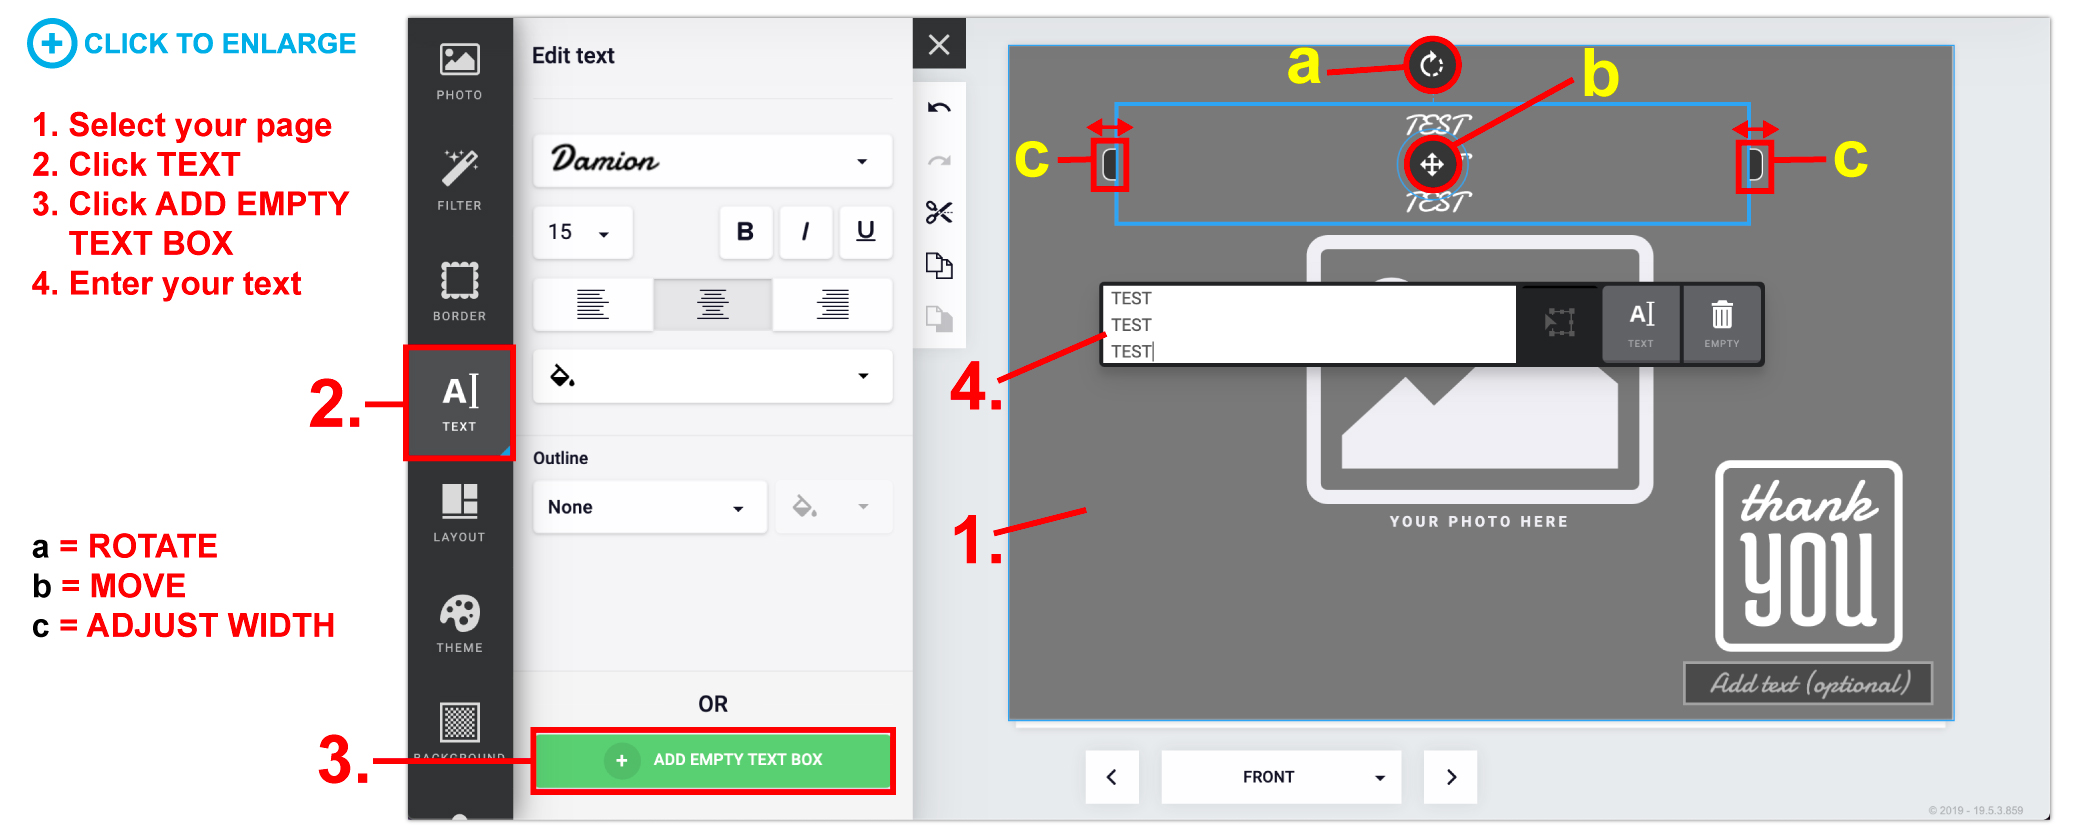
How do I add a text box?
Click TEXT > Click ADD EMPTY TEXT BOX button at the bottom > Enter your text into the white text box that says “Add text (optional).”
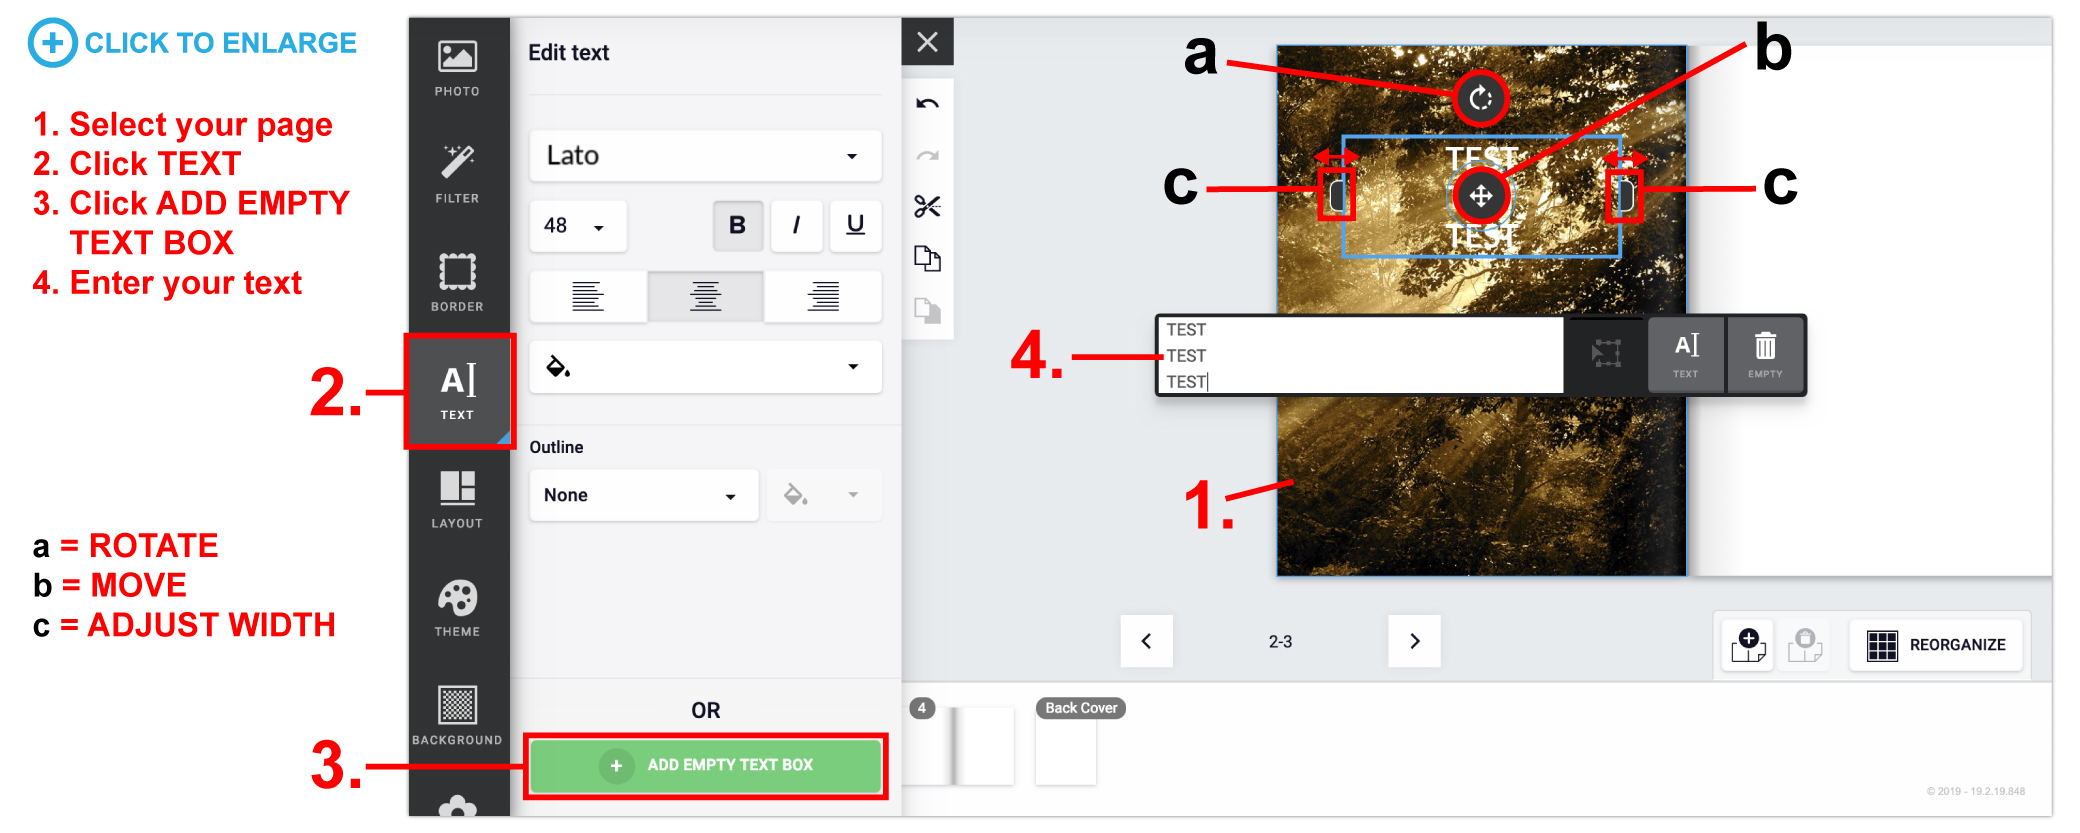
- Move a text box around by clicking and holding the 4 arrow icon while dragging.Rotate a text box by clicking and holding the rotate arrow while moving your mouse.Change the width of a text box by clicking and holding either side of the text box and moving it outwards.
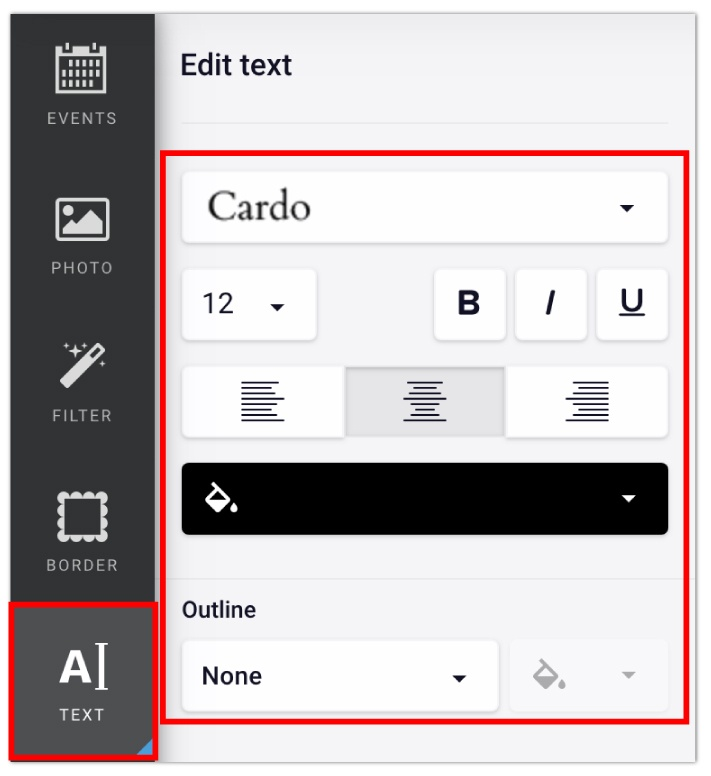
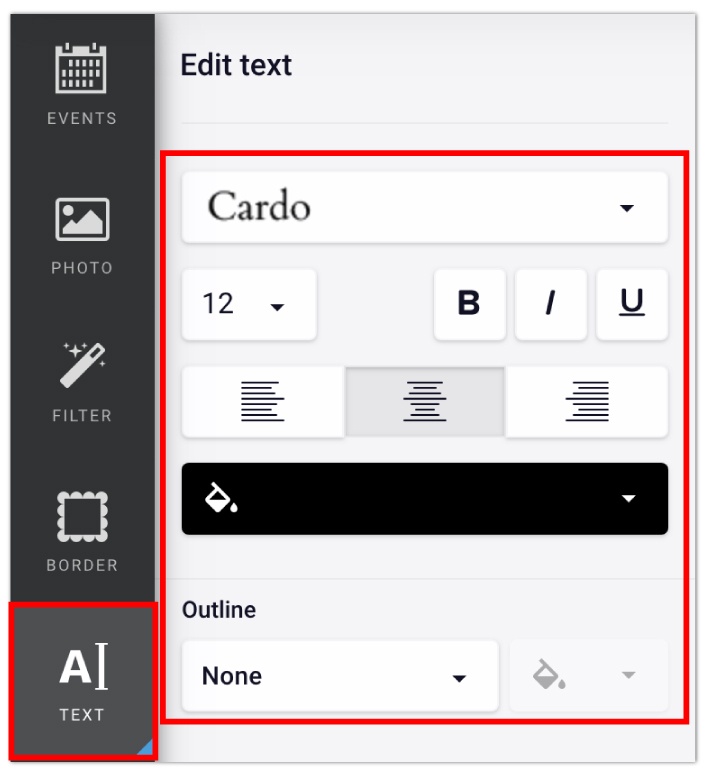
How do I change the font, style, color, etc. in a text box?
Click on the text box > in the left hand window, you can change the font type, size, alignment, color, outline, etc. (if you cannot see this area, click “TEXT” in the popup menu for that text box).
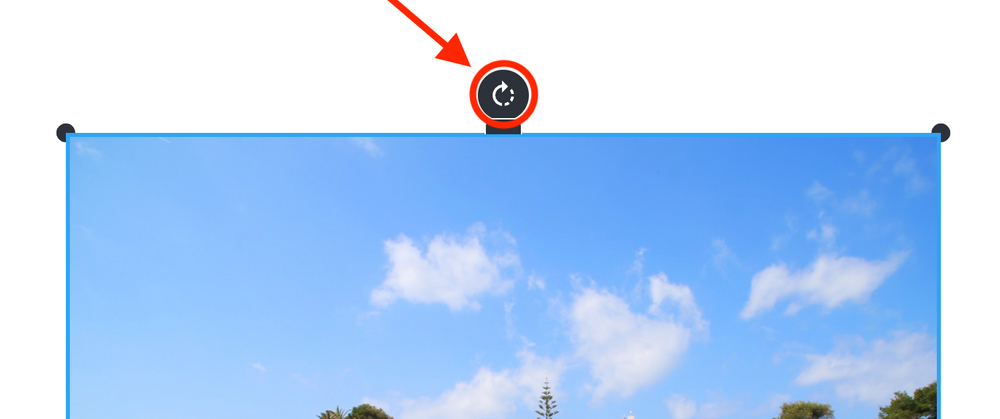
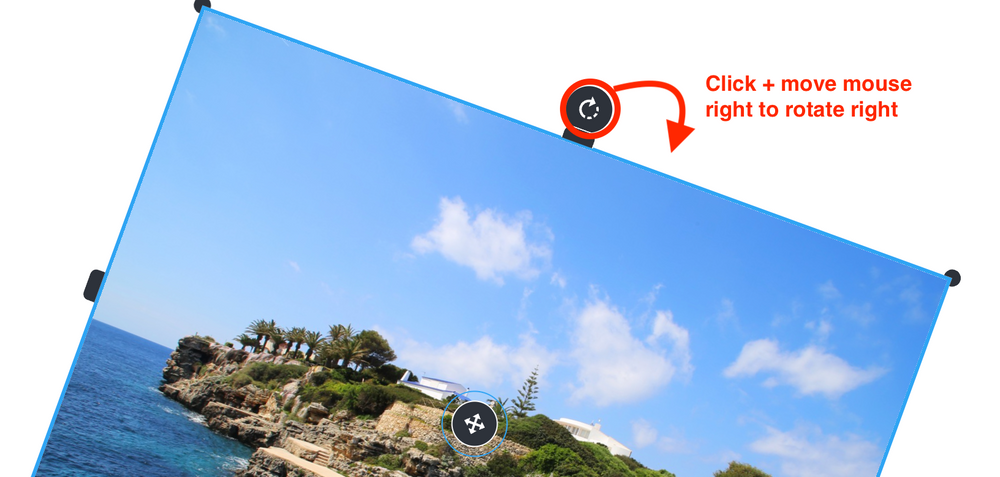
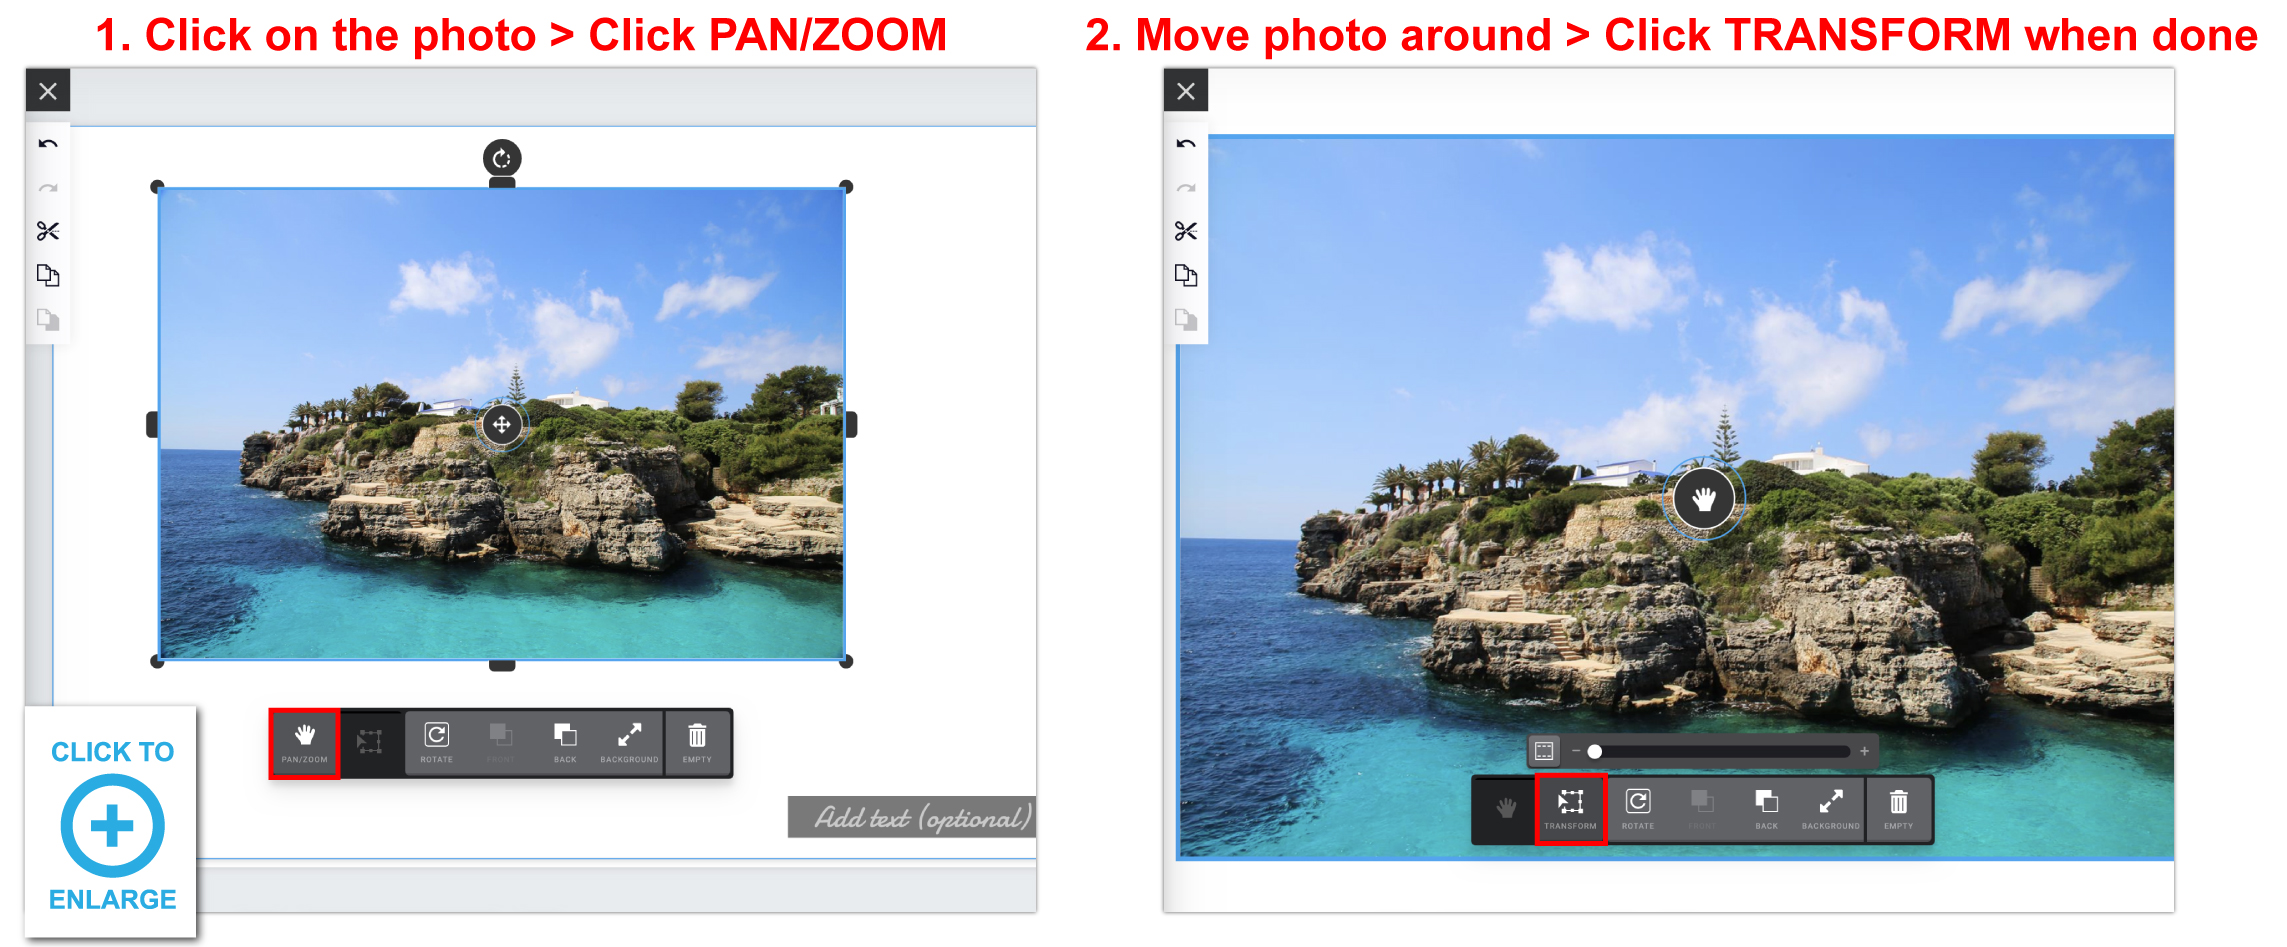
How do I zoom in and out while editing a photo box?
- Zoom in: Select your image > Click PAN/ZOOM in the popup menuZoom out: Select your image > Click TRANSFORM in the popup menu

How do I delete a photo box?
Click on the photo box you want to delete > If you have an image placed inside, click EMPTY > Click DELETE (trash can icon).
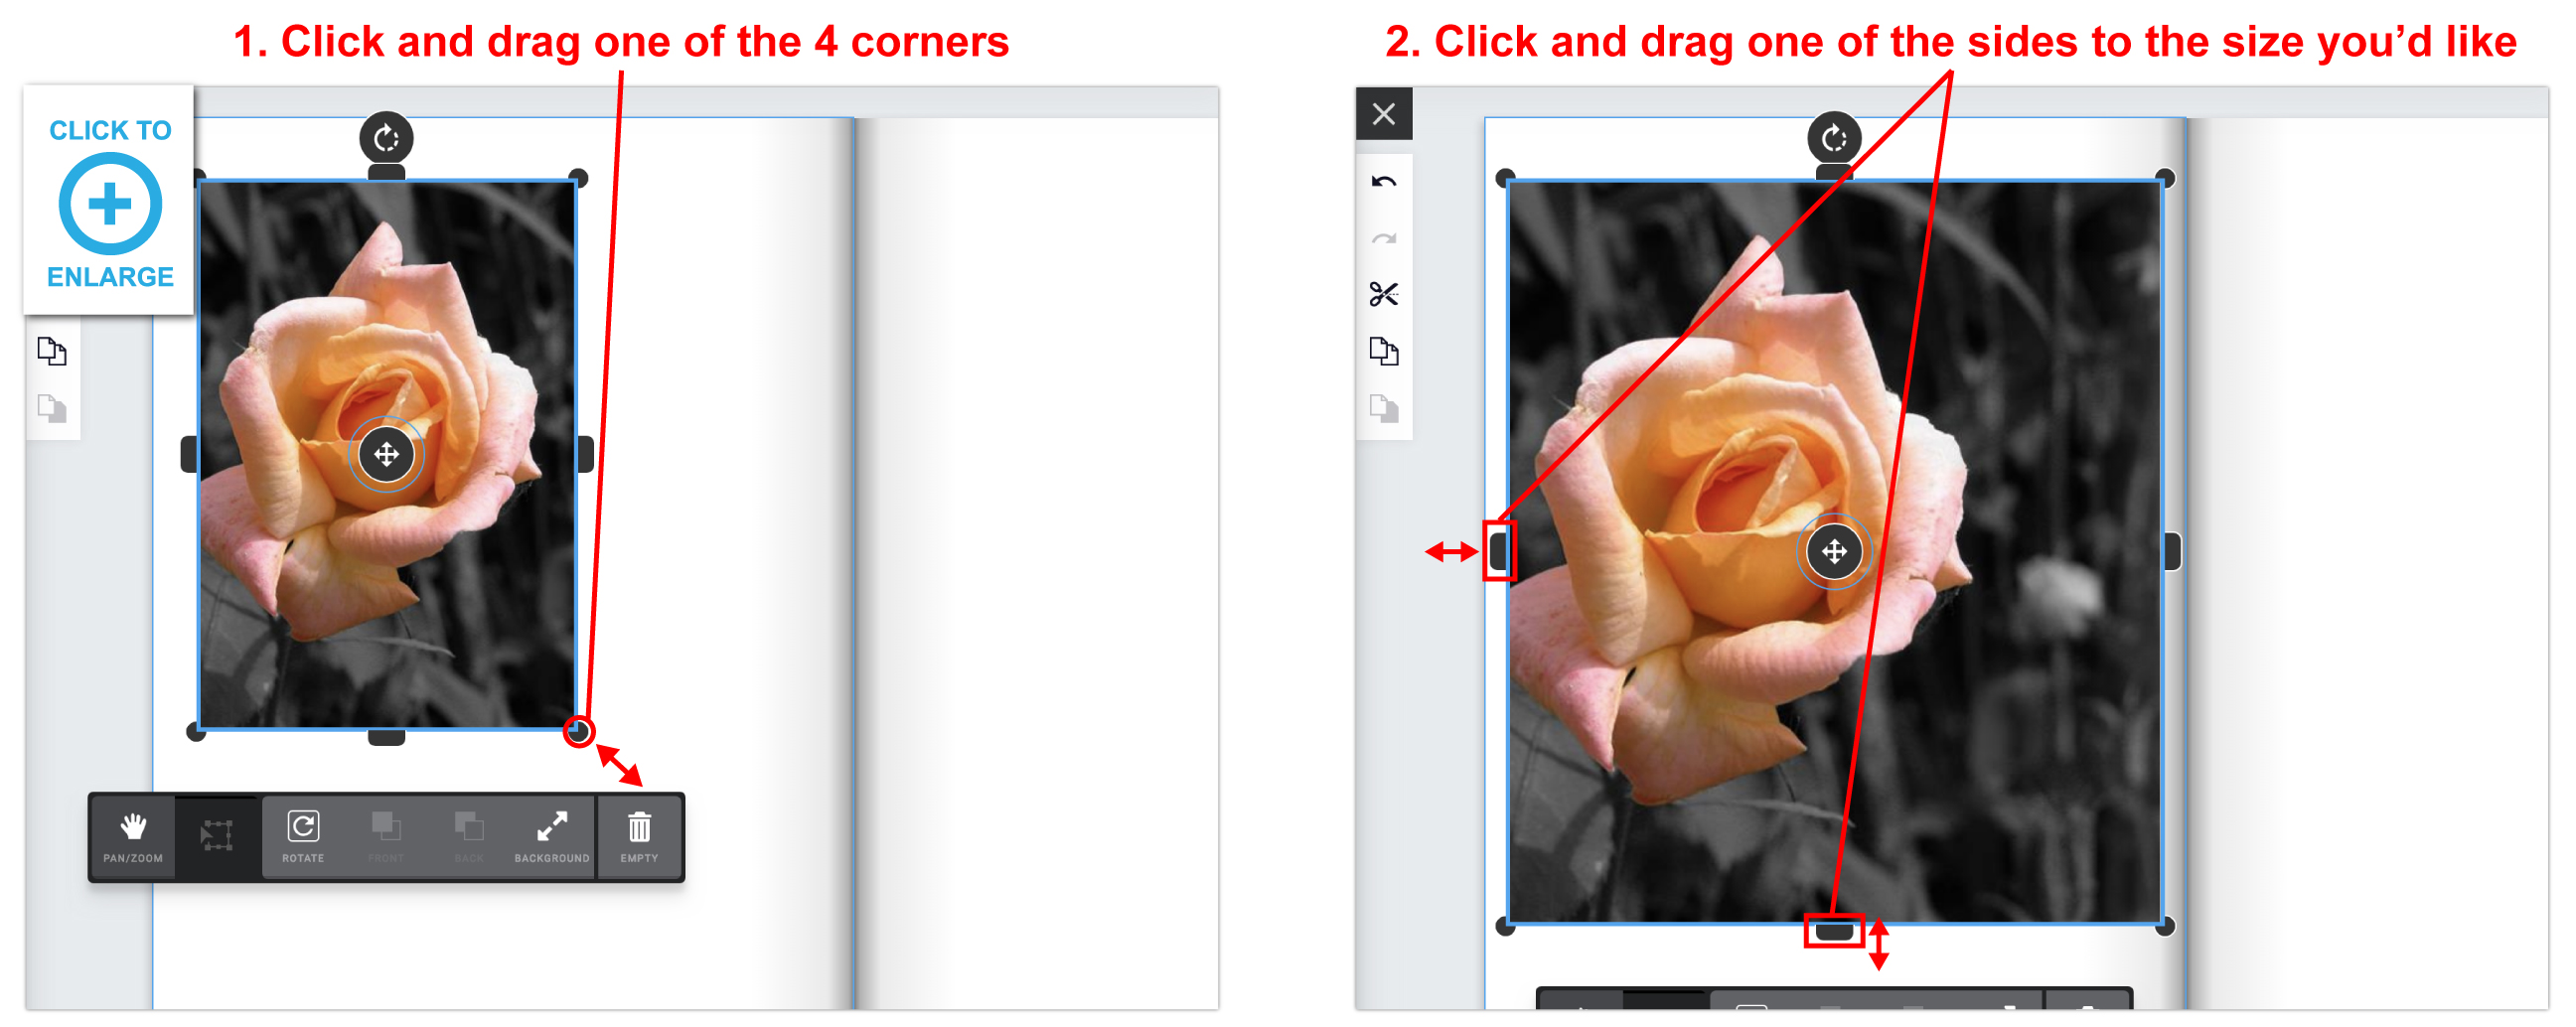
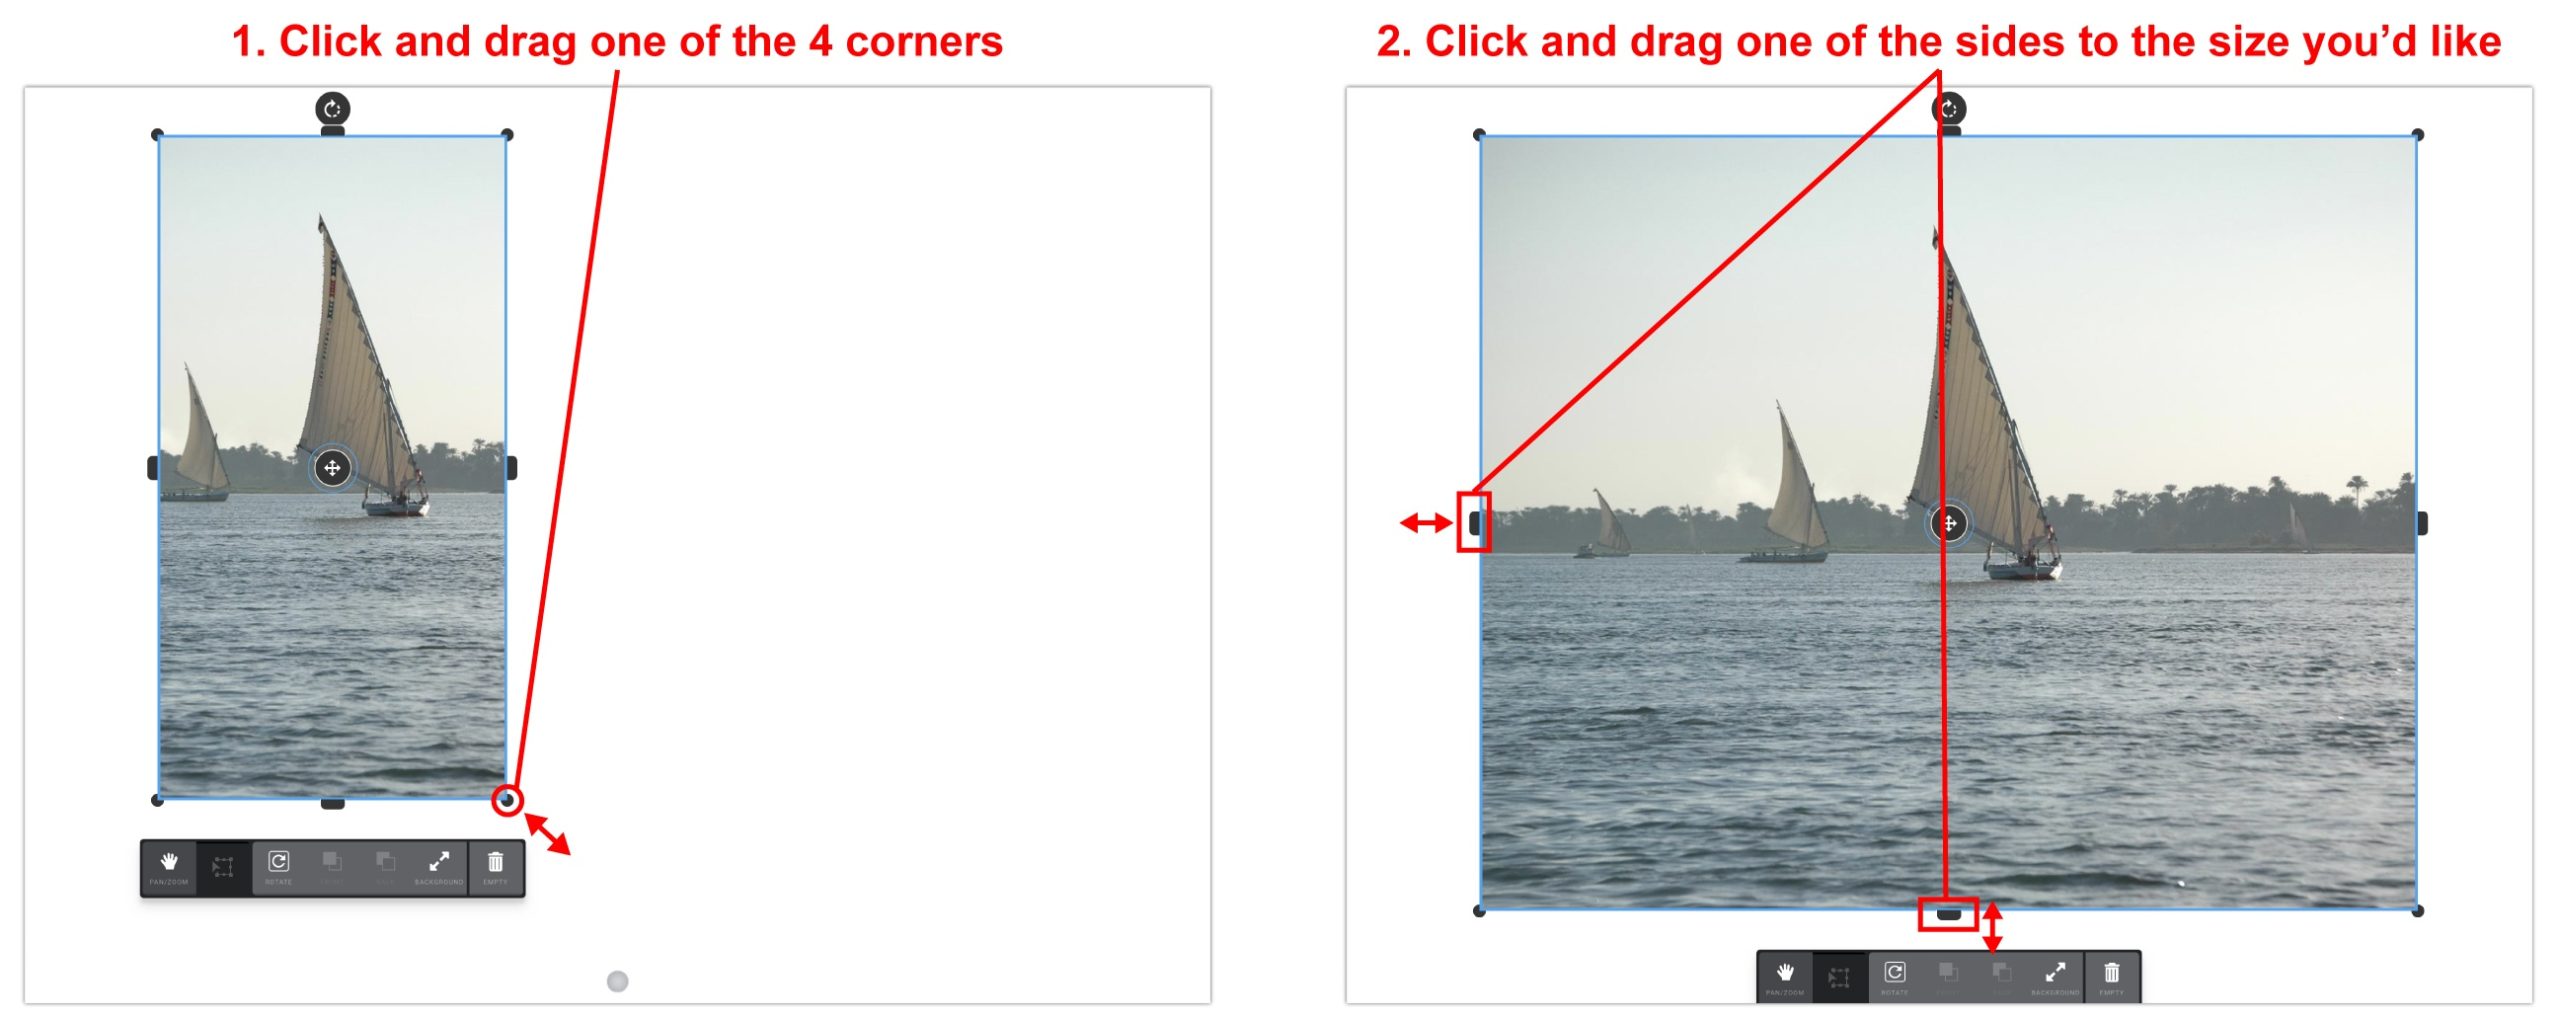
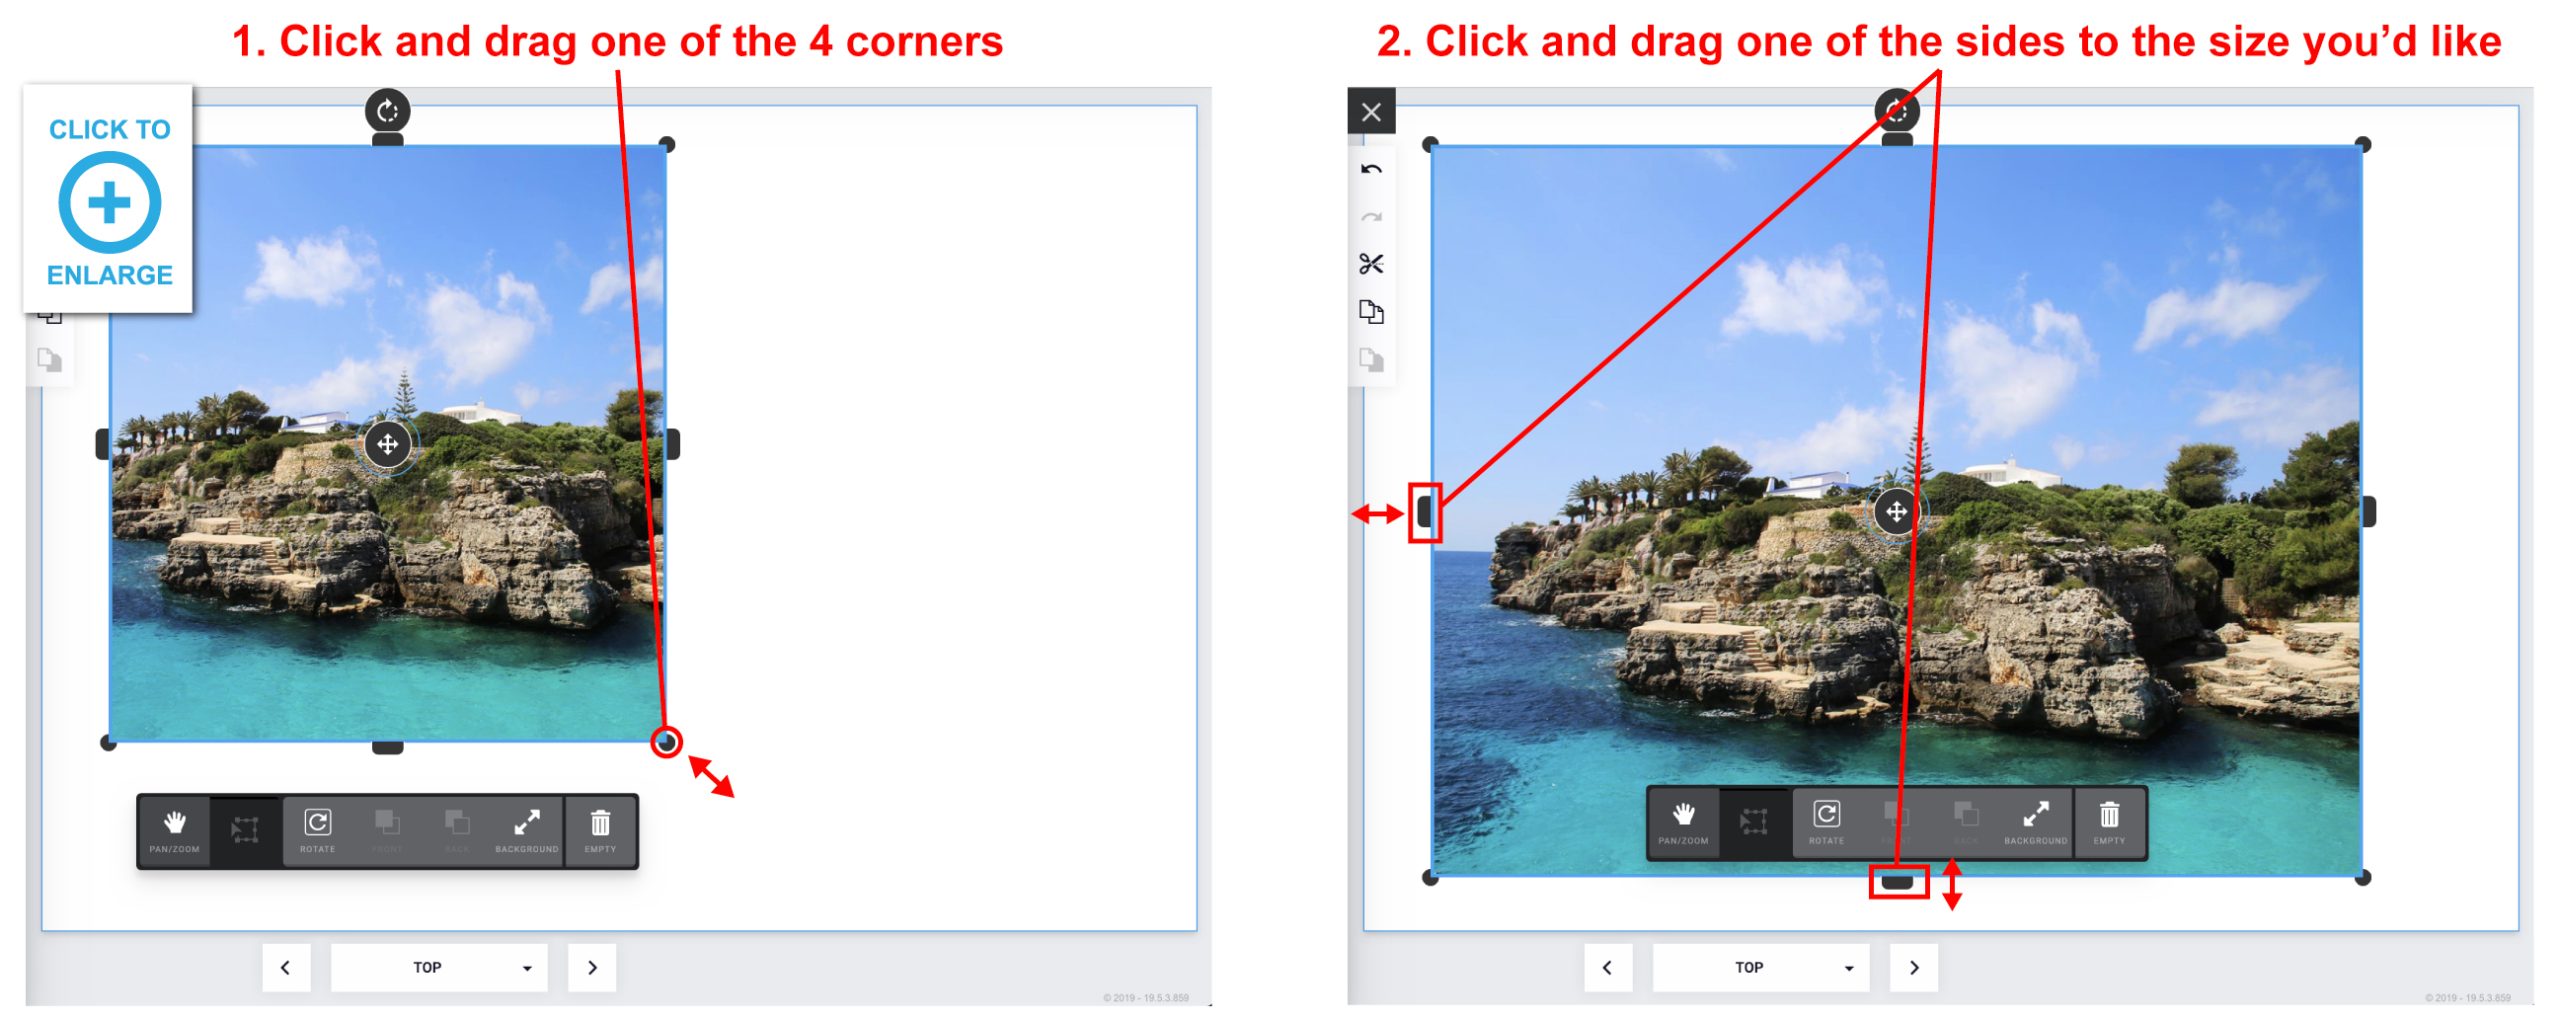
How do I resize my photo box after placing a photo inside?
If you have placed an image into a photo box and try to adjust the photo’s height or width and it’s not working, try adjusting the image size by clicking and dragging one of the 4 corners.
After making it larger, you will be able to adjust the height and/or width down to the size you need it to be.
After making it larger, you will be able to adjust the height and/or width down to the size you need it to be.
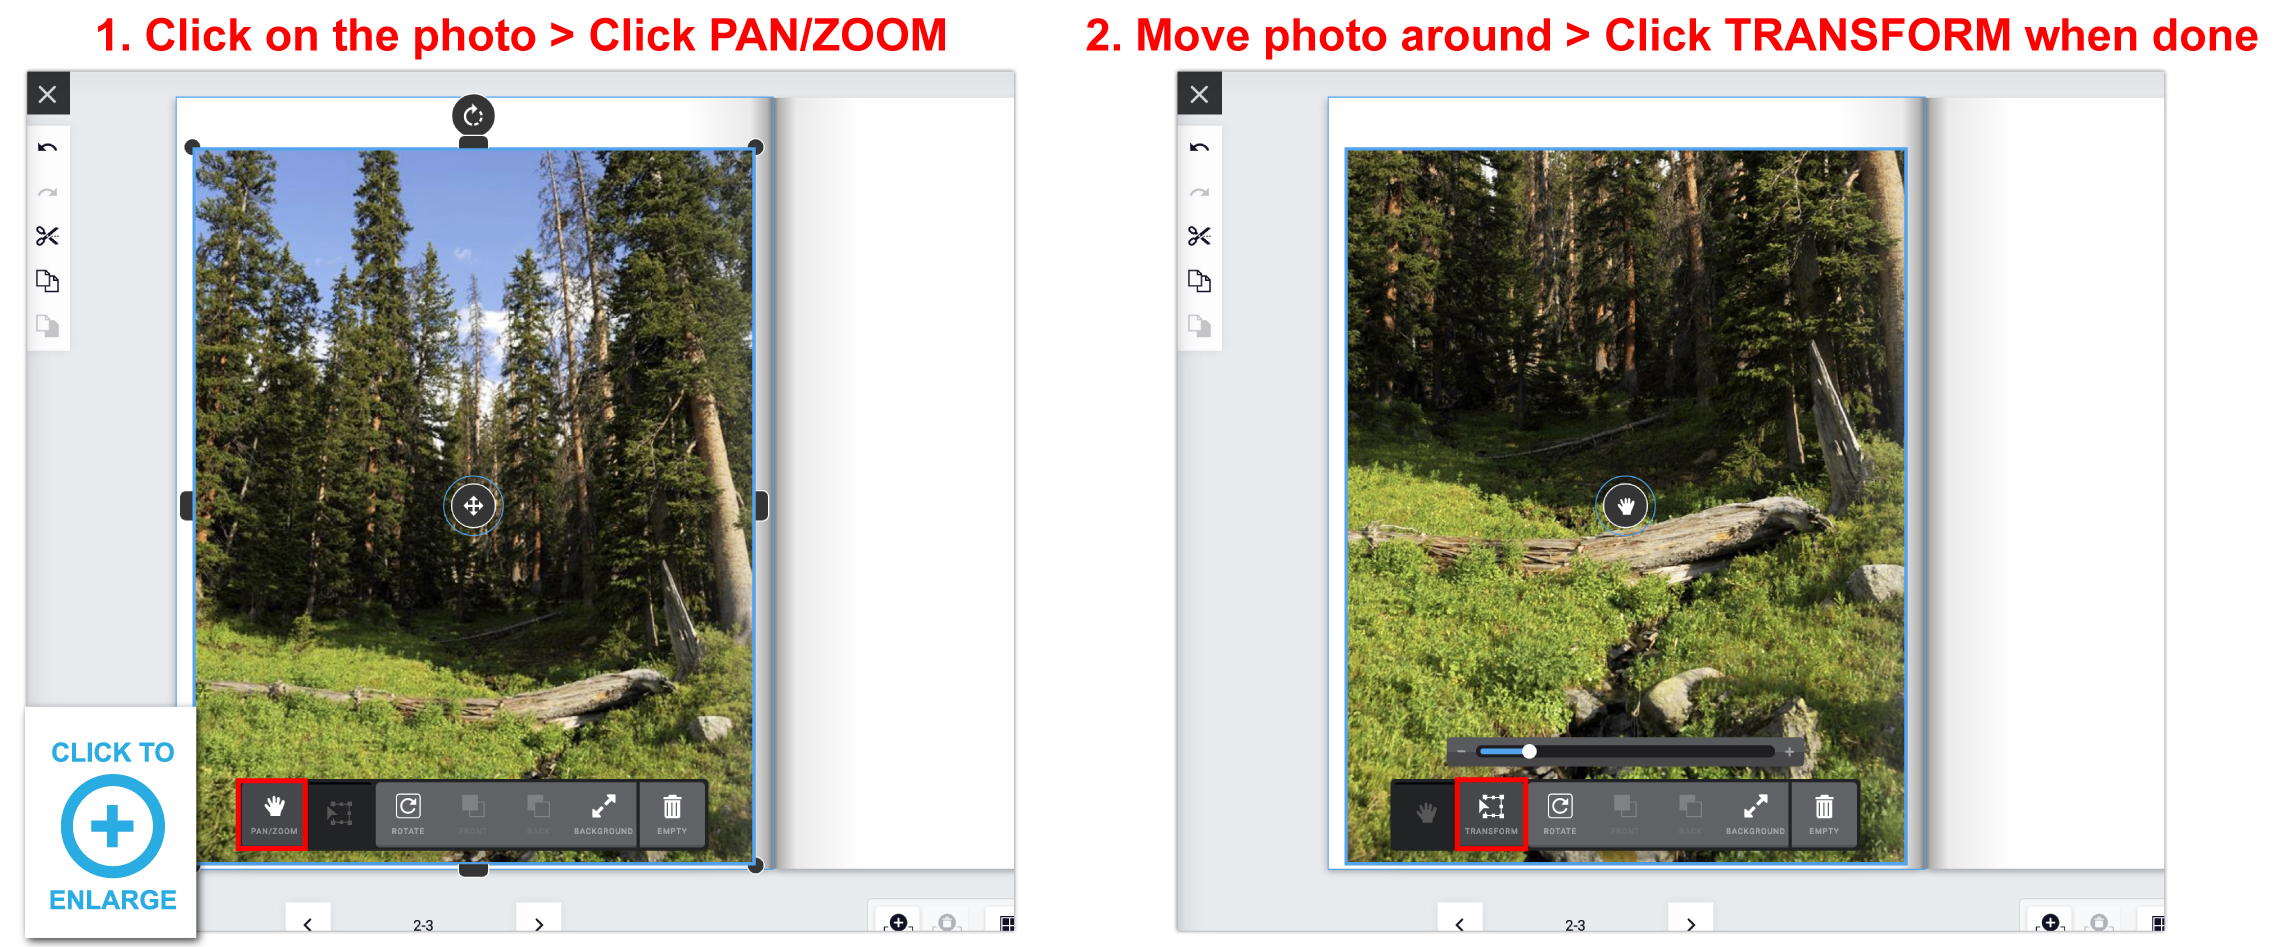
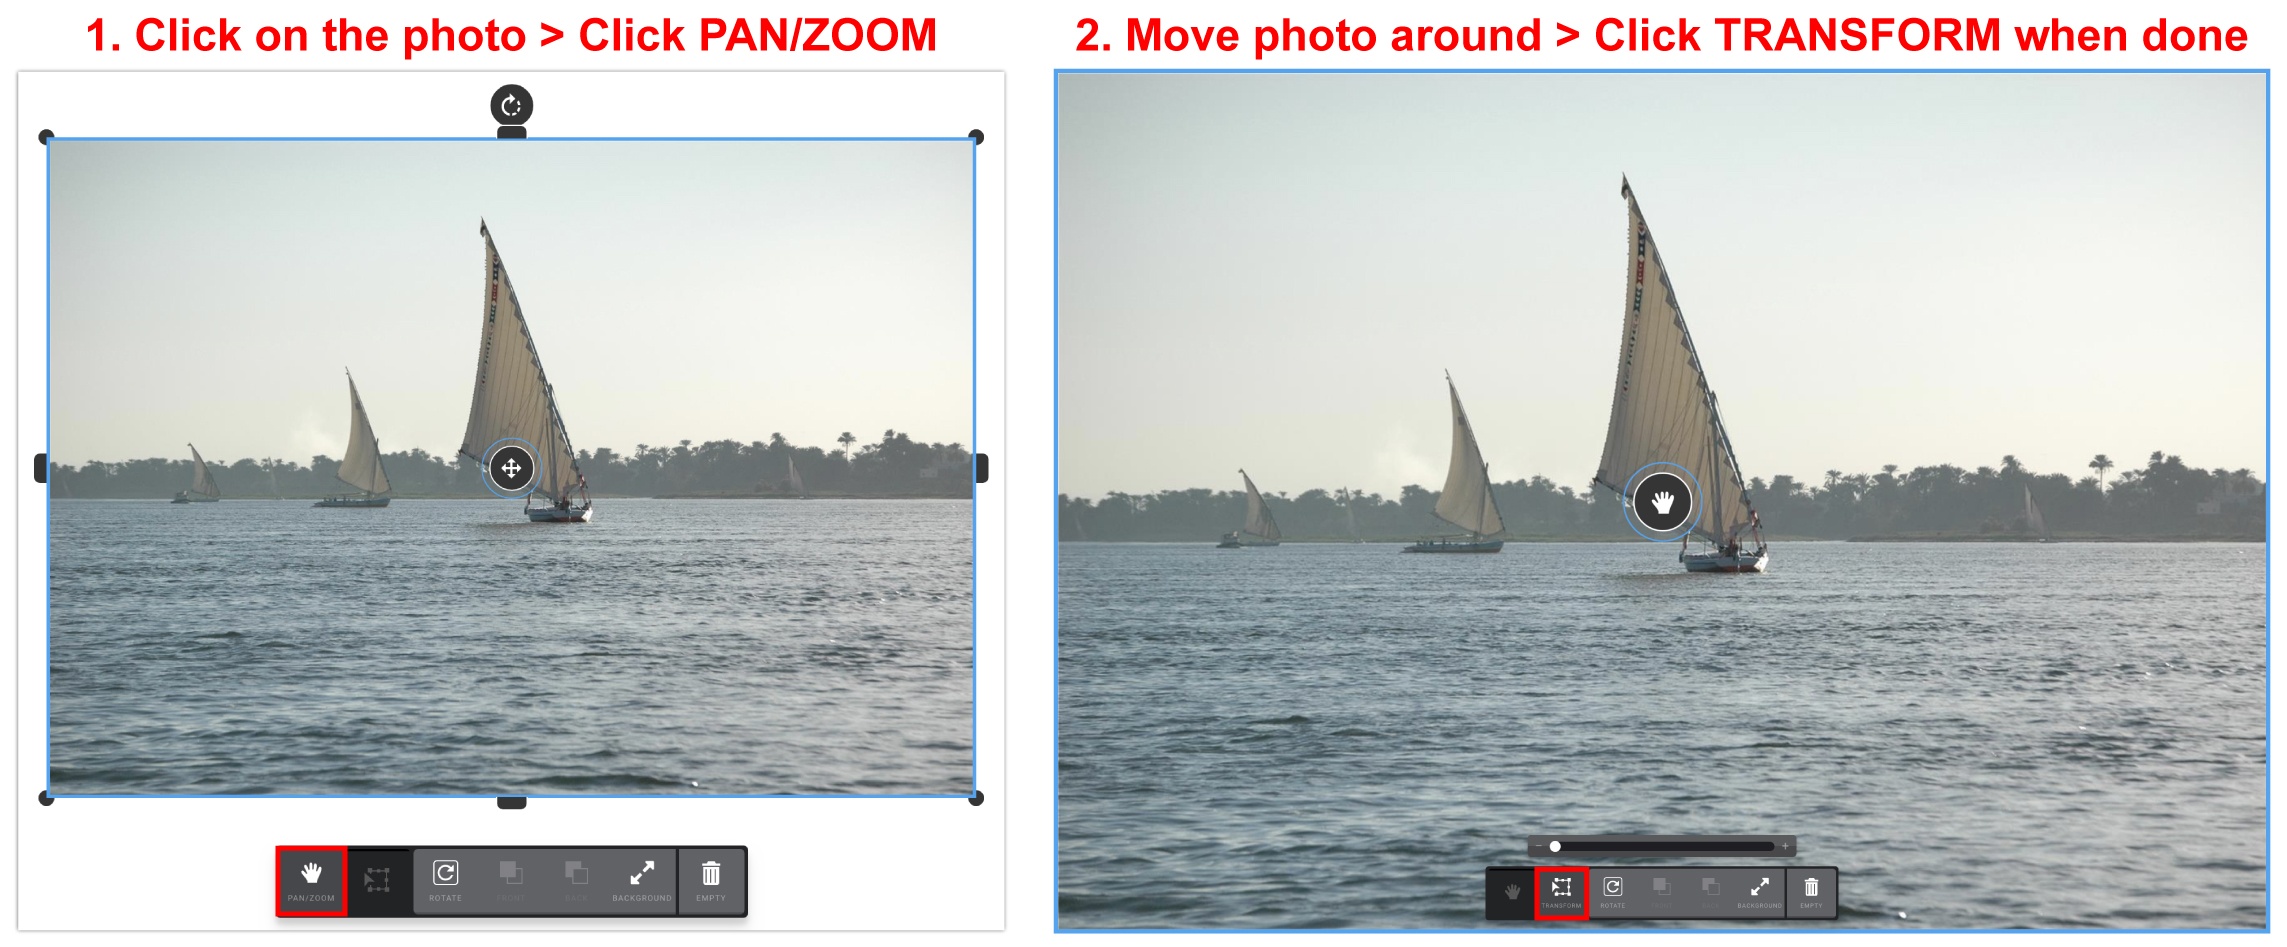
How do I move a photo around within a photo box?
After placing a photo into a photo box, click on the photo > Click PAN/ZOOM > Now you can drag the image around within that photo box. To zoom back out, click TRANSFORM.
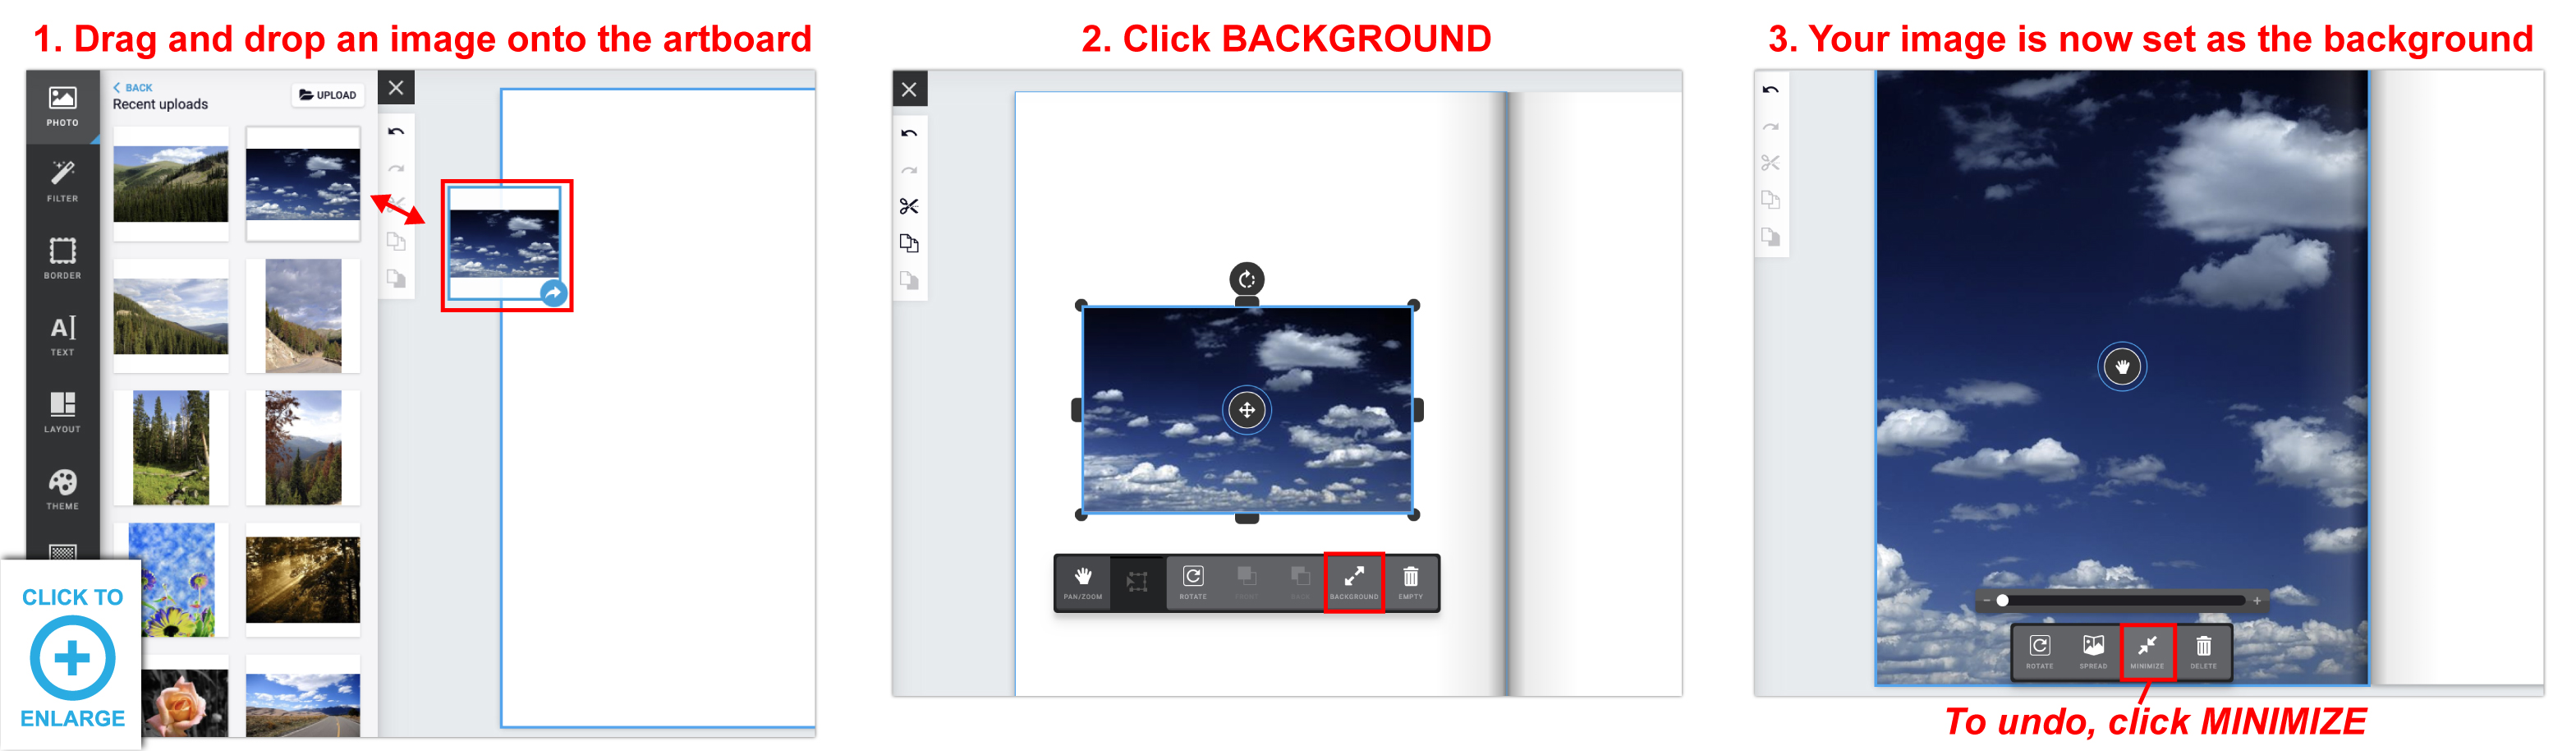
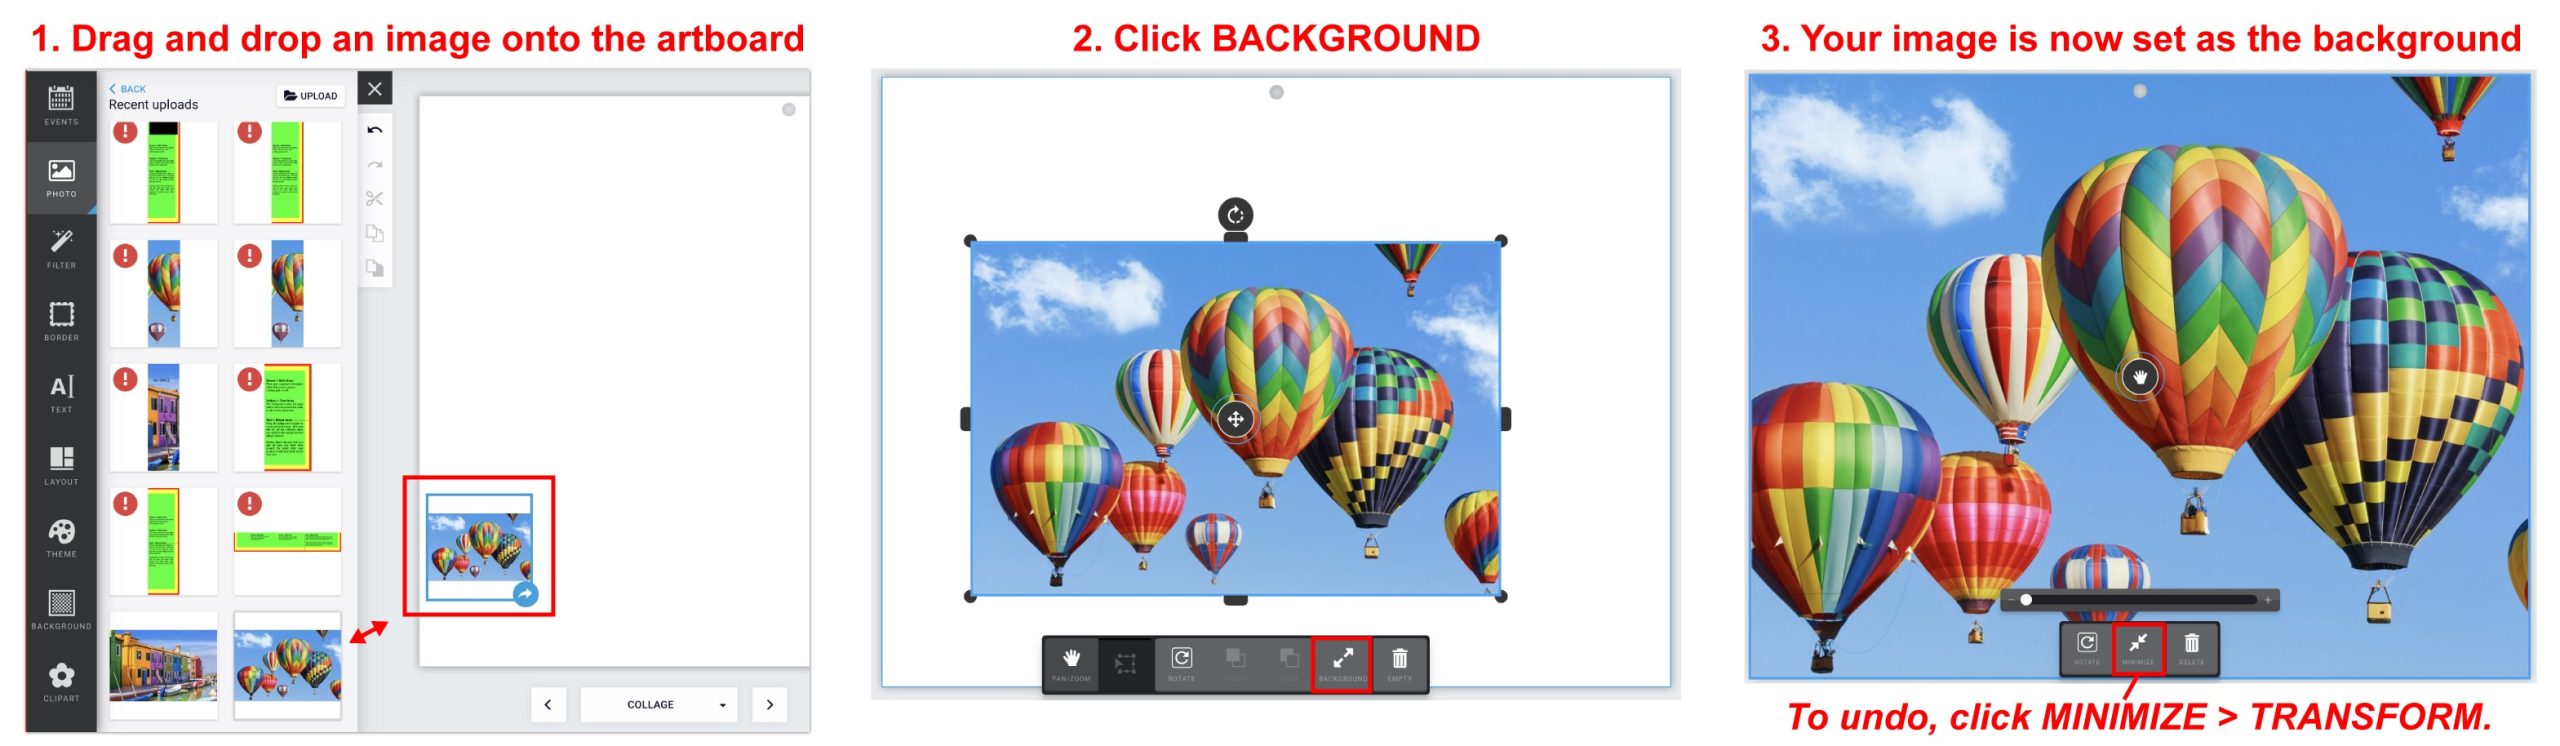
How do I make an image fill the page as a background?
Drag & drop your photo into the area you want it in > Click BACKGROUND in the popup menu for that photo box.
To undo this feature, click MINIMIZE.
To undo this feature, click MINIMIZE.
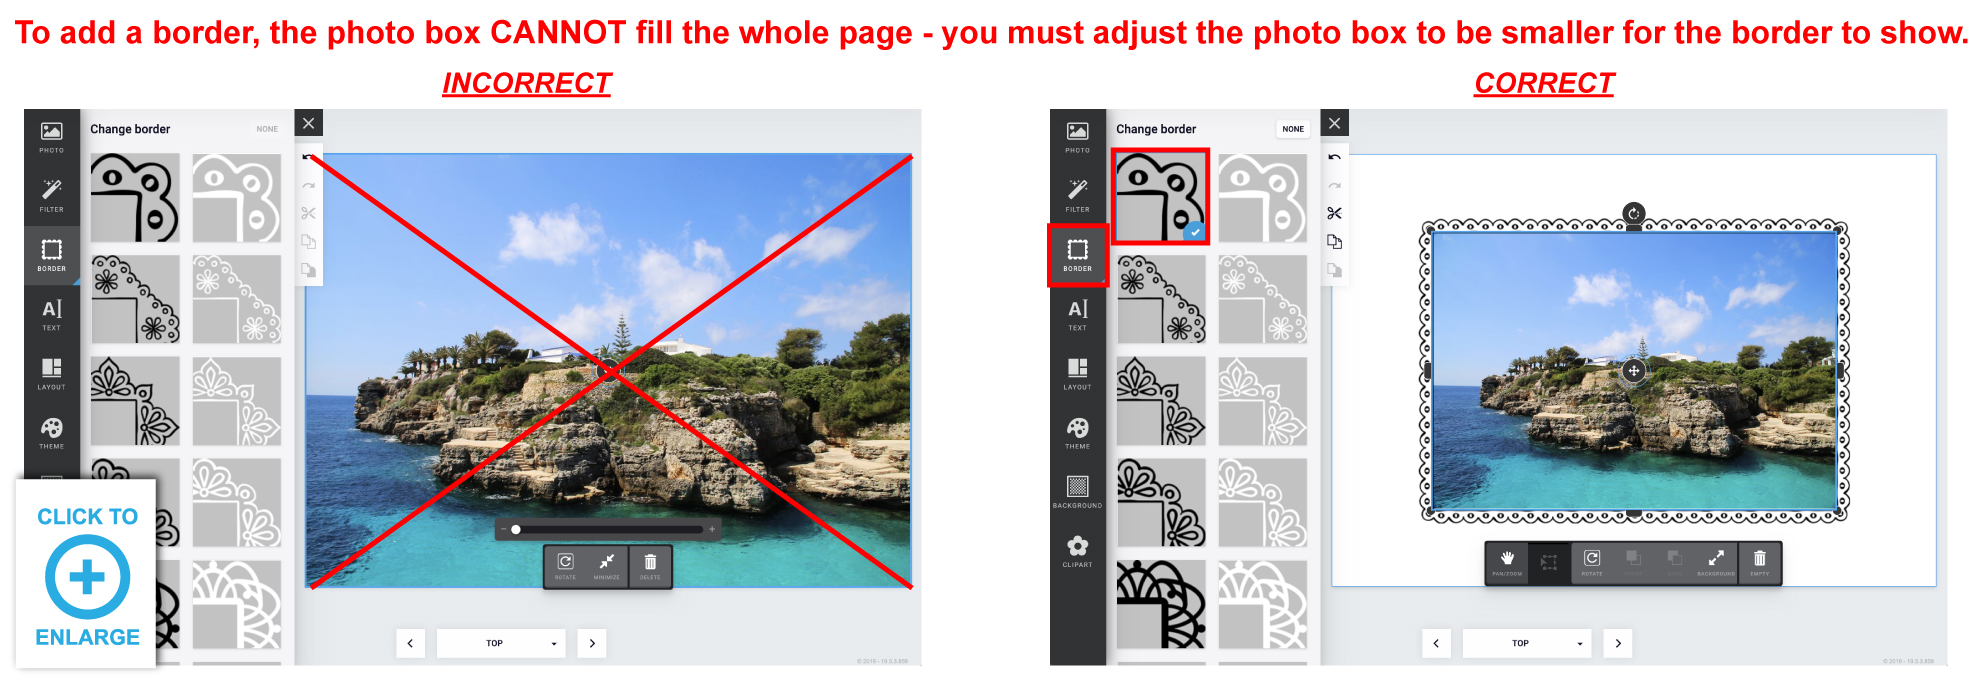
How do I add a border around my photos?
Yes, we will ship your order if it finishes production early. If this is a problem, please note on your order that you do not want your package to ship early.
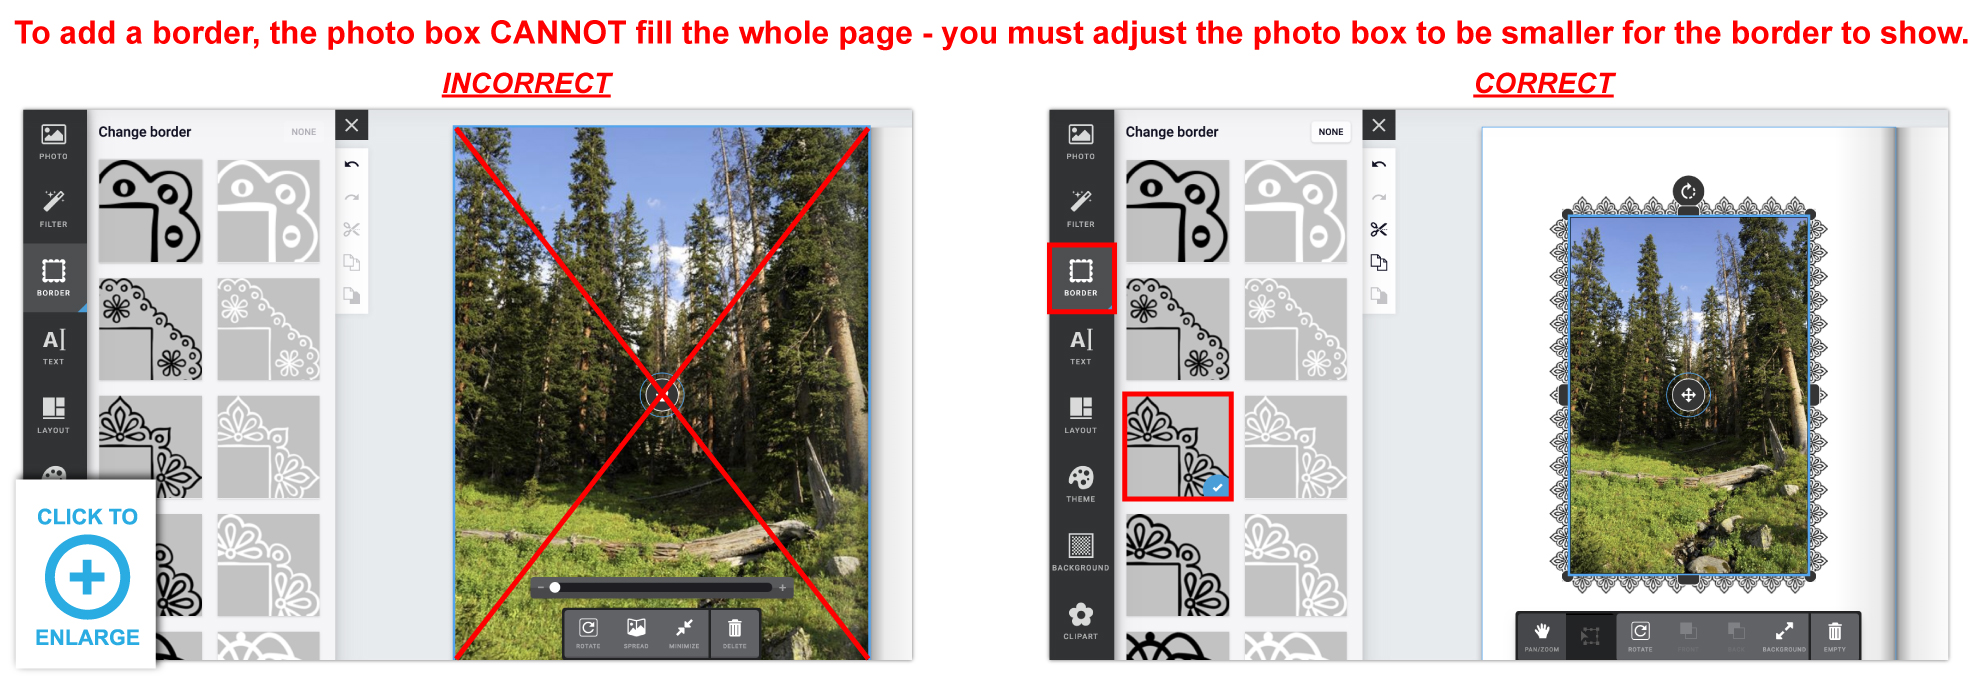
Photo Calendar Maker
What type of images should I use?
Page count depends on the type of binding you selected.

If you are starting a design before creating an account please note that the pictures that you upload and use in your design will be saved to your design. Any pictures that are uploaded that are not used in the design are not saved because there is no account to save them to.
Be sure to register an account when working on a design and save your design to your account (if you’re in the design tool and want to save or login: Click SAVE > Name Your Design > Login or Create an Account and after you will be redirected back to your design).
What fonts are used in the grids?
Generic Grid Fonts
Open Sans Light
Roboto Condensed
Open Sans
Advertising Grid Fonts
Lato
Roboto Condensed
What size should my images be if I’m editing them beforehand?
If you are sizing and editing your top month images before placing them into the design tool, design them to be these sizes (or dimensions) so they fit correctly and include enough for the bleed.
- 11″ x 8.5″ Calendars: 3375 x 2625 pixels (11.25″ x 8.75″ at 300 dpi)
- 8.5″ x 5.5″ Calendars: 2625 x 1725 pixels (8.75″ x 5.75″ at 300 dpi)
- 12″ x 12″ Calendars: 3675 x 3675 pixels (12.25″ x 12.25″ at 300 dpi)
How do I upload my photos?
From My Device:

From Facebook:

- Click PHOTO > At the top of the Choose photo window, click the UPLOAD button > Either drag and drop your image(s) or click on the box to search your device. Once your image(s) are uploaded, click DONE. You can find all your previously uploaded images under My Uploads > Recent uploads.
From Facebook:
- Click PHOTO > Click “Connect to Facebook” > Login to your Facebook account > now you will have access to all your Facebook profile’s photo albums.
Where can I find my previously uploaded photos?
All previously uploaded files can be found by clicking PHOTO > My Uploads > Recent uploads.

What do I do if my picture is low resolution?
You can shrink the image to try and make it smaller or find a higher resolution version of that image. If those options don’t work, you will need to find a new image. If you use a low resolution photo, be aware that the image may print fuzzy/pixelated.
How do I add photo boxes?
To Collage Pages:

To Monthly Grid dates:
You can only add images to individual dates on the grids. You cannot add images to the previous/ next month’s dates.
- Photo Layouts: Select your page > Click LAYOUT > choose between a Page layout and Spread layout > select the photo layout you want to use and it will fill the page(s).Single Photo Box: Select your page > Click PHOTO > ADD EMPTY PHOTO BOX
To Monthly Grid dates:
You can only add images to individual dates on the grids. You cannot add images to the previous/ next month’s dates.
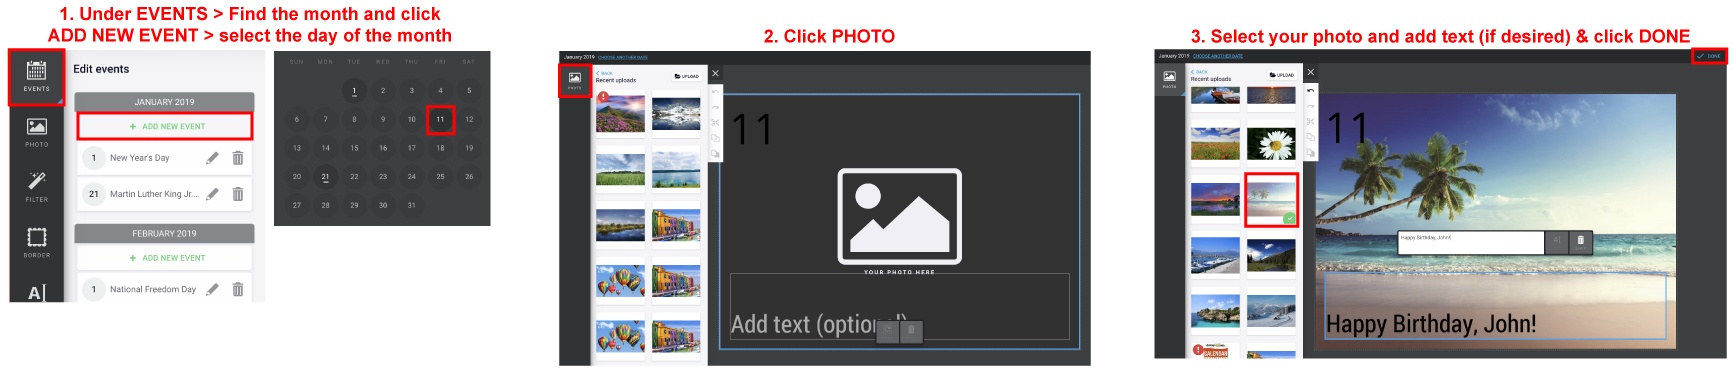
- Click EVENTS > Scroll down to the month you want to add the image to > click ADD NEW EVENT and choose the day of the month > Click PHOTO > click on (or drag & drop) the image you’d like into the photo placeholder (and add text if you’d like ) > Click DONE
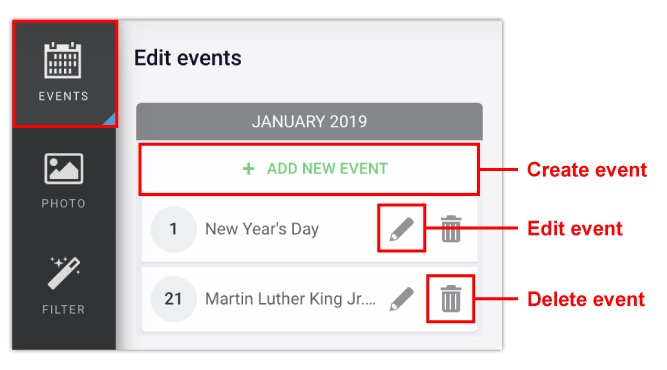
How do I create, edit or delete holidays and events?
Create an Event:
How do I add a text box?
Click TEXT > Click ADD EMPTY TEXT BOX button at the bottom > Enter your text into the white text box that says “Add text (optional).”
- Move a text box around by clicking and holding the 4 arrow icon while dragging.Rotate a text box by clicking and holding the rotate arrow while moving your mouse.Change the width of a text box by clicking and holding either side of the text box and moving it outwards.
How do I change the font style, size, color, etc. in a text box?
Click on the text box > in the left hand window, you can change the font type, size, alignment, color, outline, etc. (if you cannot see this area, click “TEXT” in the popup menu for that text box).
How do I zoom in and out while editing a photo box?
- Zoom in: Select your image > Click PAN/ZOOM in the popup menuZoom out: Select your image > Click TRANSFORM in the popup menu

How do I delete a photo box?
Click on the photo box you want to delete > If you have an image placed inside, click EMPTY > Click DELETE (trash can icon).

How do I resize my photo box after placing a photo inside?
If you have placed an image into a photo box and try to adjust the photo’s height or width and it’s not working, try adjusting the image size by clicking and dragging one of the 4 corners. After making it larger, you will be able to adjust the height and/or width down to the size you need it to be.
How do I move a photo around within a photo box?
After placing a photo into a photo box, click on the photo > Click PAN/ZOOM > Now you can drag the image around within that photo box. To zoom back out, click TRANSFORM.
How do I make an image fill the page as a background?
Drag & drop your photo into the area you want it in > Click BACKGROUND in the popup menu for that photo box
To undo this feature, click MINIMIZE.
To undo this feature, click MINIMIZE.
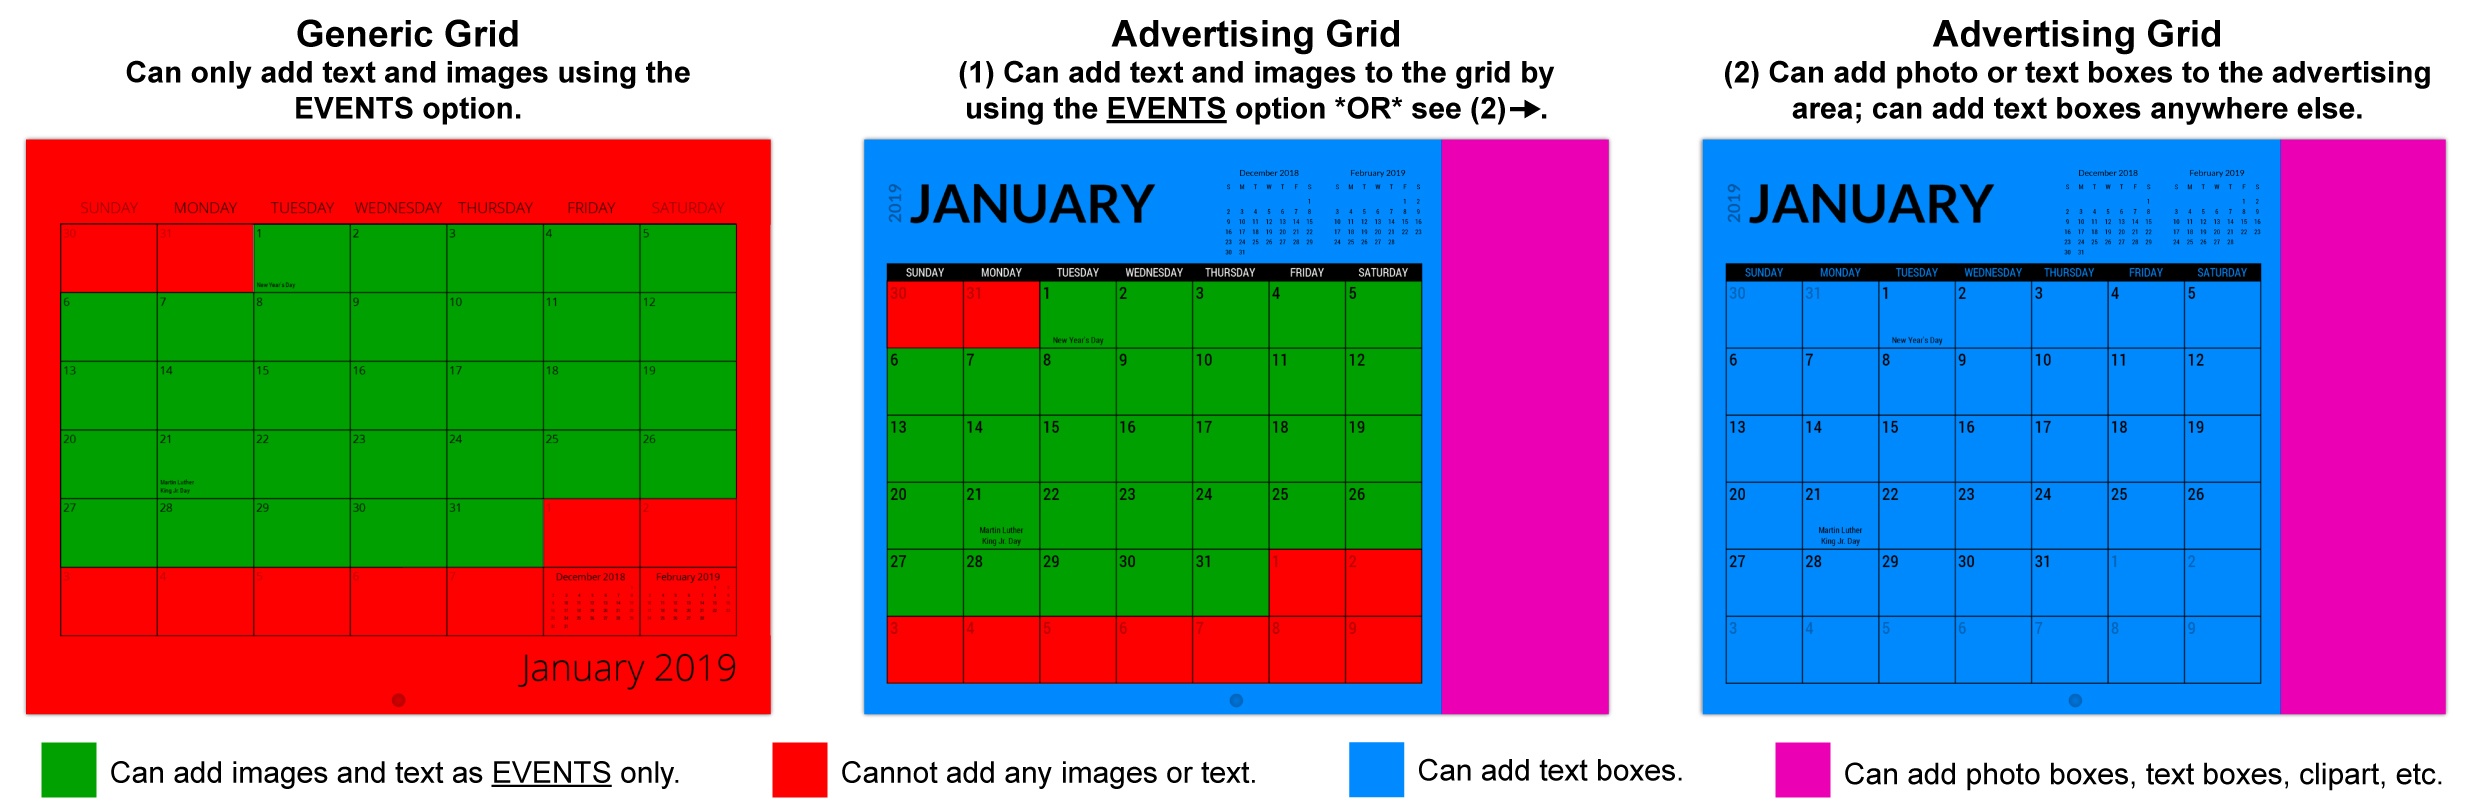
Can I make changes to the calendar grid or add photos and text to the white space around the calendar grid?
For the Generic Grid, you can add events, holidays and images to individual grid dates by selecting EVENTS. You cannot edit outside the grid area.
For the Advertising Grid, you can add events, holidays and images to individual grid dates by selecting EVENTS. You can also add text boxes anywhere on the grid, but not images. There is also space on the right side (11×8.5 and 8.5×5.5 calendars) or bottom (12×12 calendars) where you can place text and/or images.
For the Advertising Grid, you can add events, holidays and images to individual grid dates by selecting EVENTS. You can also add text boxes anywhere on the grid, but not images. There is also space on the right side (11×8.5 and 8.5×5.5 calendars) or bottom (12×12 calendars) where you can place text and/or images.
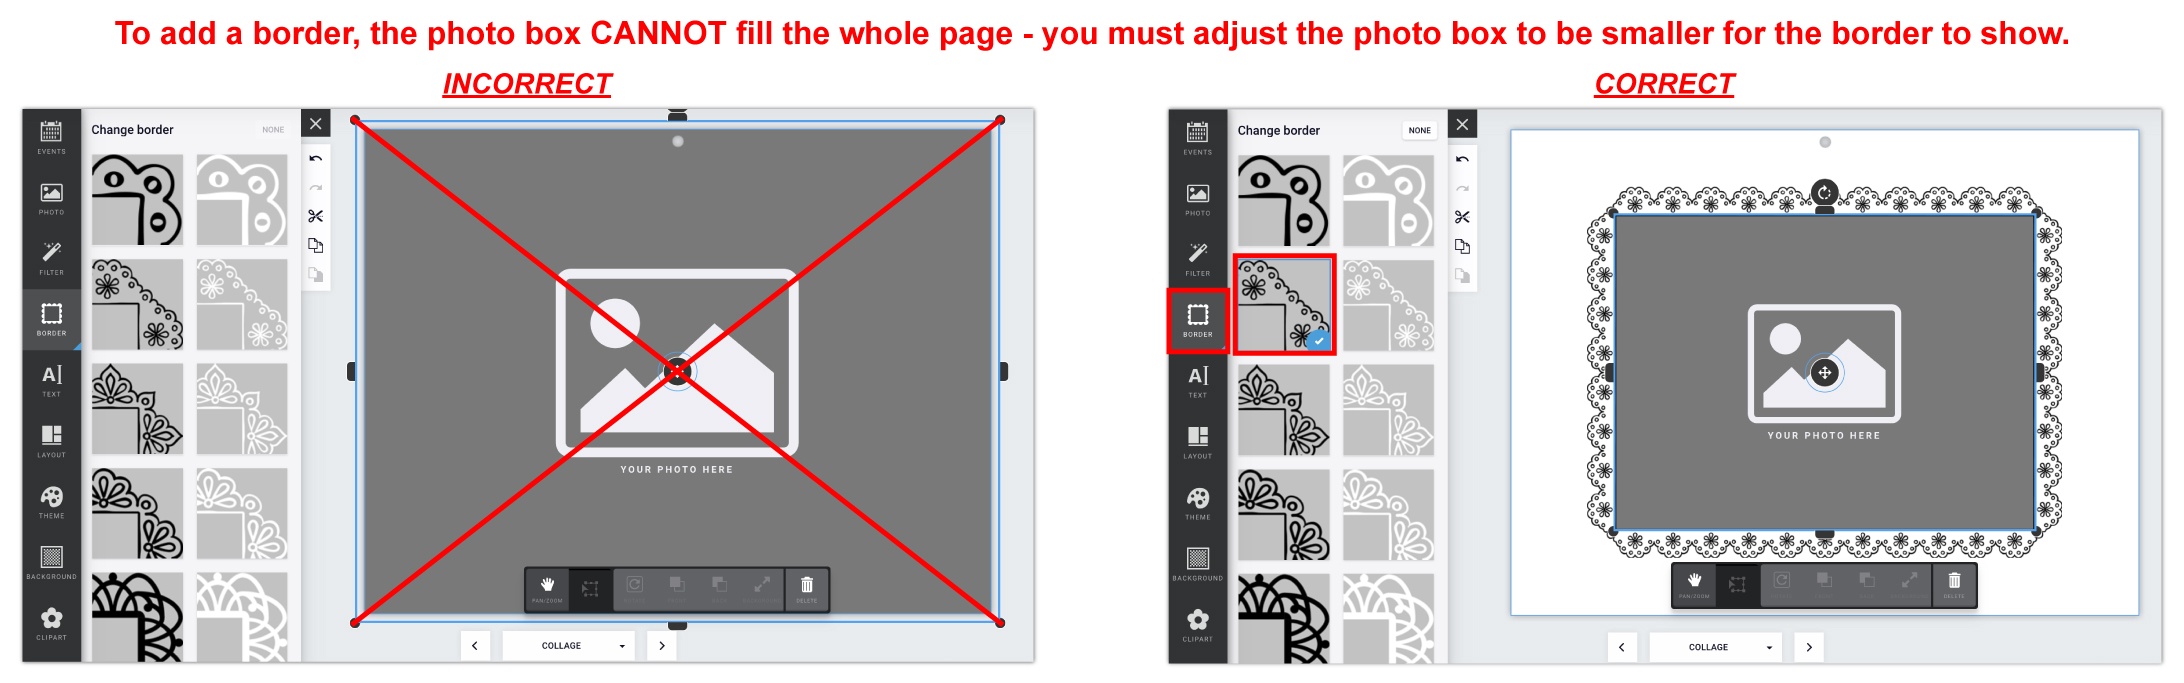
How do I add a border around my photos?
In order to add a border to your photo, you must make sure the photo box is not filling the whole page. There must be enough space around the photo box on the page to show the border.
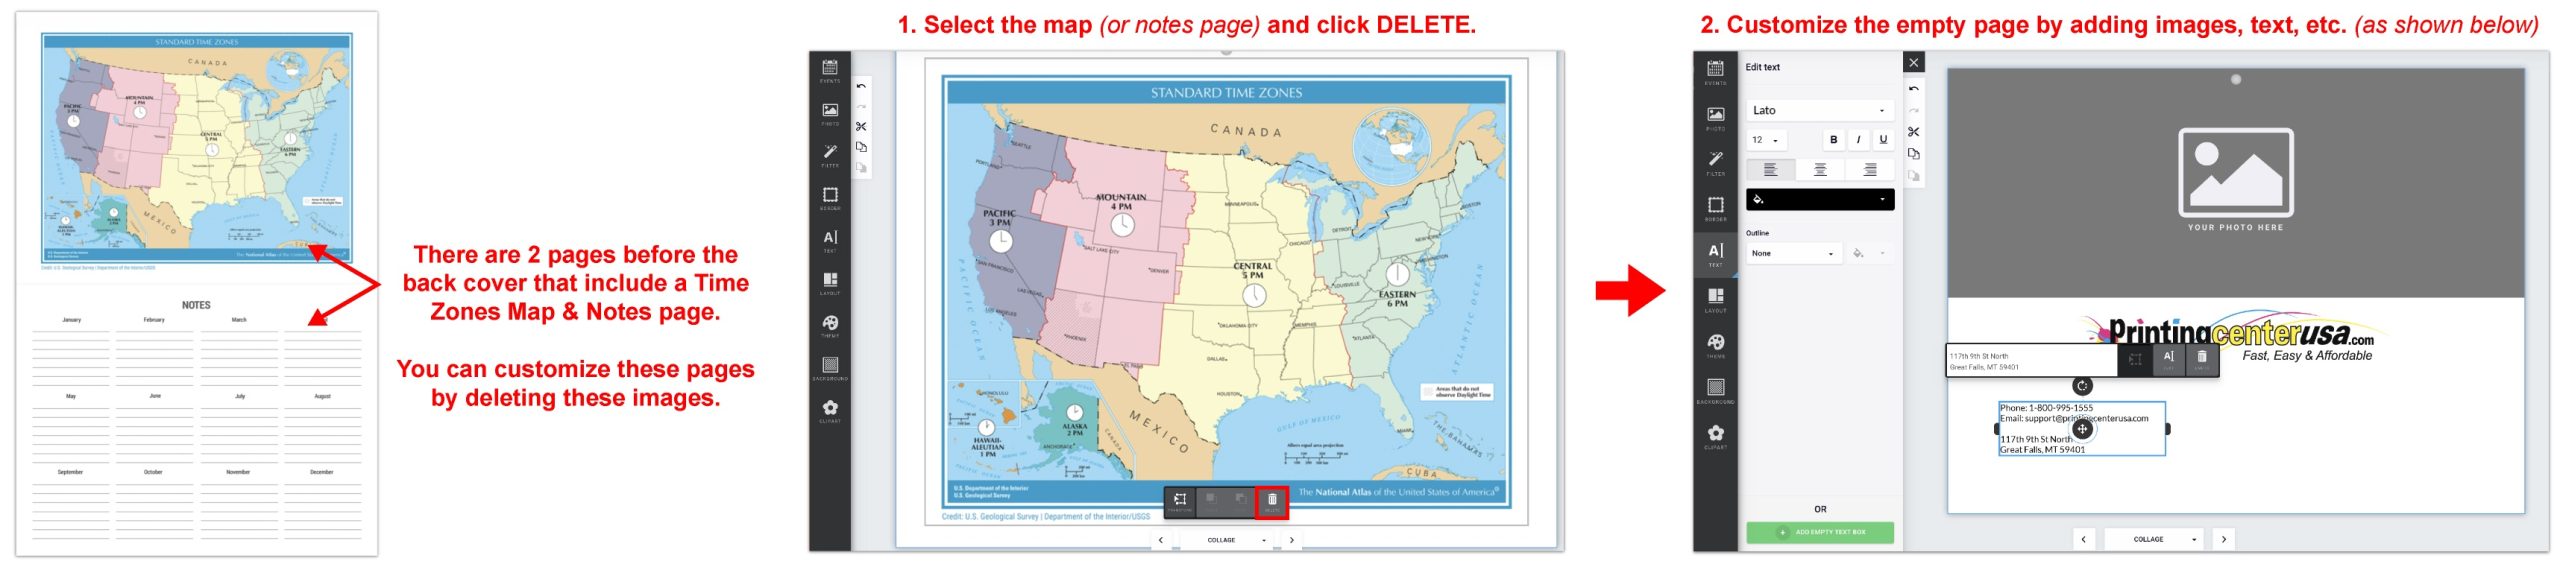
How can I design my own pages at the end (instead of using the Time Zones map and Notes page)?
In all designs, we have included 2 filler (collage) pages before the back cover. They include a Time Zones map and a Notes page. If you’d like to design your own, all you have to do is click on the Time Zones map and/or Notes page and click delete. Now you can add photo boxes and text boxes to the pages however you’d like.
What are the dimensions for the advertising area on the Advertising Grid?
In all designs, we have included 2 filler (collage) pages before the back cover. They include a Time Zones map and a Notes page. If you’d like to design your own, all you have to do is click on the Time Zones map and/or Notes page and click delete. Now you can add photo boxes and text boxes to the pages however you’d like.
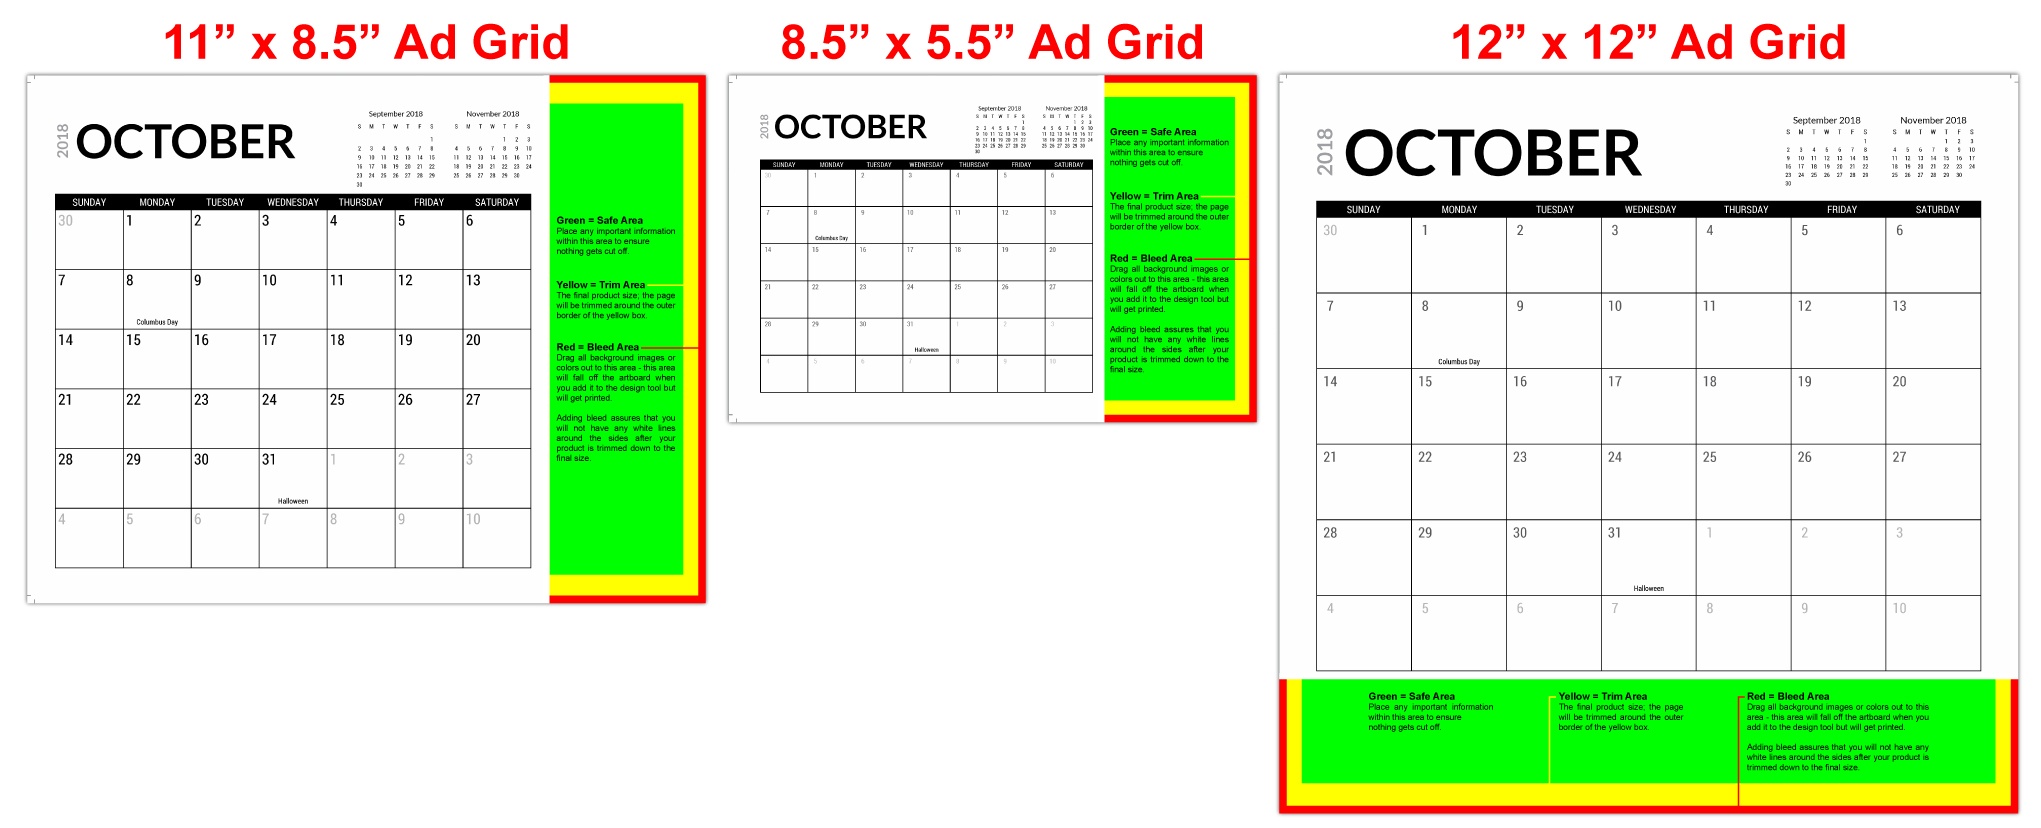
- 11×8.5: 777 x 2625px (with bleed) — Click here to download the 11×8.5 ad space template8.5×5.5: 756 x 1725px (with bleed) — Click here to download the 8.5×5.5 ad space template12x12: 3675 x 666px (with bleed) — Click here to download the 12×12 ad space template
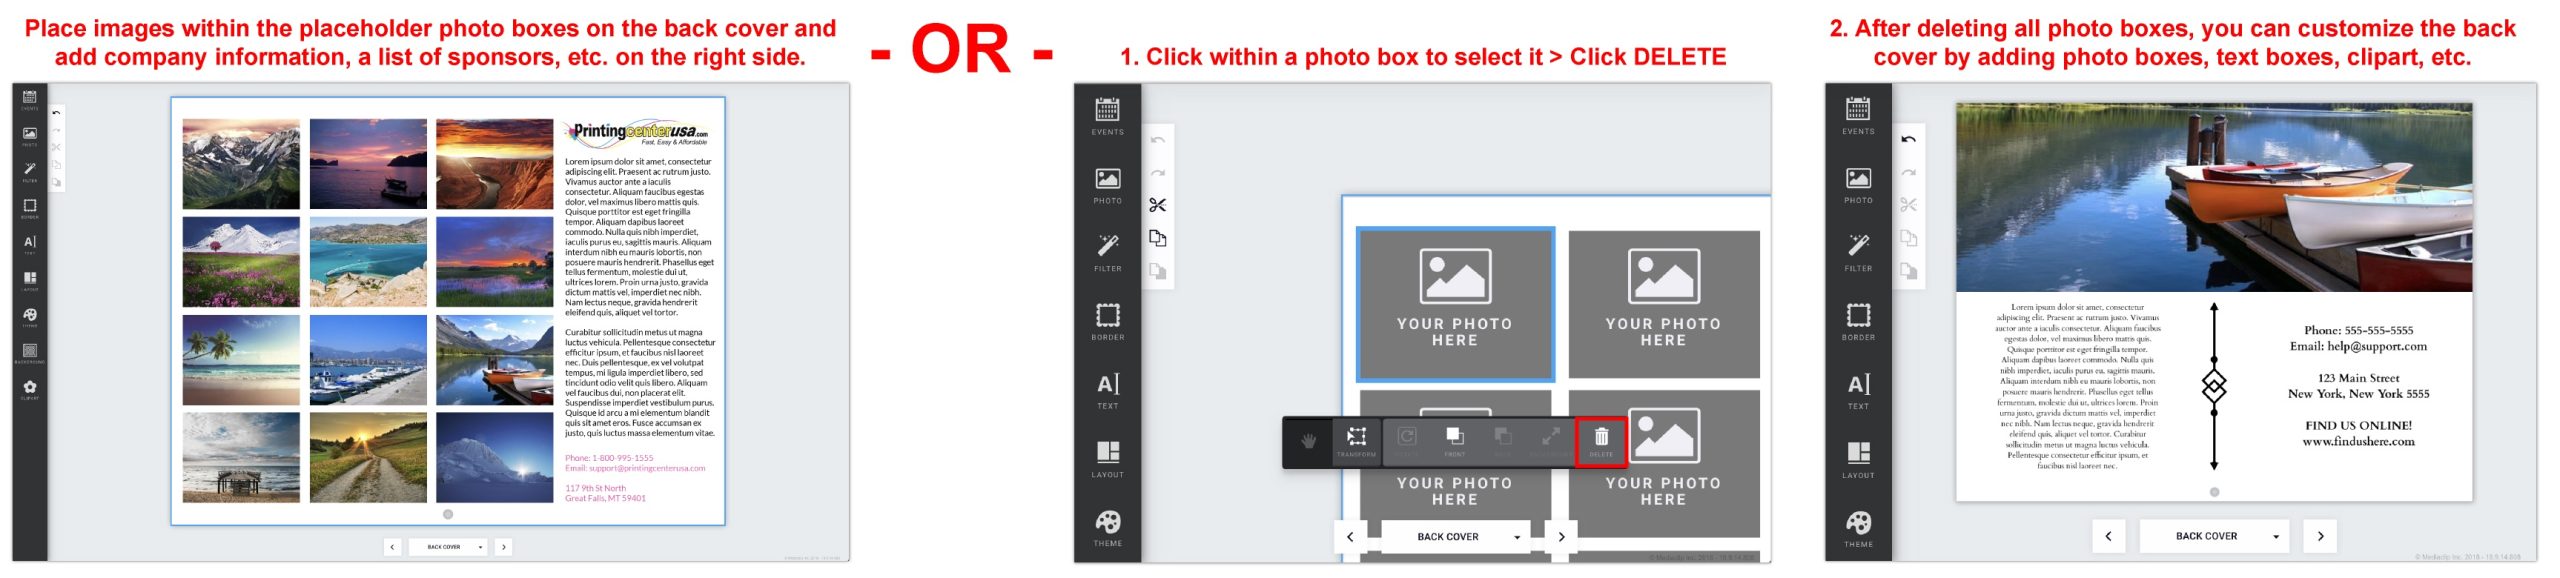
Can I design my own custom back cover?
Each back cover has pre-placed photo boxes depending on the number of months you selected. For example, a 12-month calendar has 12 photo boxes so you can add in the same images you used throughout your calendar for each month. We also left empty space so that you can add in your business information, contact information, a list of sponsors, etc.
Note: On the back cover, if you leave the empty area on the right blank, it will print blank. We will not pre-populate that area for you.
If you would like to customize your back cover, all you have to do is delete the photo boxes on that page. From there, you can add your own photos, text boxes, background, clipart, etc.
Greeting Card Maker
Do I have to design the inside of my card?
No! If you just want a design on the outside of your greeting card, leave the insides blank and choose (4/0) Color Front / Empty Back as your Ink Color in the pricing tool at checkout.

What type of images should I use?
Please use images saved as RGB images for best result. CMYK images can have some color shifts during rendering FULL COLOR FILES ONLY. NO BLACK AND WHITE. All black and white files will render as full color builds. There is no option for black ink only when using our online design tool.

If you are starting a design before creating an account please note that the pictures that you upload and use in your design will be saved to your design. Any pictures that are uploaded that are not used in the design are not saved because there is no account to save them to.
Be sure to register an account when working on a design and save your design to your account (if you’re in the design tool and want to save or login: Click SAVE > Name Your Design > Login or Create an Account and after you will be redirected back to your design).
If you are starting a design before creating an account please note that the pictures that you upload and use in your design will be saved to your design. Any pictures that are uploaded that are not used in the design are not saved because there is no account to save them to.
Be sure to register an account when working on a design and save your design to your account (if you’re in the design tool and want to save or login: Click SAVE > Name Your Design > Login or Create an Account and after you will be redirected back to your design).
Where can I find my previously uploaded photos?

What do I do if my picture is low resolution?
How do I add image placeholders?
How do I add a text box?
Click TEXT > Click ADD EMPTY TEXT BOX button at the bottom > Enter your text into the white text box that says “Add text (optional).”
- Move a text box around by clicking and holding the 4 arrow icon while dragging.Rotate a text box by clicking and holding the rotate arrow while moving your mouse.Change the width of a text box by clicking and holding either side of the text box and moving it outwards.
How do I change the font style, size, color, etc. in a text box?
Click on the text box > in the left hand window, you can change the font type, size, alignment, color, outline, etc. (if you cannot see this area, click “TEXT” in the popup menu for that text box).

How do I zoom in and out while editing a photo box?
- Zoom in: Select your image > Click PAN/ZOOM in the popup menuZoom out: Select your image > Click TRANSFORM in the popup menu

How do I delete a photo box?
Click on the photo box you want to delete > If you have an image placed inside, click EMPTY > Click DELETE (trash can icon).

How do I resize my photo box after placing a photo inside?
If you have placed an image into a photo box and try to adjust the photo’s height or width and it’s not working, try adjusting the image size by clicking and dragging one of the 4 corners. After making it larger, you will be able to adjust the height and/or width down to the size you need it to be.
How do I move a photo around within a photo box?
After placing a photo into a photo box, click on the photo > Click PAN/ZOOM > Now you can drag the image around within that photo box. To zoom back out, click TRANSFORM.
How do I make an image fill the page as a background?
Drag & drop your photo into the area you want it in > Click BACKGROUND in the popup menu for that photo box
To undo this feature, click MINIMIZE.
To undo this feature, click MINIMIZE.