Skip to content Skip to main navigation Skip to footer

Tag: tutorials-body

File Preparation | Bleeds | Publisher

Bleeds: Publisher

Checklist

  1. Open Page Setup
  2. Add Bleeds and Margins (Safety Lines)
  3. Use Rulers to Create a Trim Guide
  4. Utilizing the Bleed Line
  5. Utilizing the Margins (Safety Lines)

1. Open Page Setup

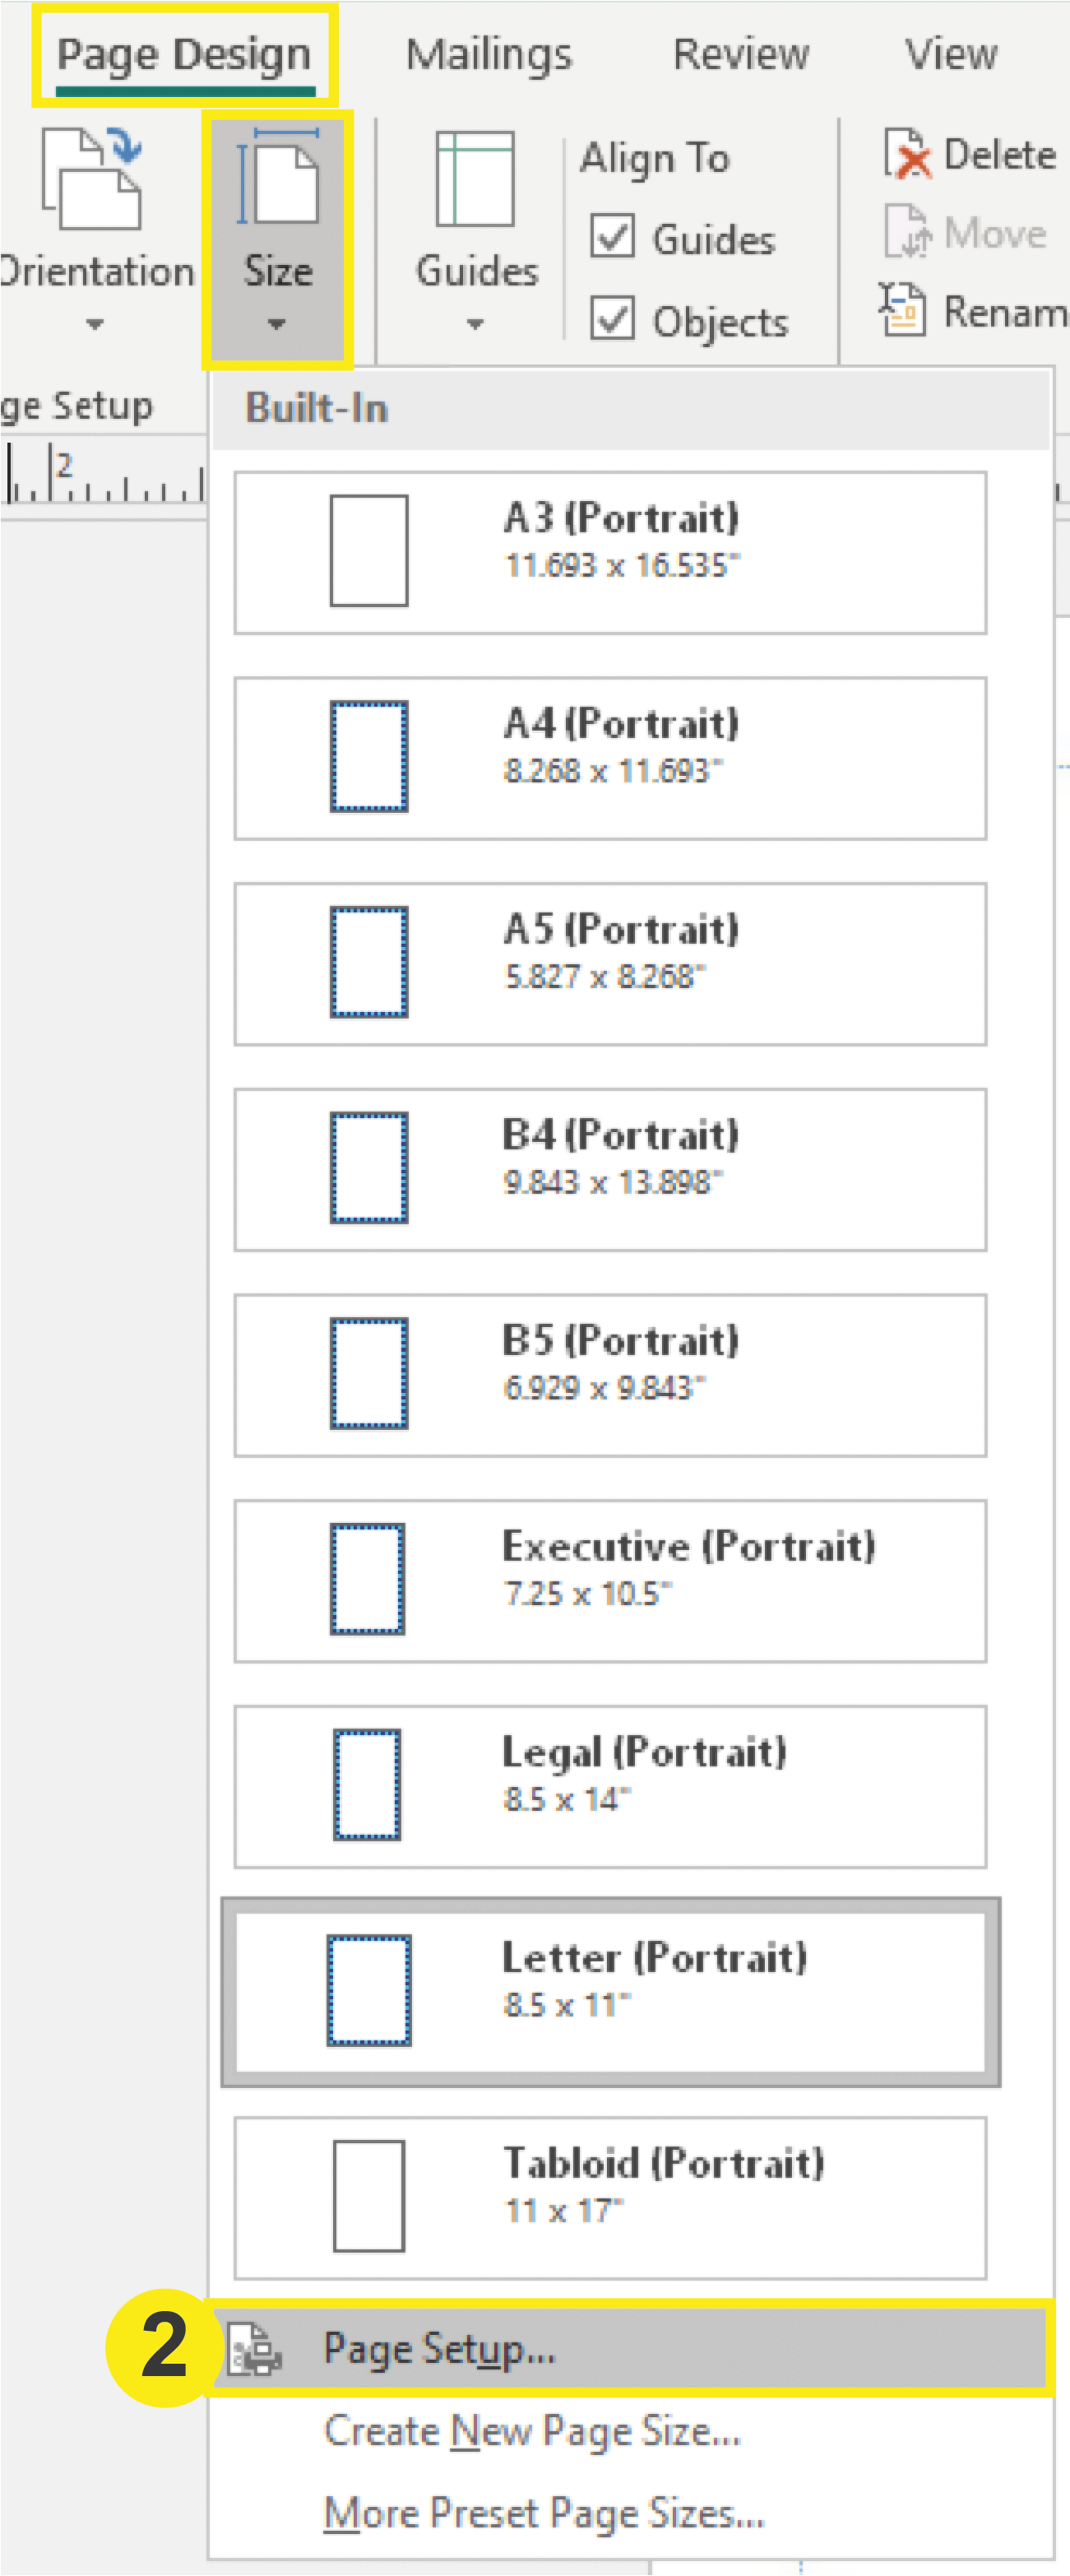
In the top menu, navigate to Page Design > Size > Page Setup.
This will prompt the Page Setup window to open where you will input your document settings.

2. Add Bleeds and Margins (Safety Lines)

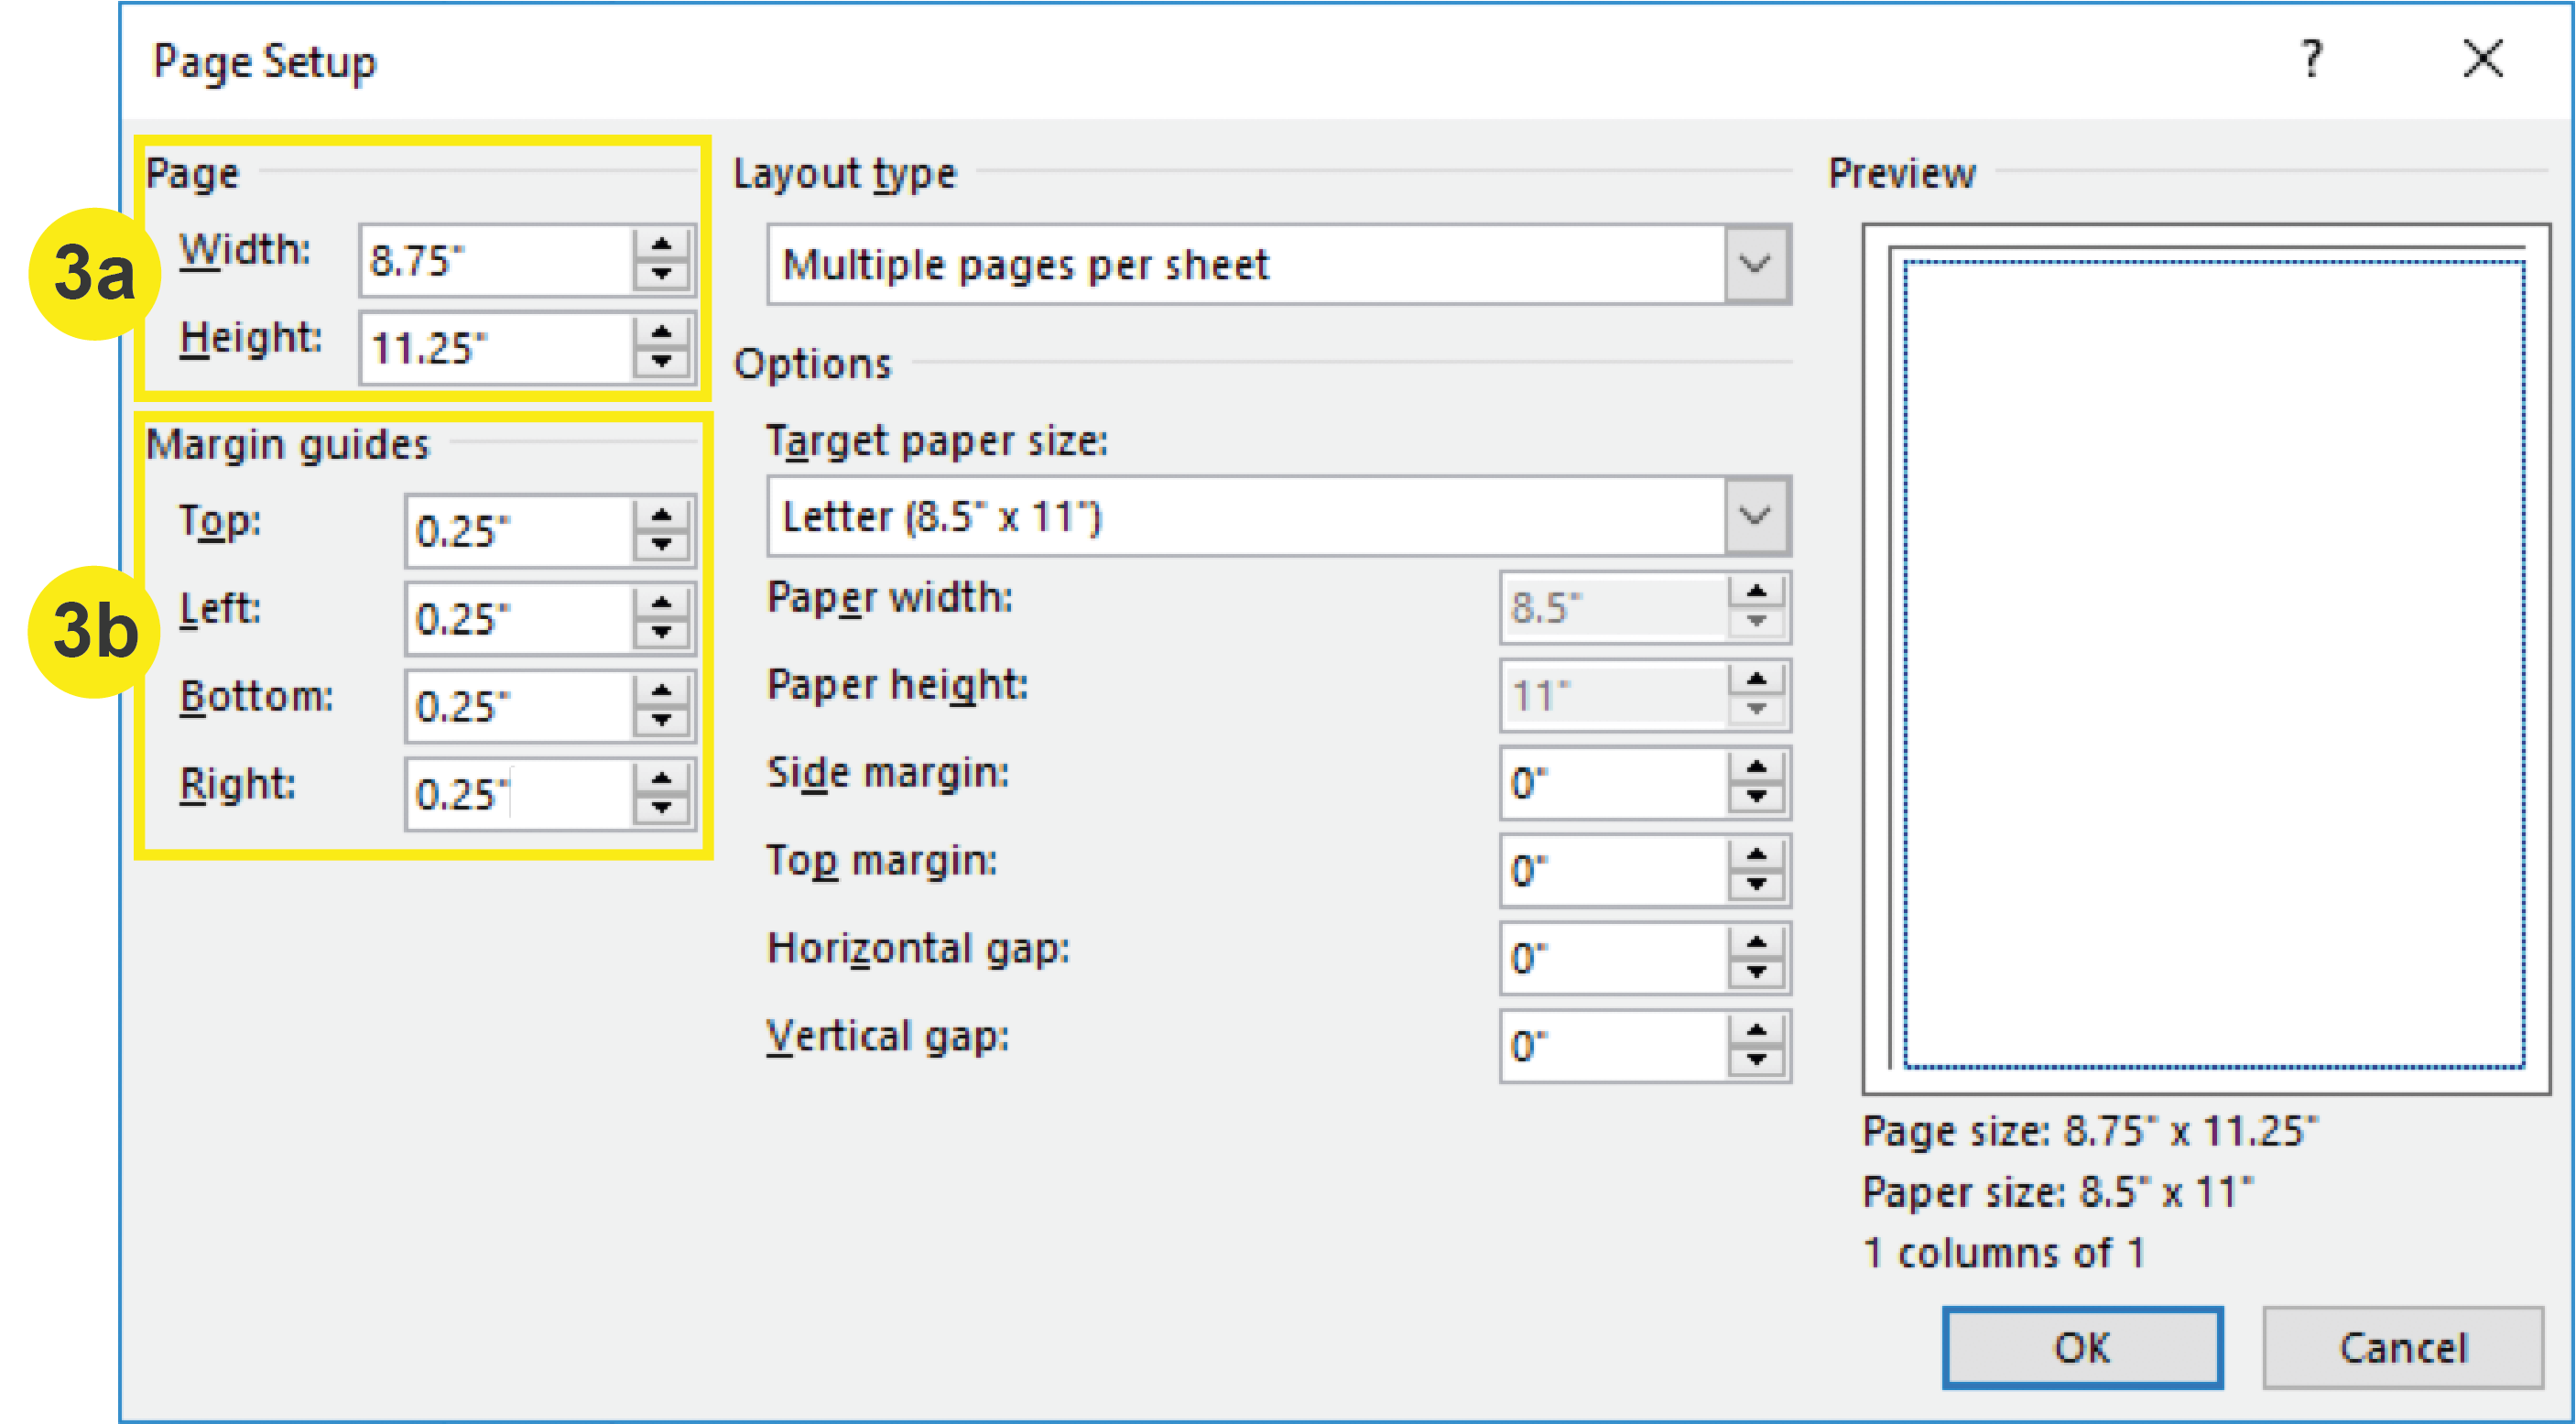
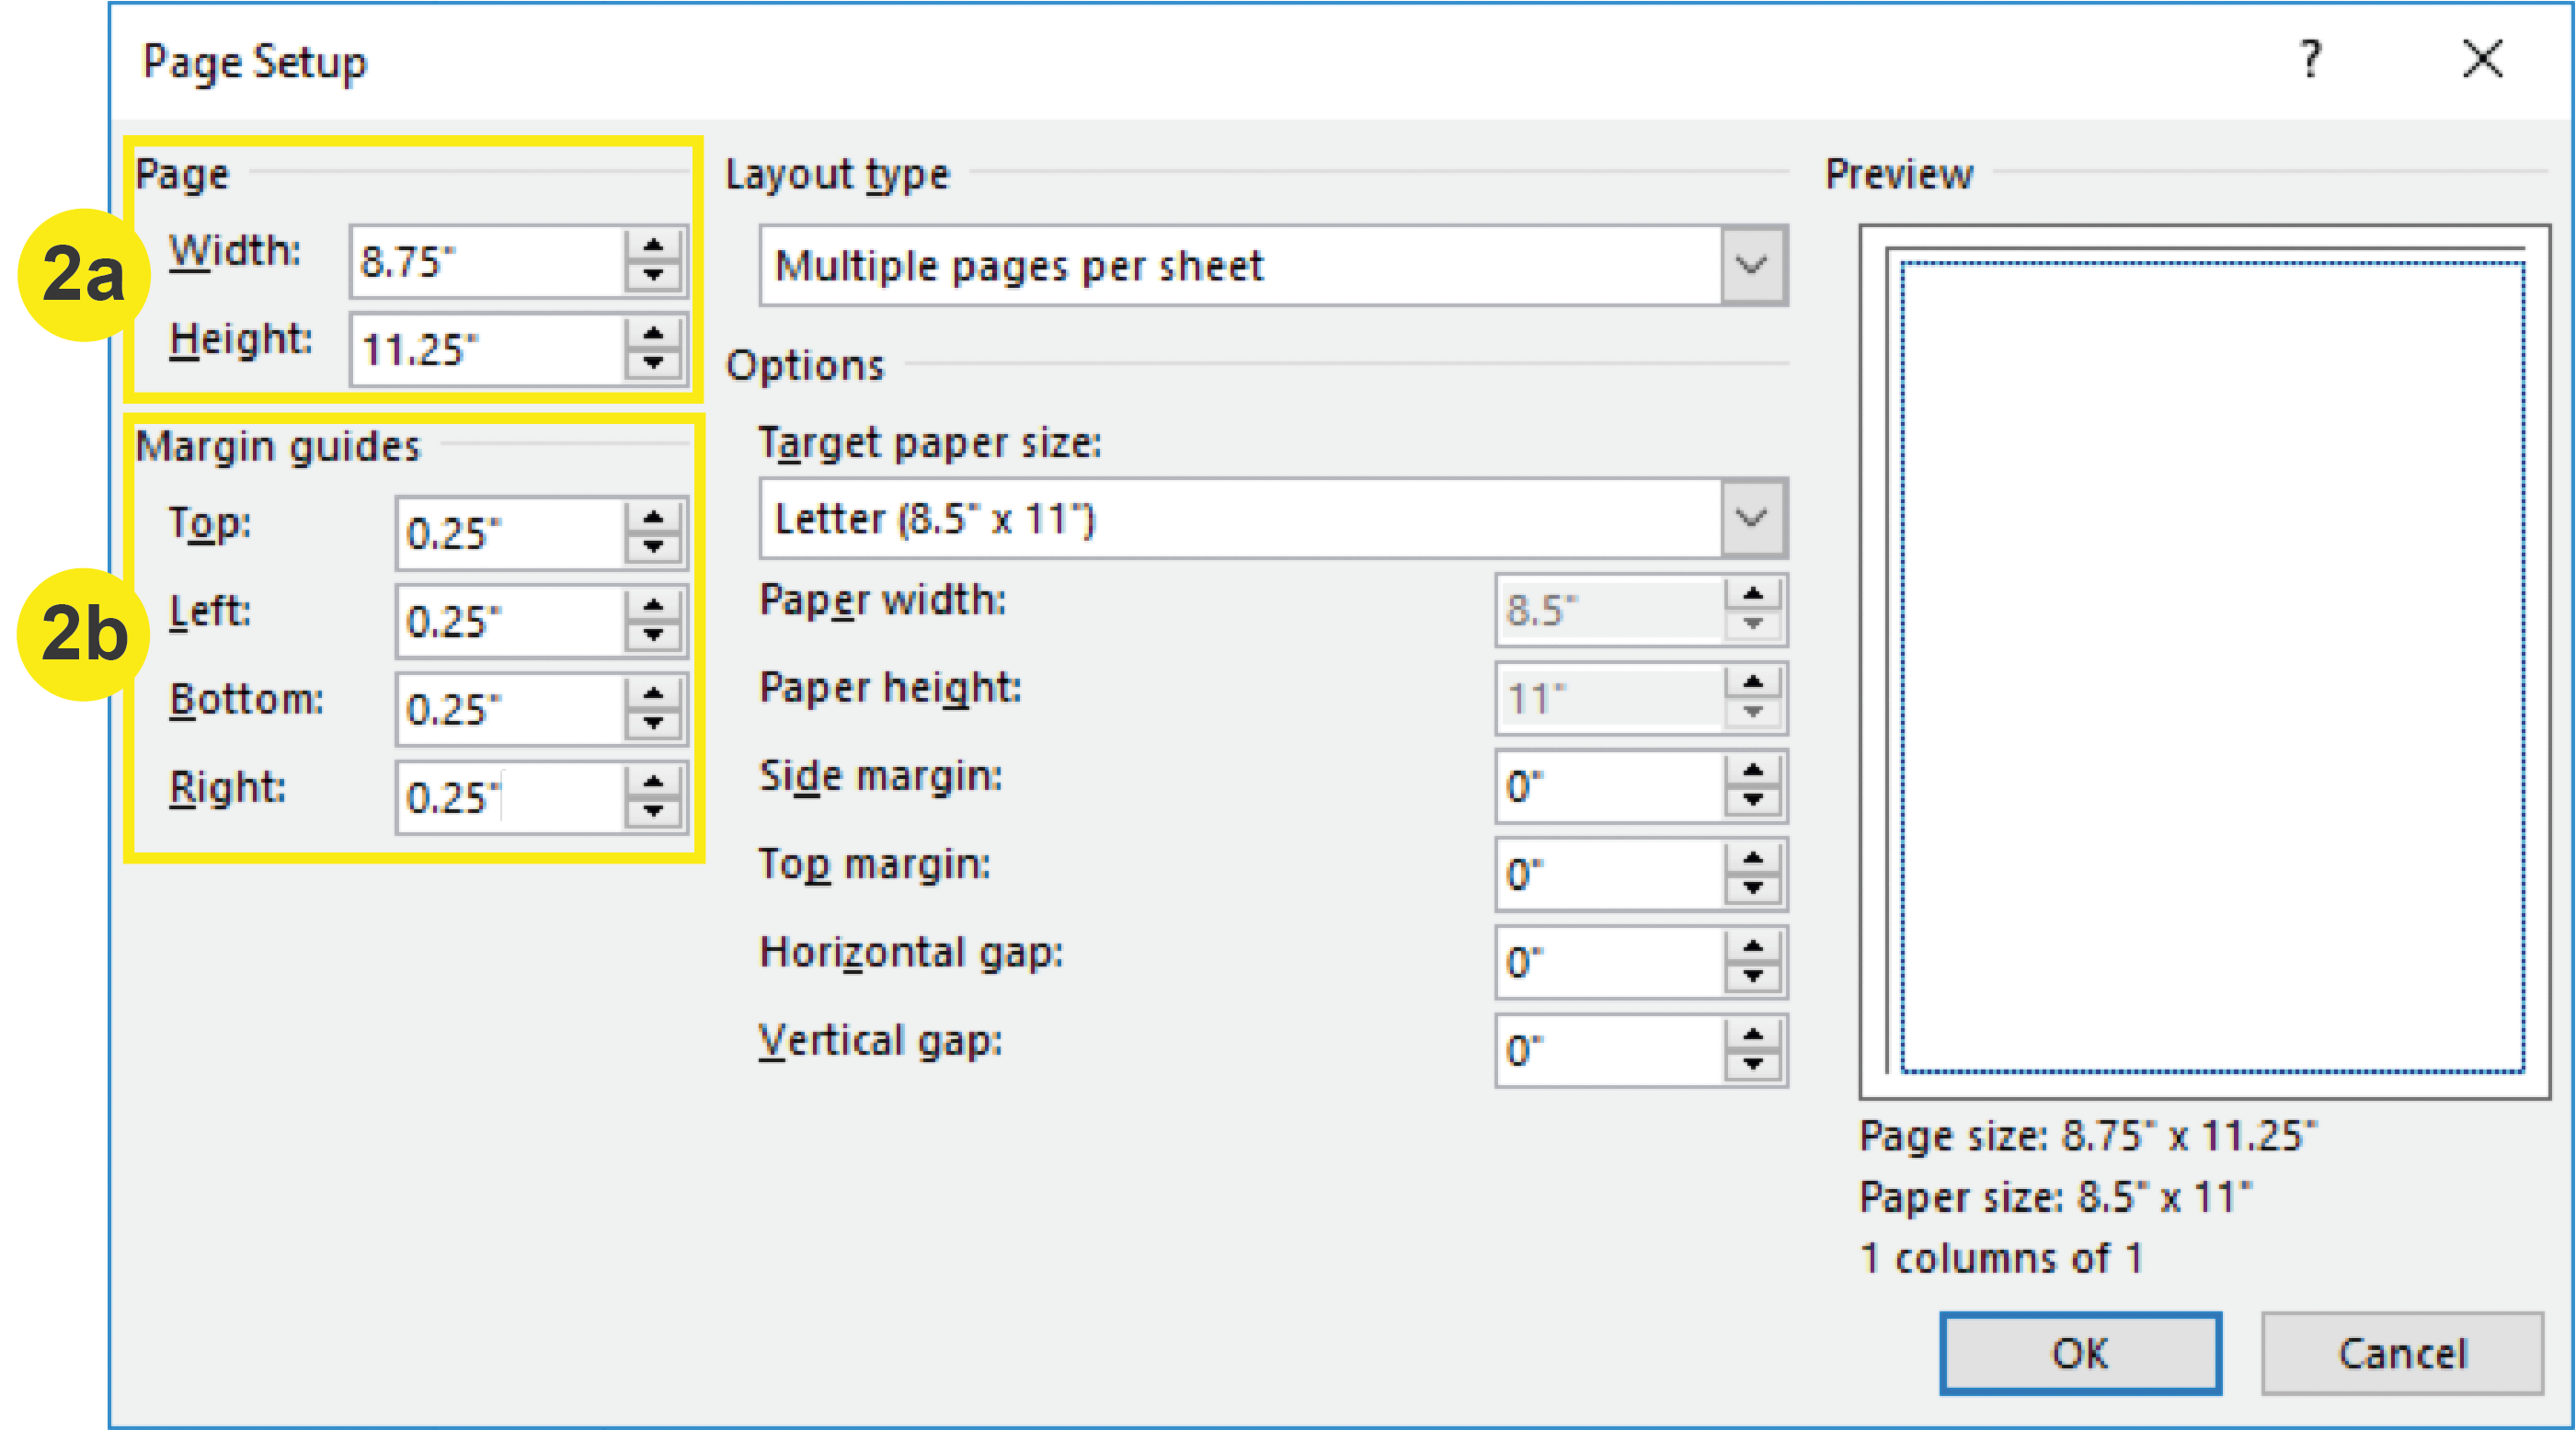
a. In the “Page” section, input the bleed size of your document. To determine the bleed size, add .25 inches to both the width and height. For Example: An 8.5” x 11” Letterhead plus bleed would be 8.75” x 11.25”

b. In the “Margin guides” section, change the value to .25 inches for each side (top, left, bottom, right). Click OK.
Note: Note that your Target Paper Size (Final Trim Size) remains 8.5” x 11”
Publisher_Page Setup

3. Use Rulers to Create a Trim Guide

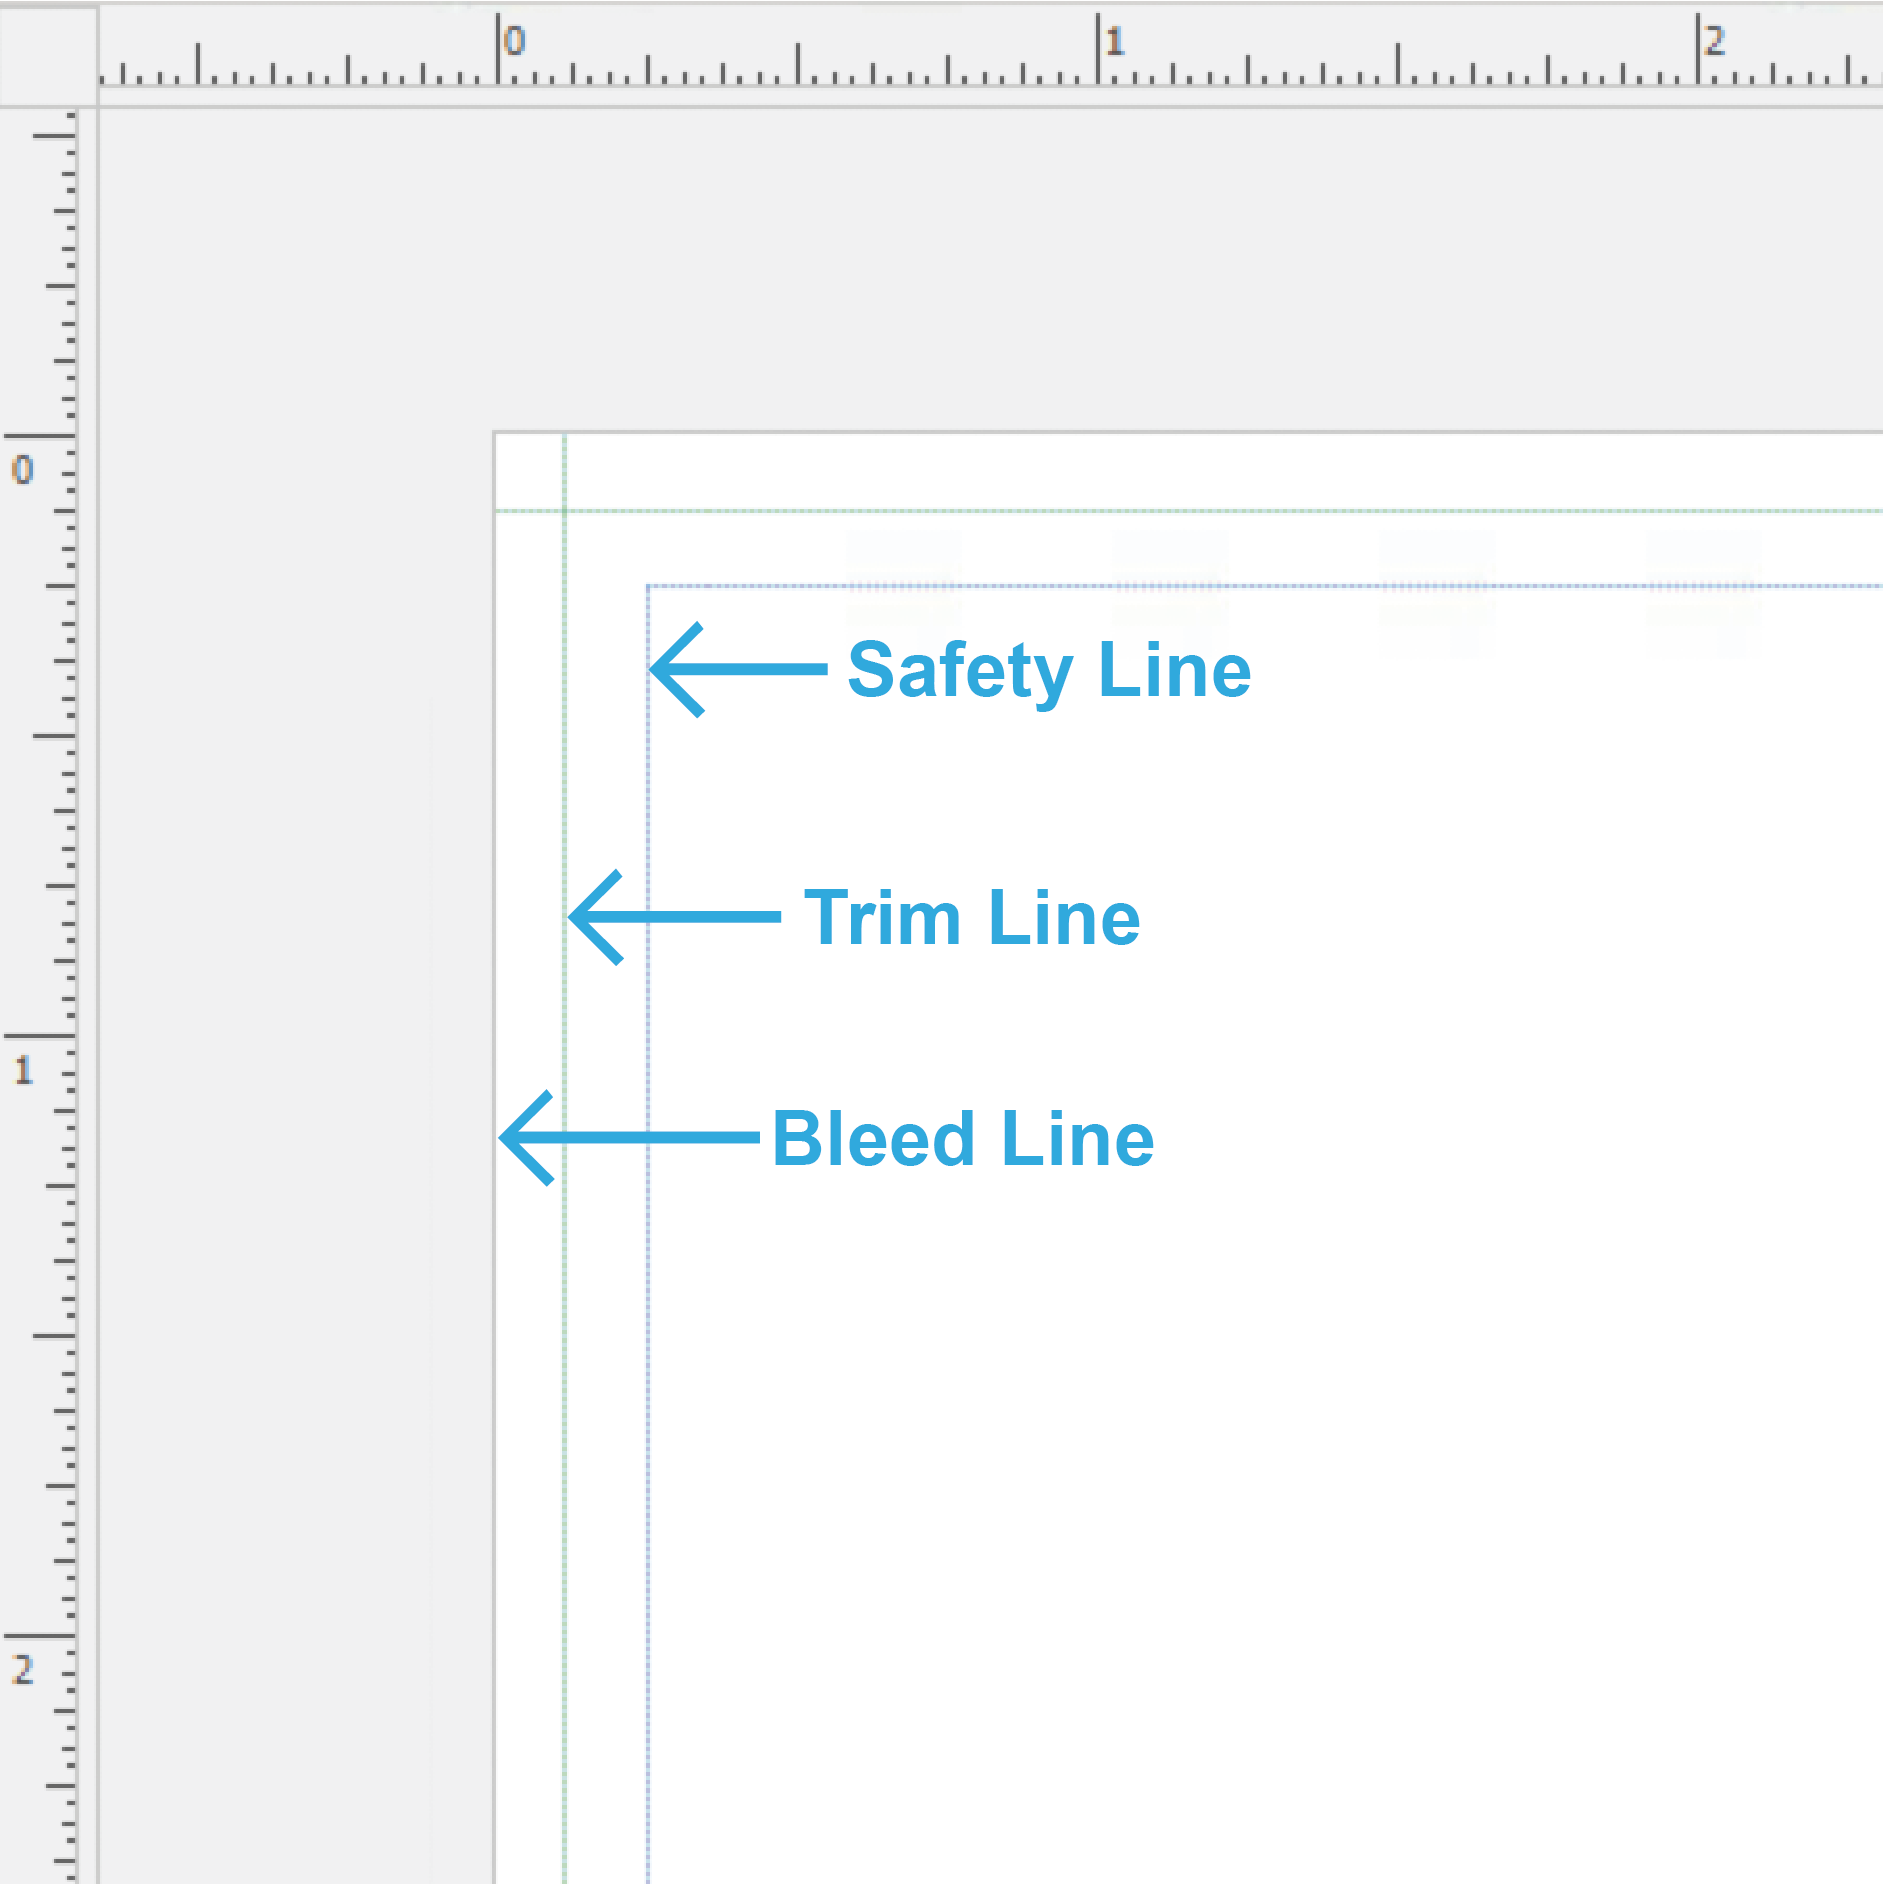
After adding bleed to and margins (safety lines) to your document, you still will not be able to see where your trim line will be. To add a Trim Guide to your document, Click + Drag your mouse from the rulers to create a .125 inch guide within the document. This should fall directly between the edge of the document and the innermost margins (safety lines).
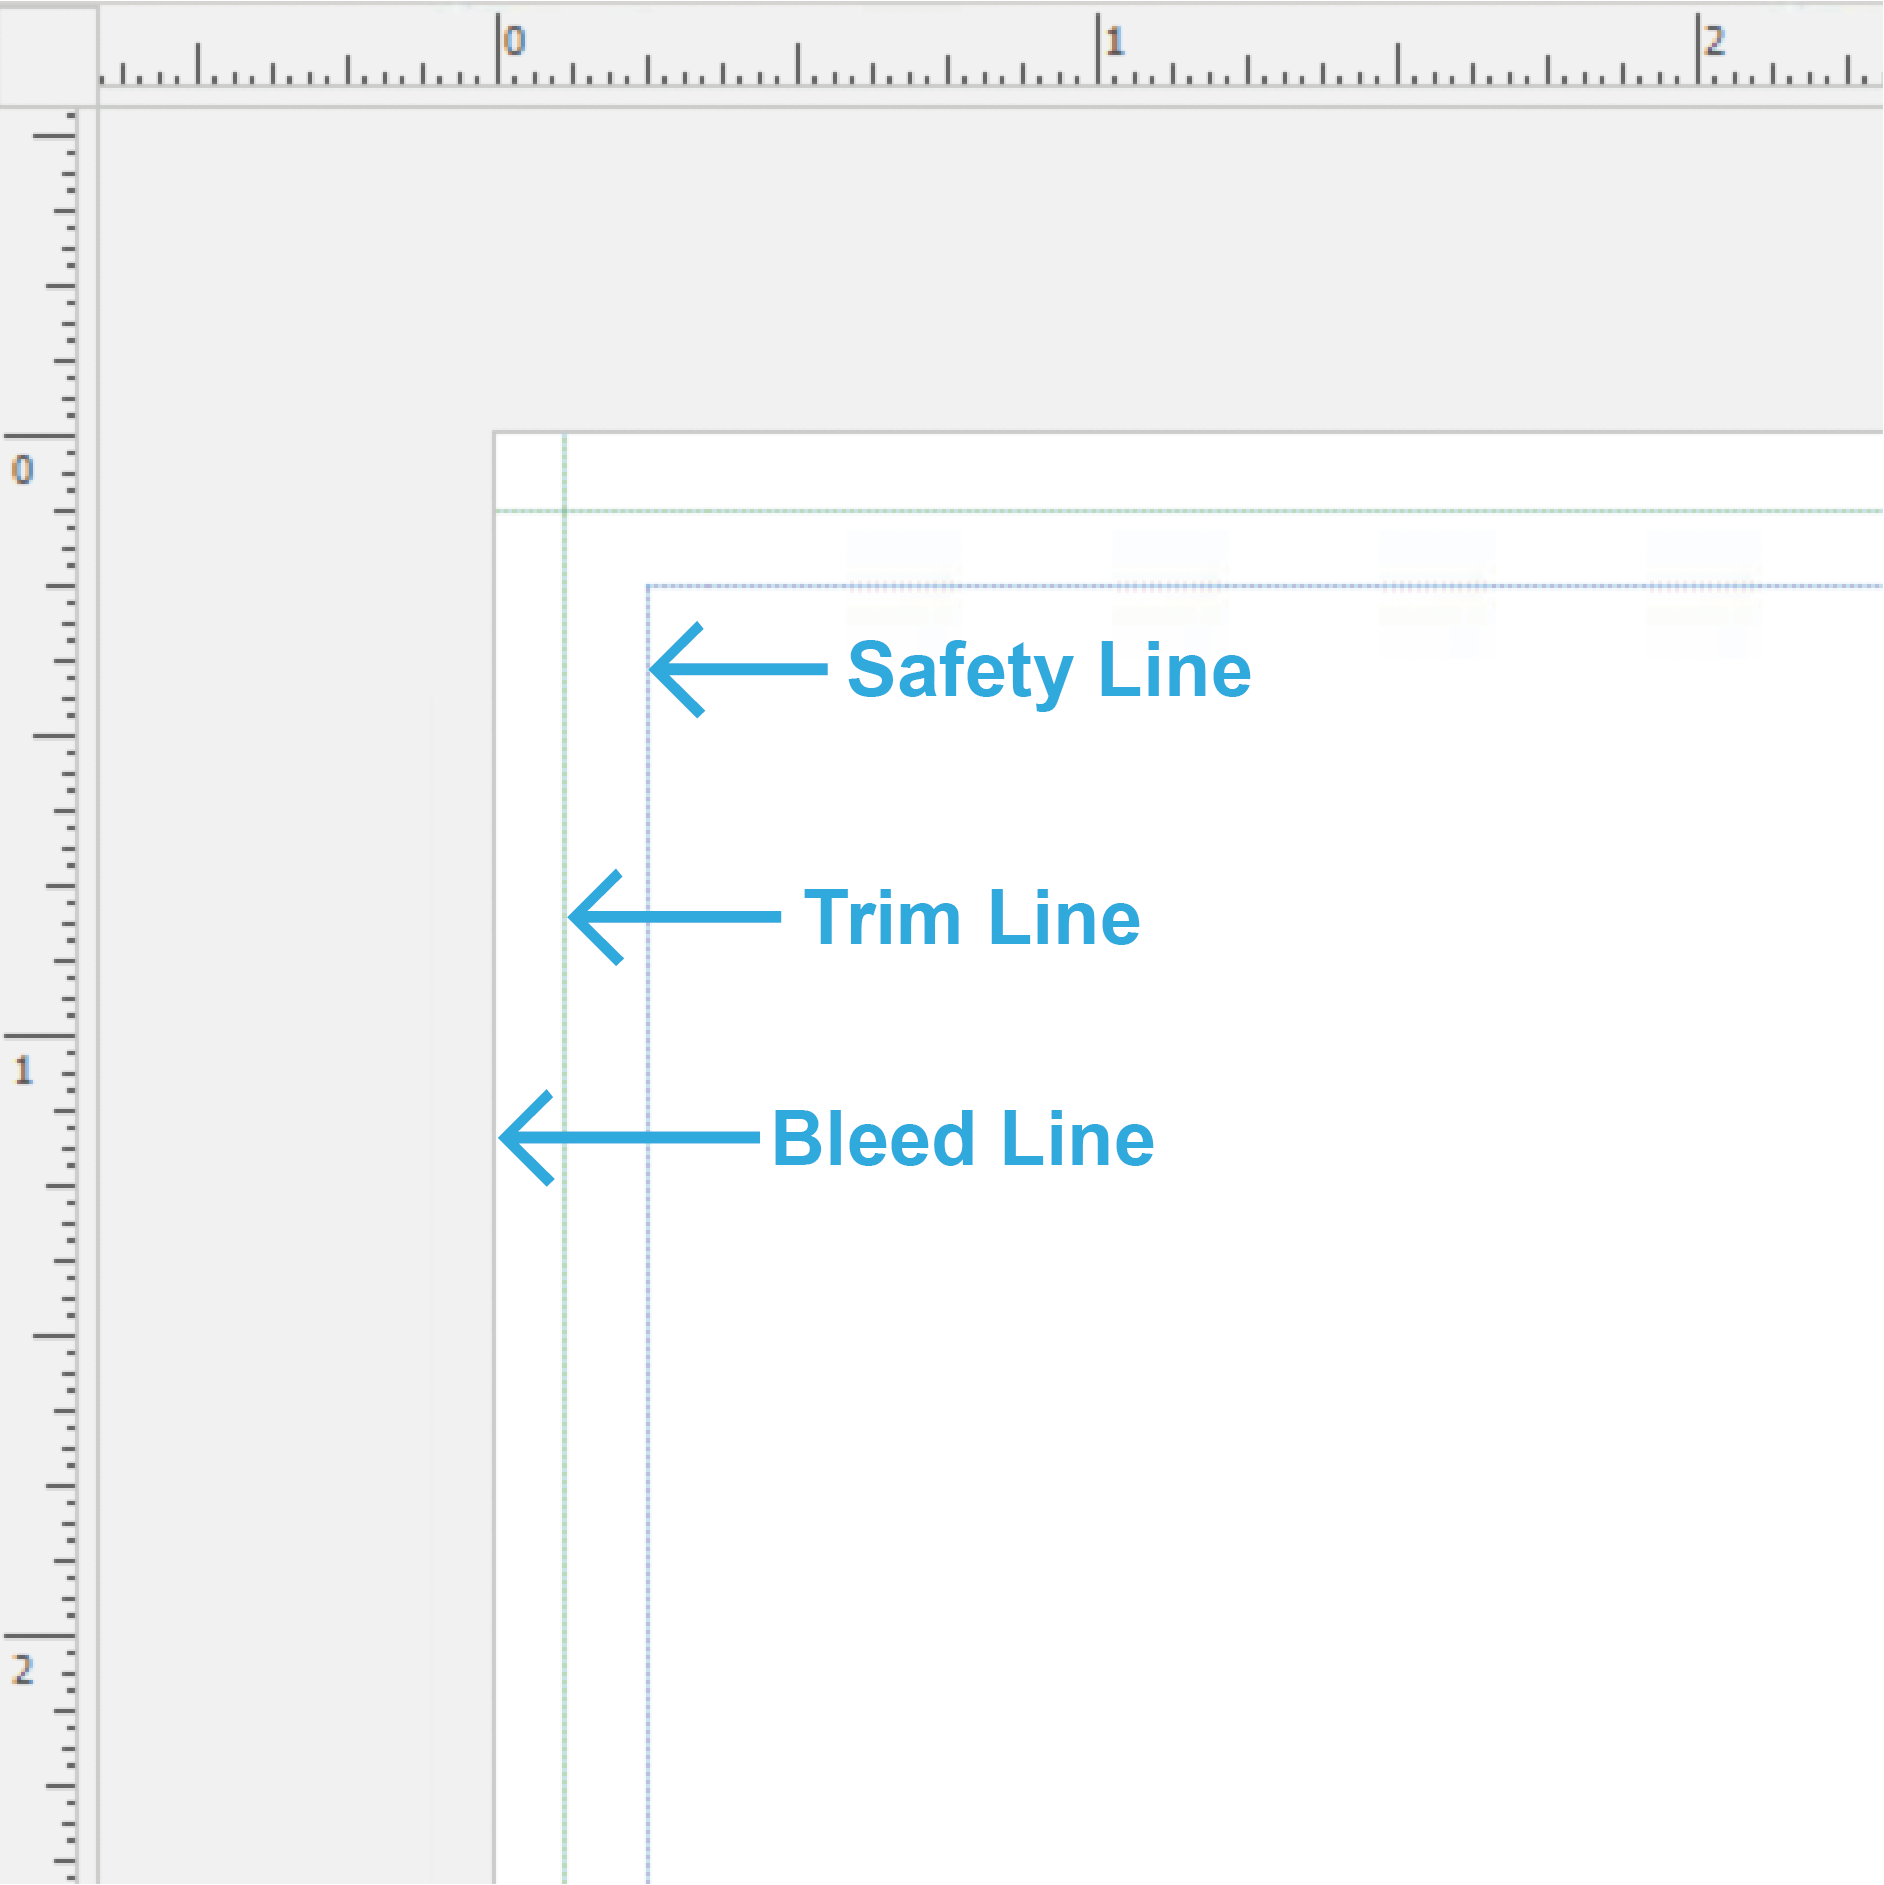
Publisher_Safety_Trim_Bleed

4. Utilizing the Bleed Line

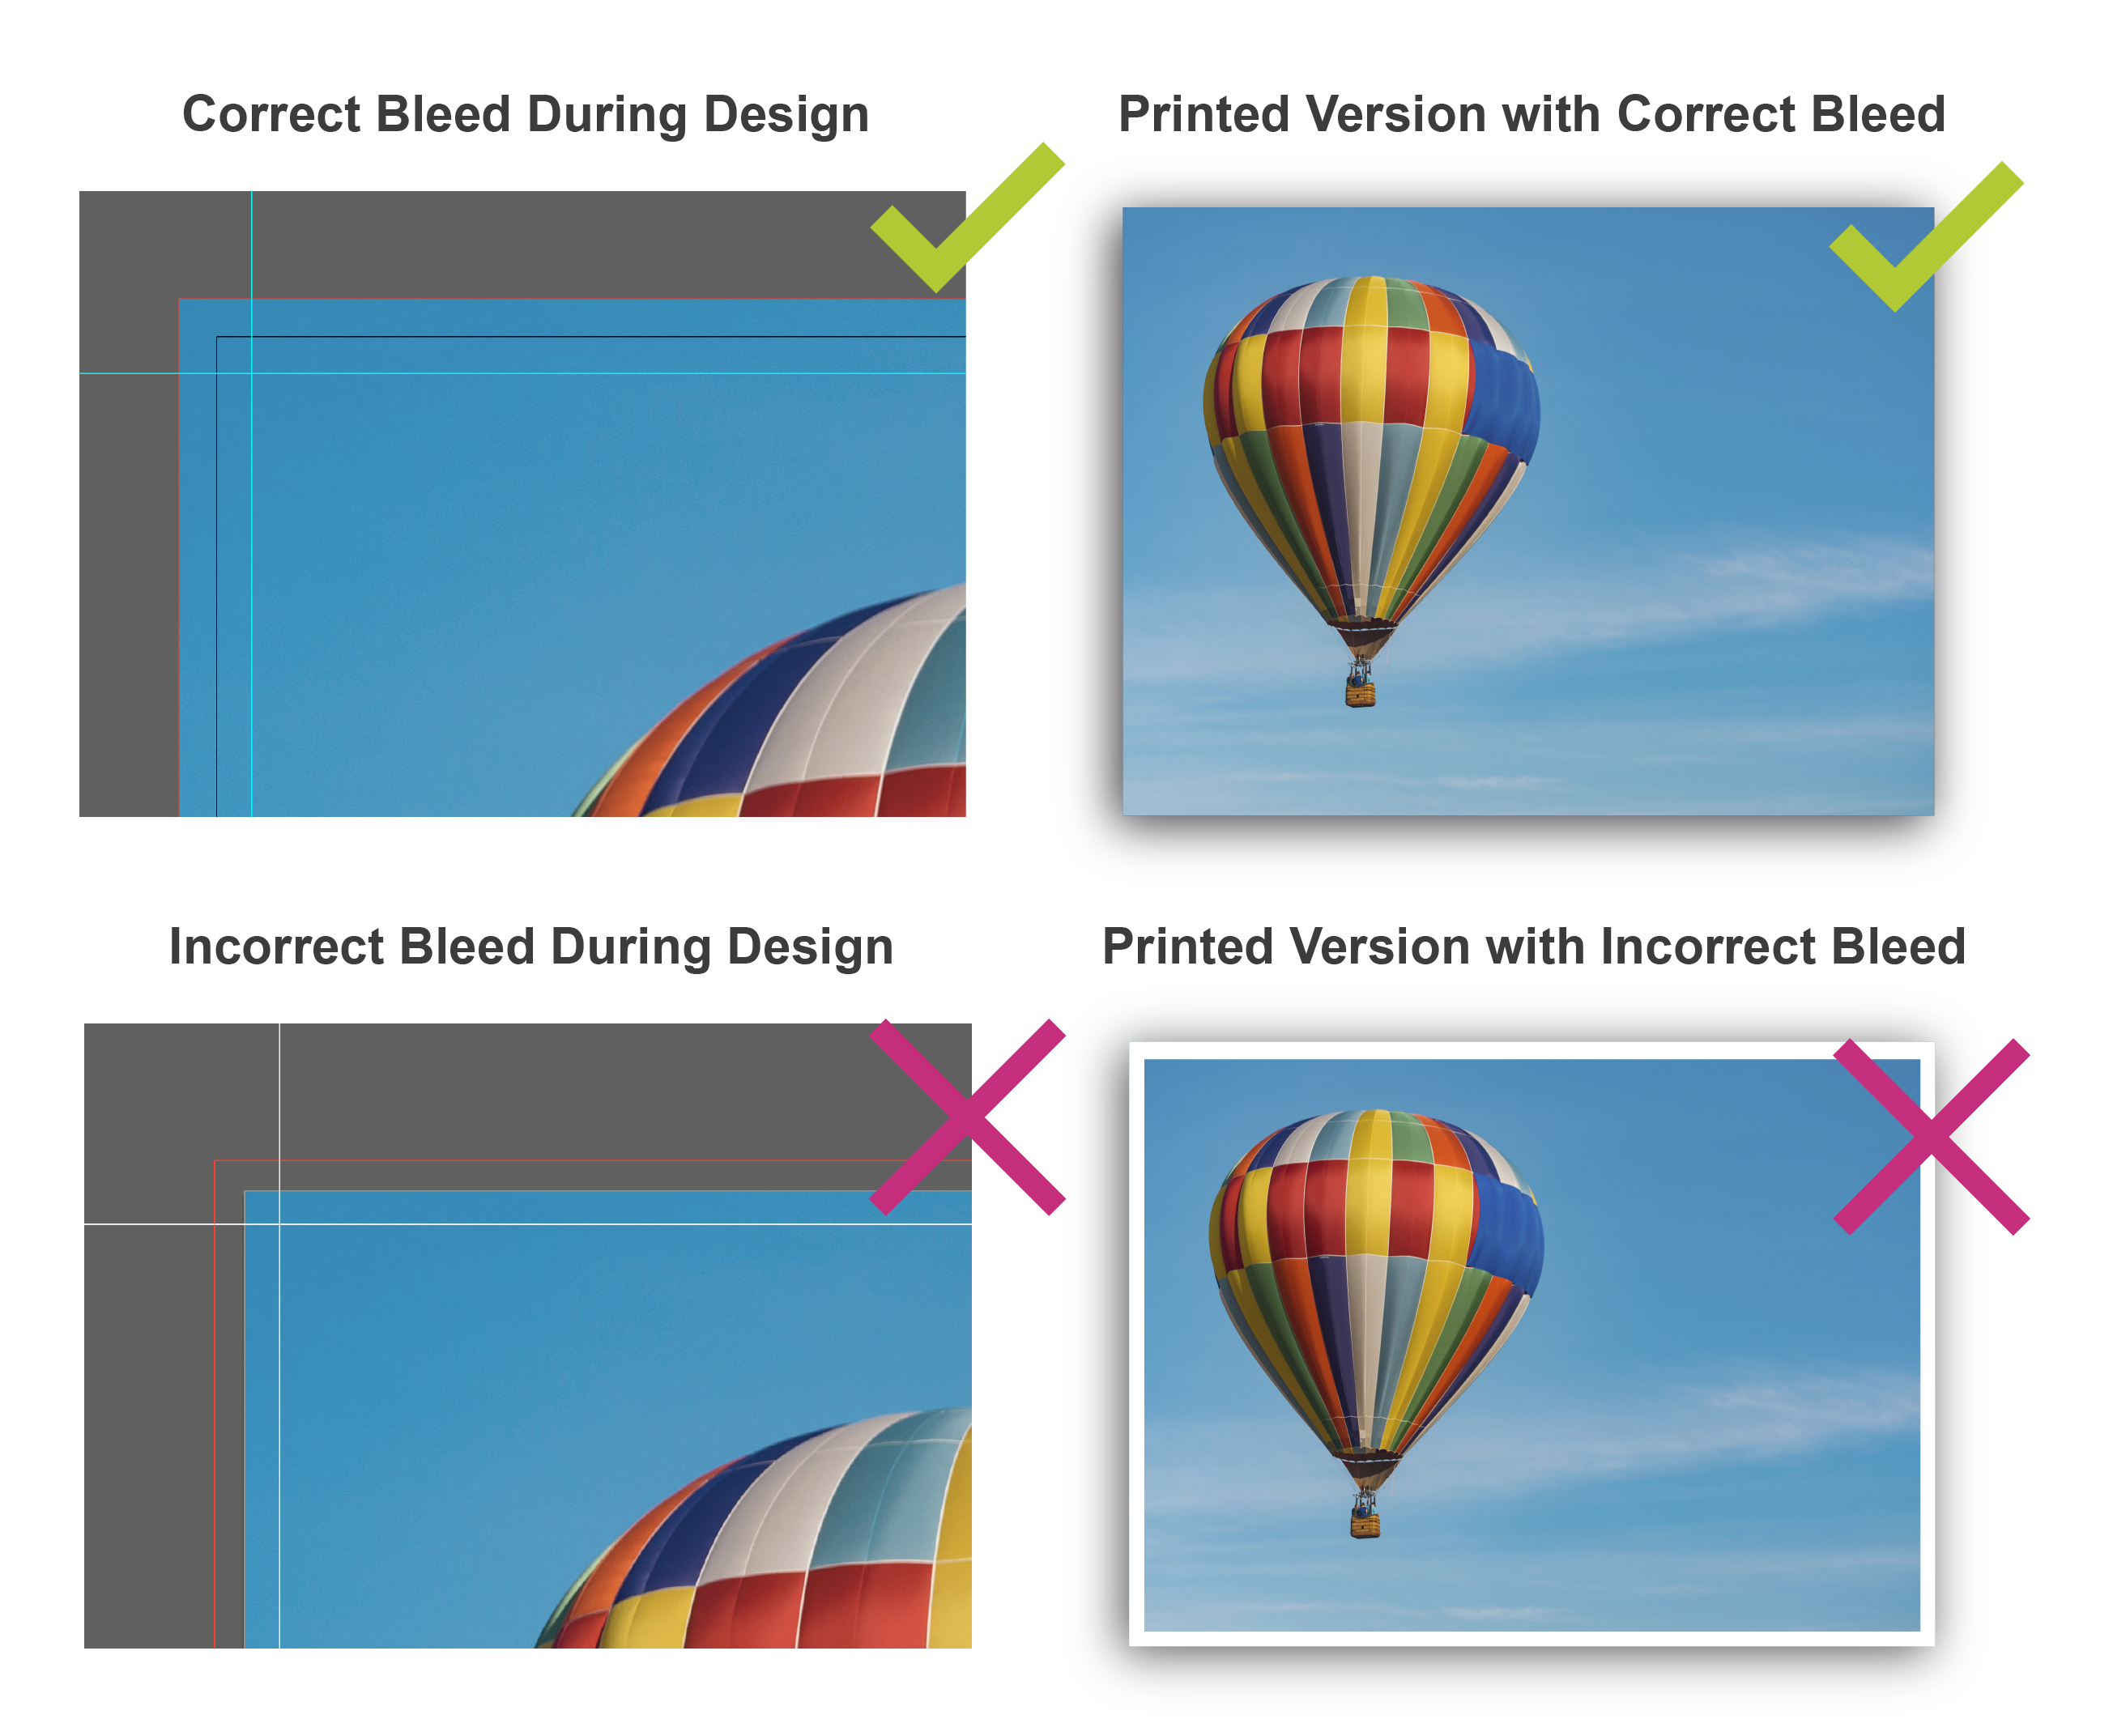
To utilize your bleeds when designing, extend your graphics and/or images (that you want to print up to the edge) beyond the edge of the page to the bleed line.
Note: Your images when bleeding to the edge will cover up all of your Guides.

Publisher_Utilizing Bleed Line

5. Utilizing the Margins (Safety Lines)

Place your important information (Page numbers, logos, text, etc.) within the safety line to ensure that you don’t lose any of it during the trimming process.
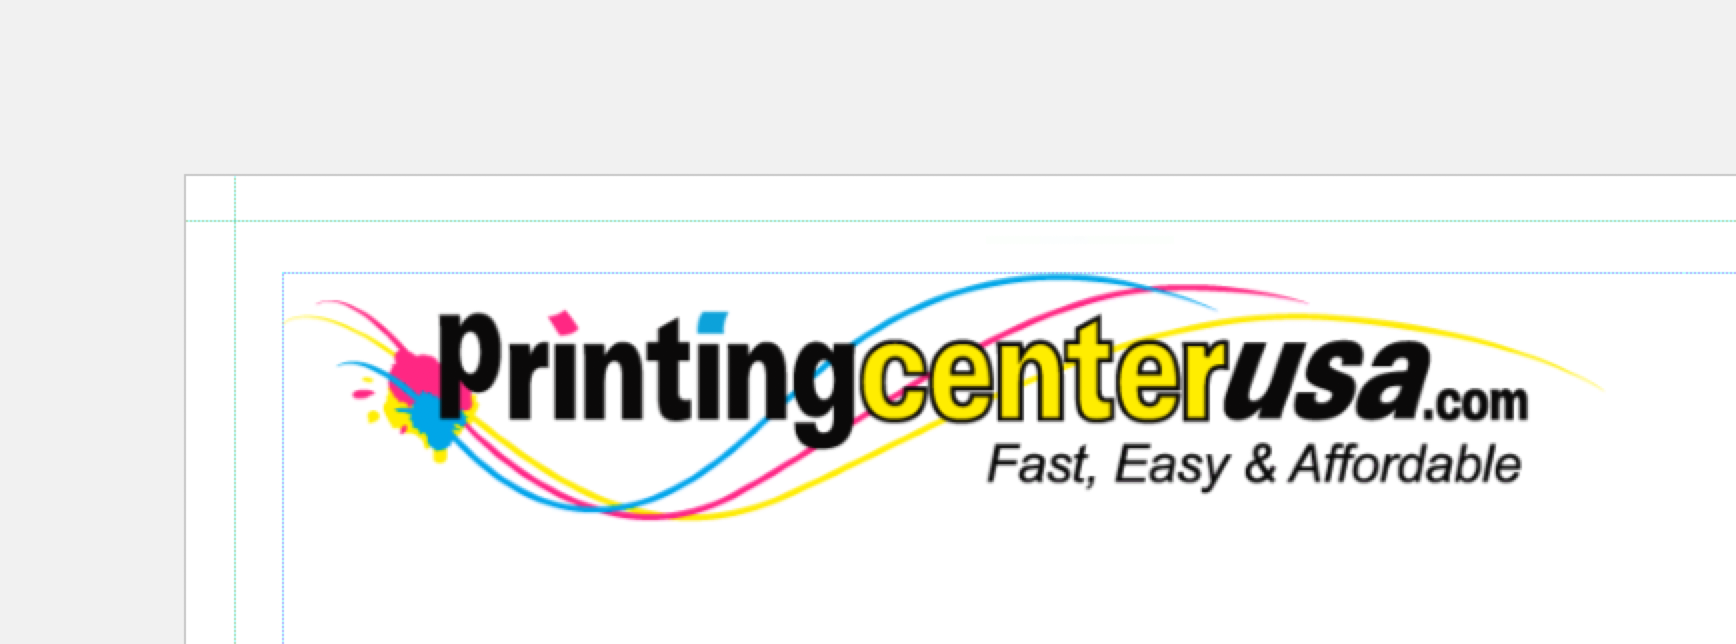
Publisher_Utilizing Margins

File Preparation | Bleeds | Canva

Bleeds: Canva

Checklist

  1. Turn on Bleeds and Margins (Safety Lines)
  2. How your page setup should look
  3. Using the Margins (Safety Lines)

1. Turn on Bleeds and Margins (Safety Lines)

In your design, click “File” at the top left side of the screen.

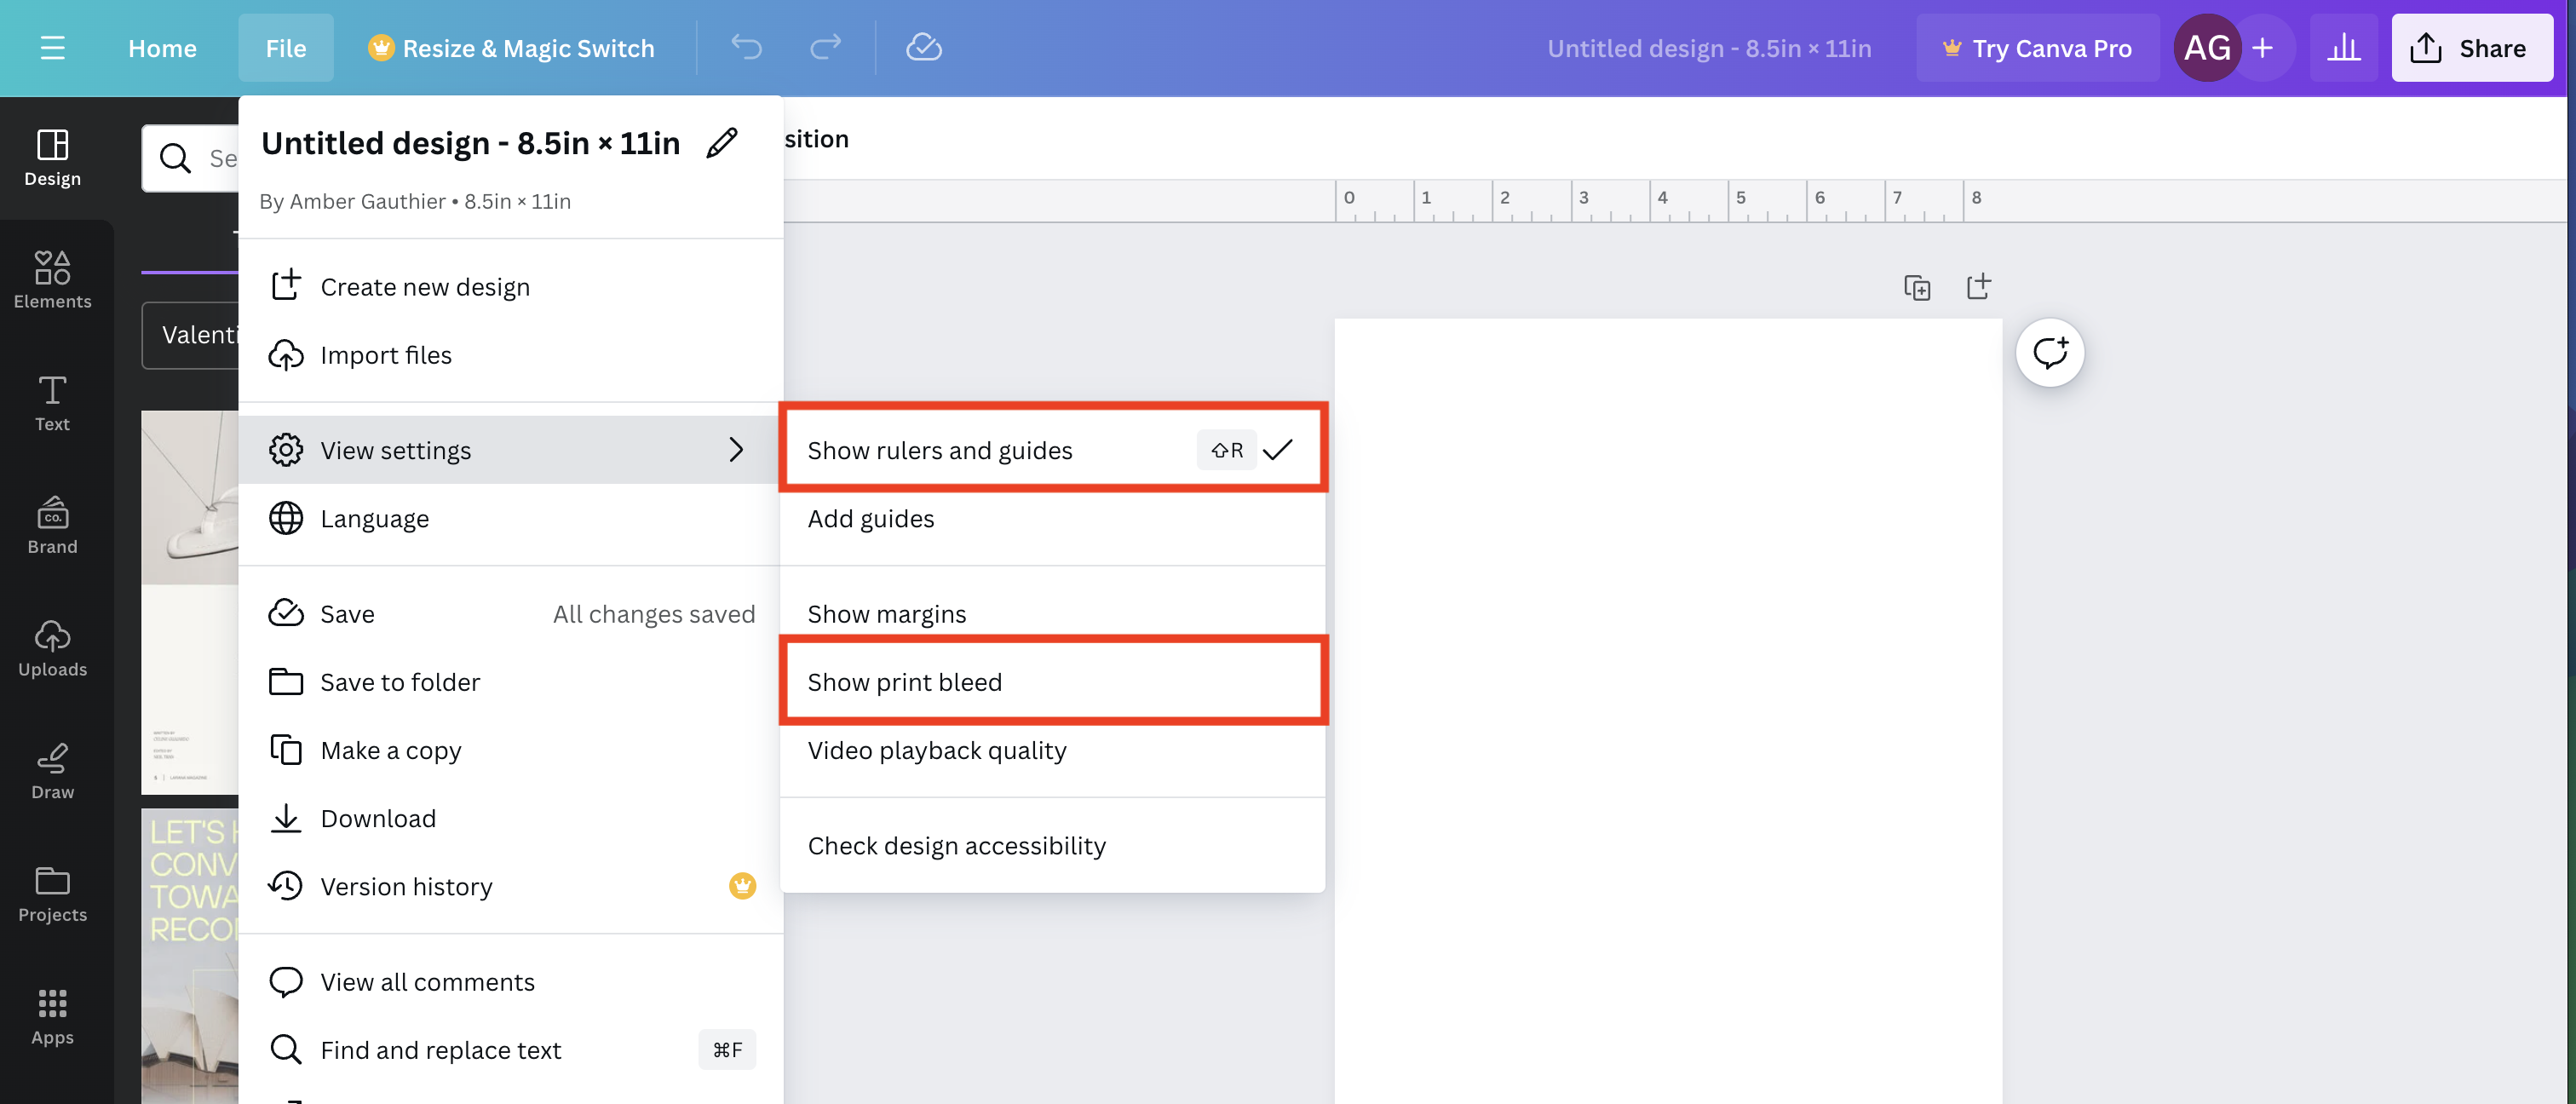
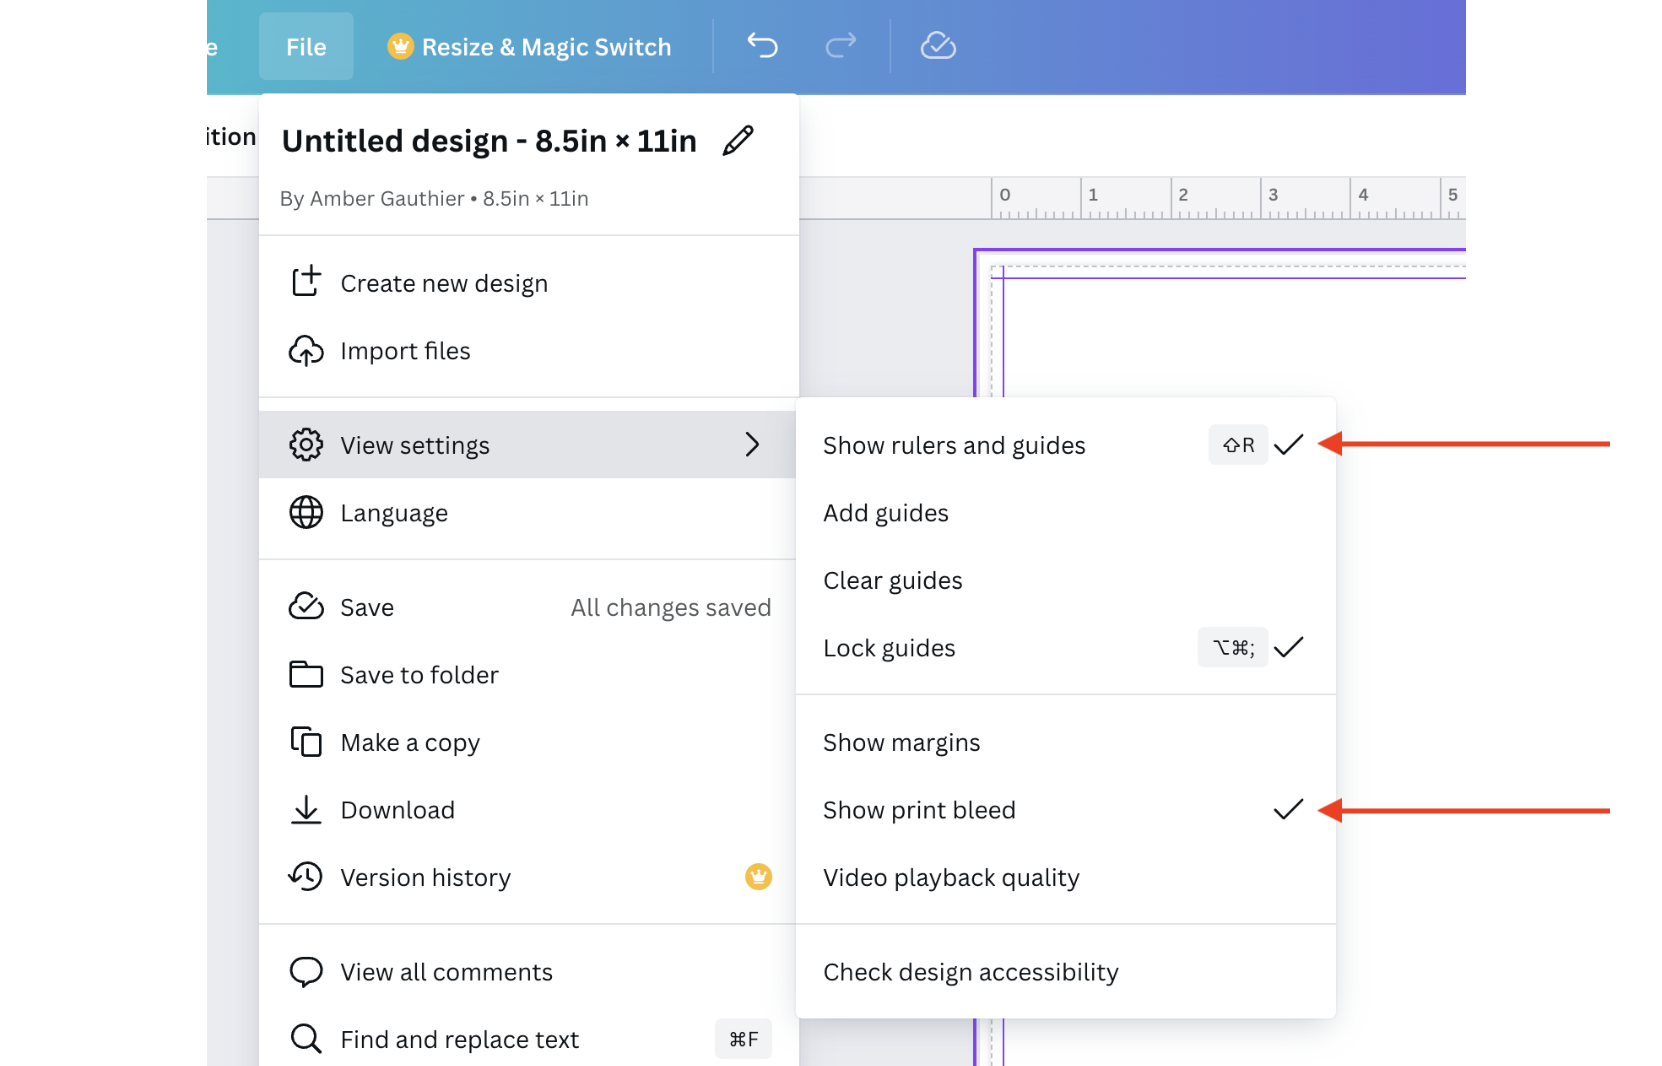
Click “View settings” and ensure the following options have a checkmark next to them: “Show rulers and guides”, and “Show print bleed”.

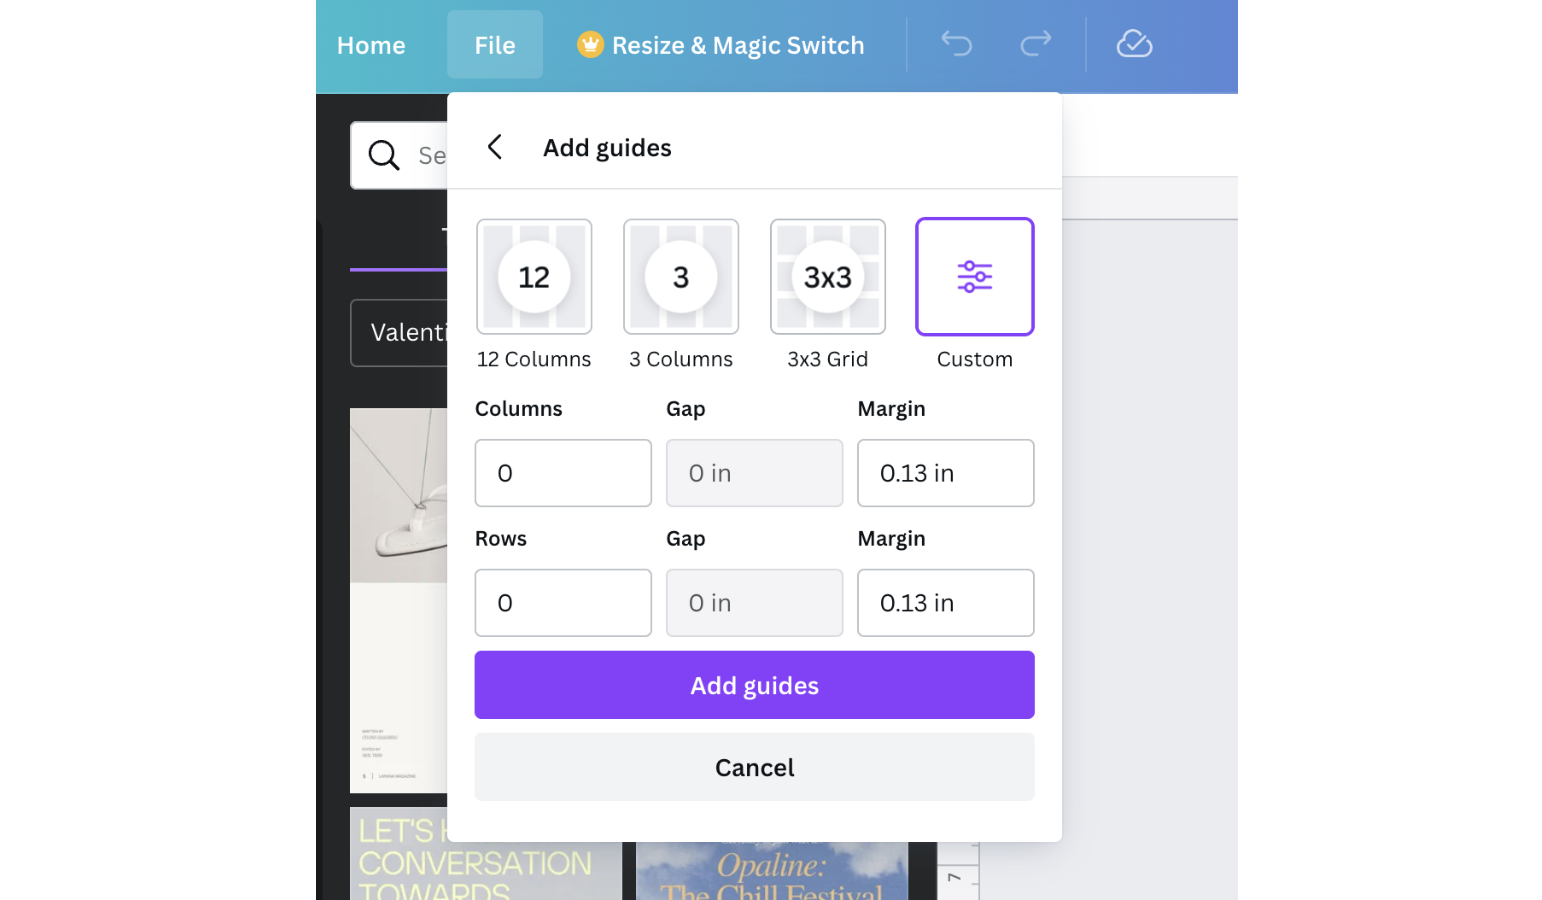
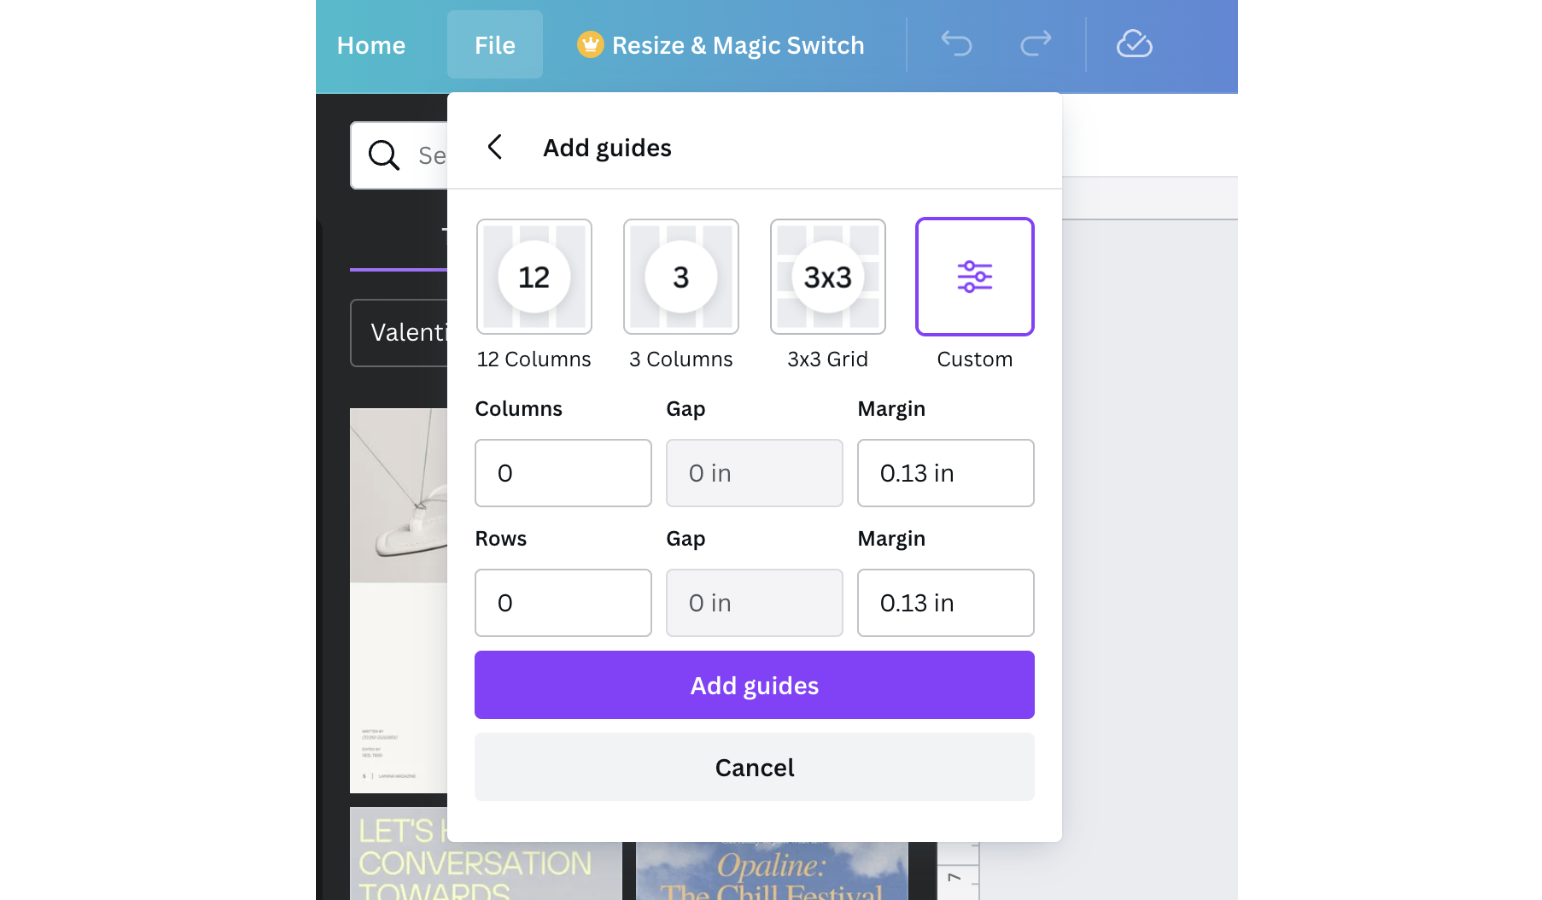
After this, Go to File > View Settings > Add guides. Choose the “Custom” option.

Under the “Margin” boxes, enter “0.13” for both boxes. Make sure the “Columns”, “Rows” and “Gap” are all set to 0. Click “Add guides”.

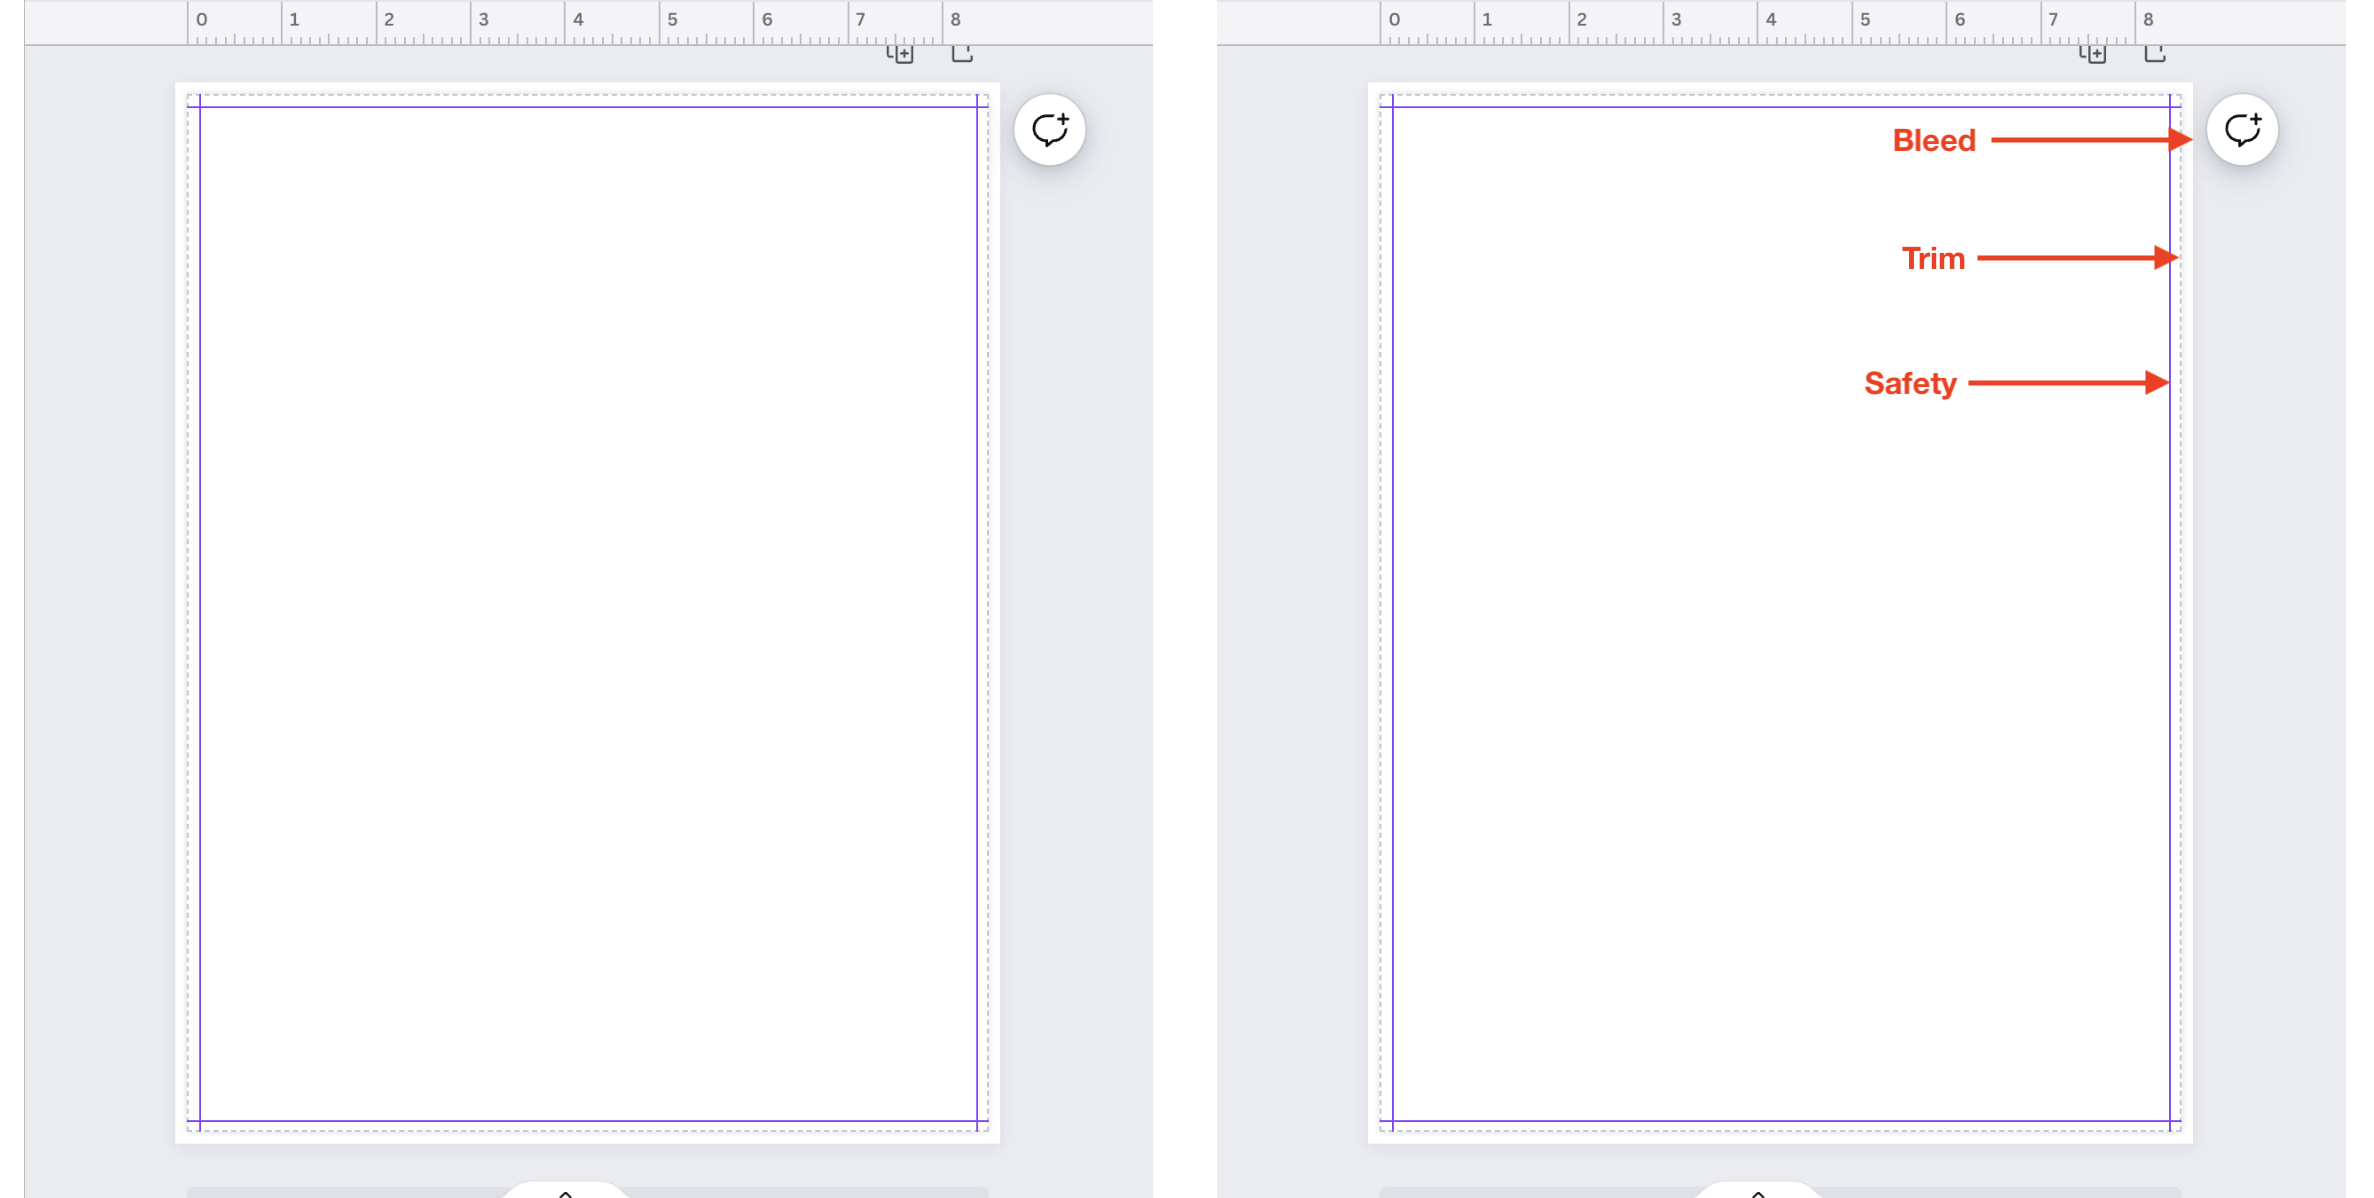
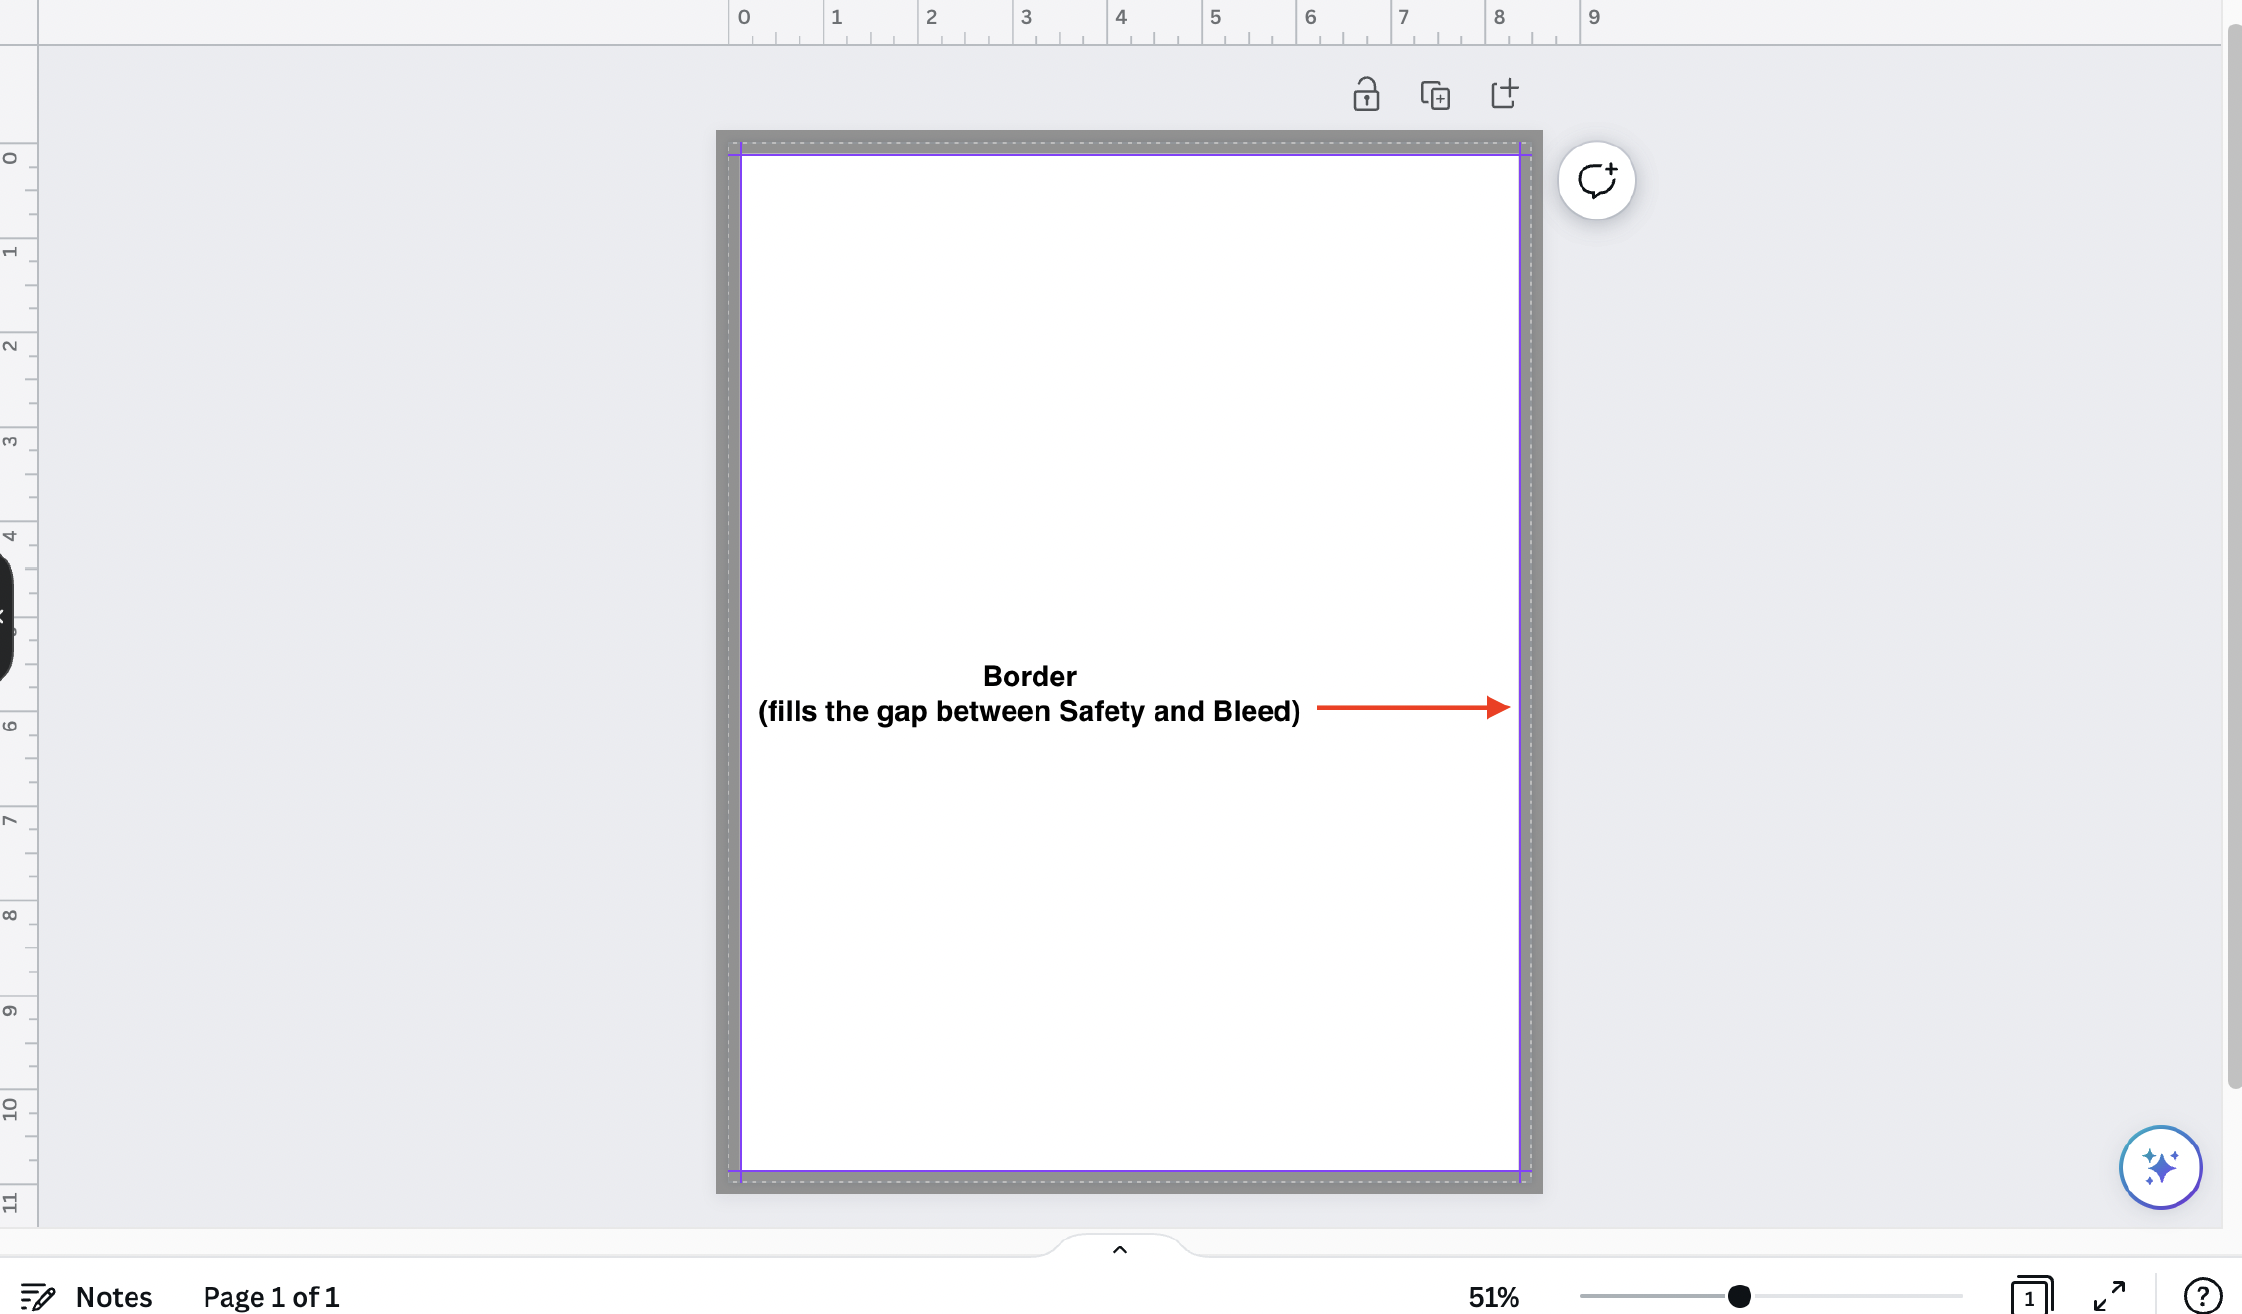
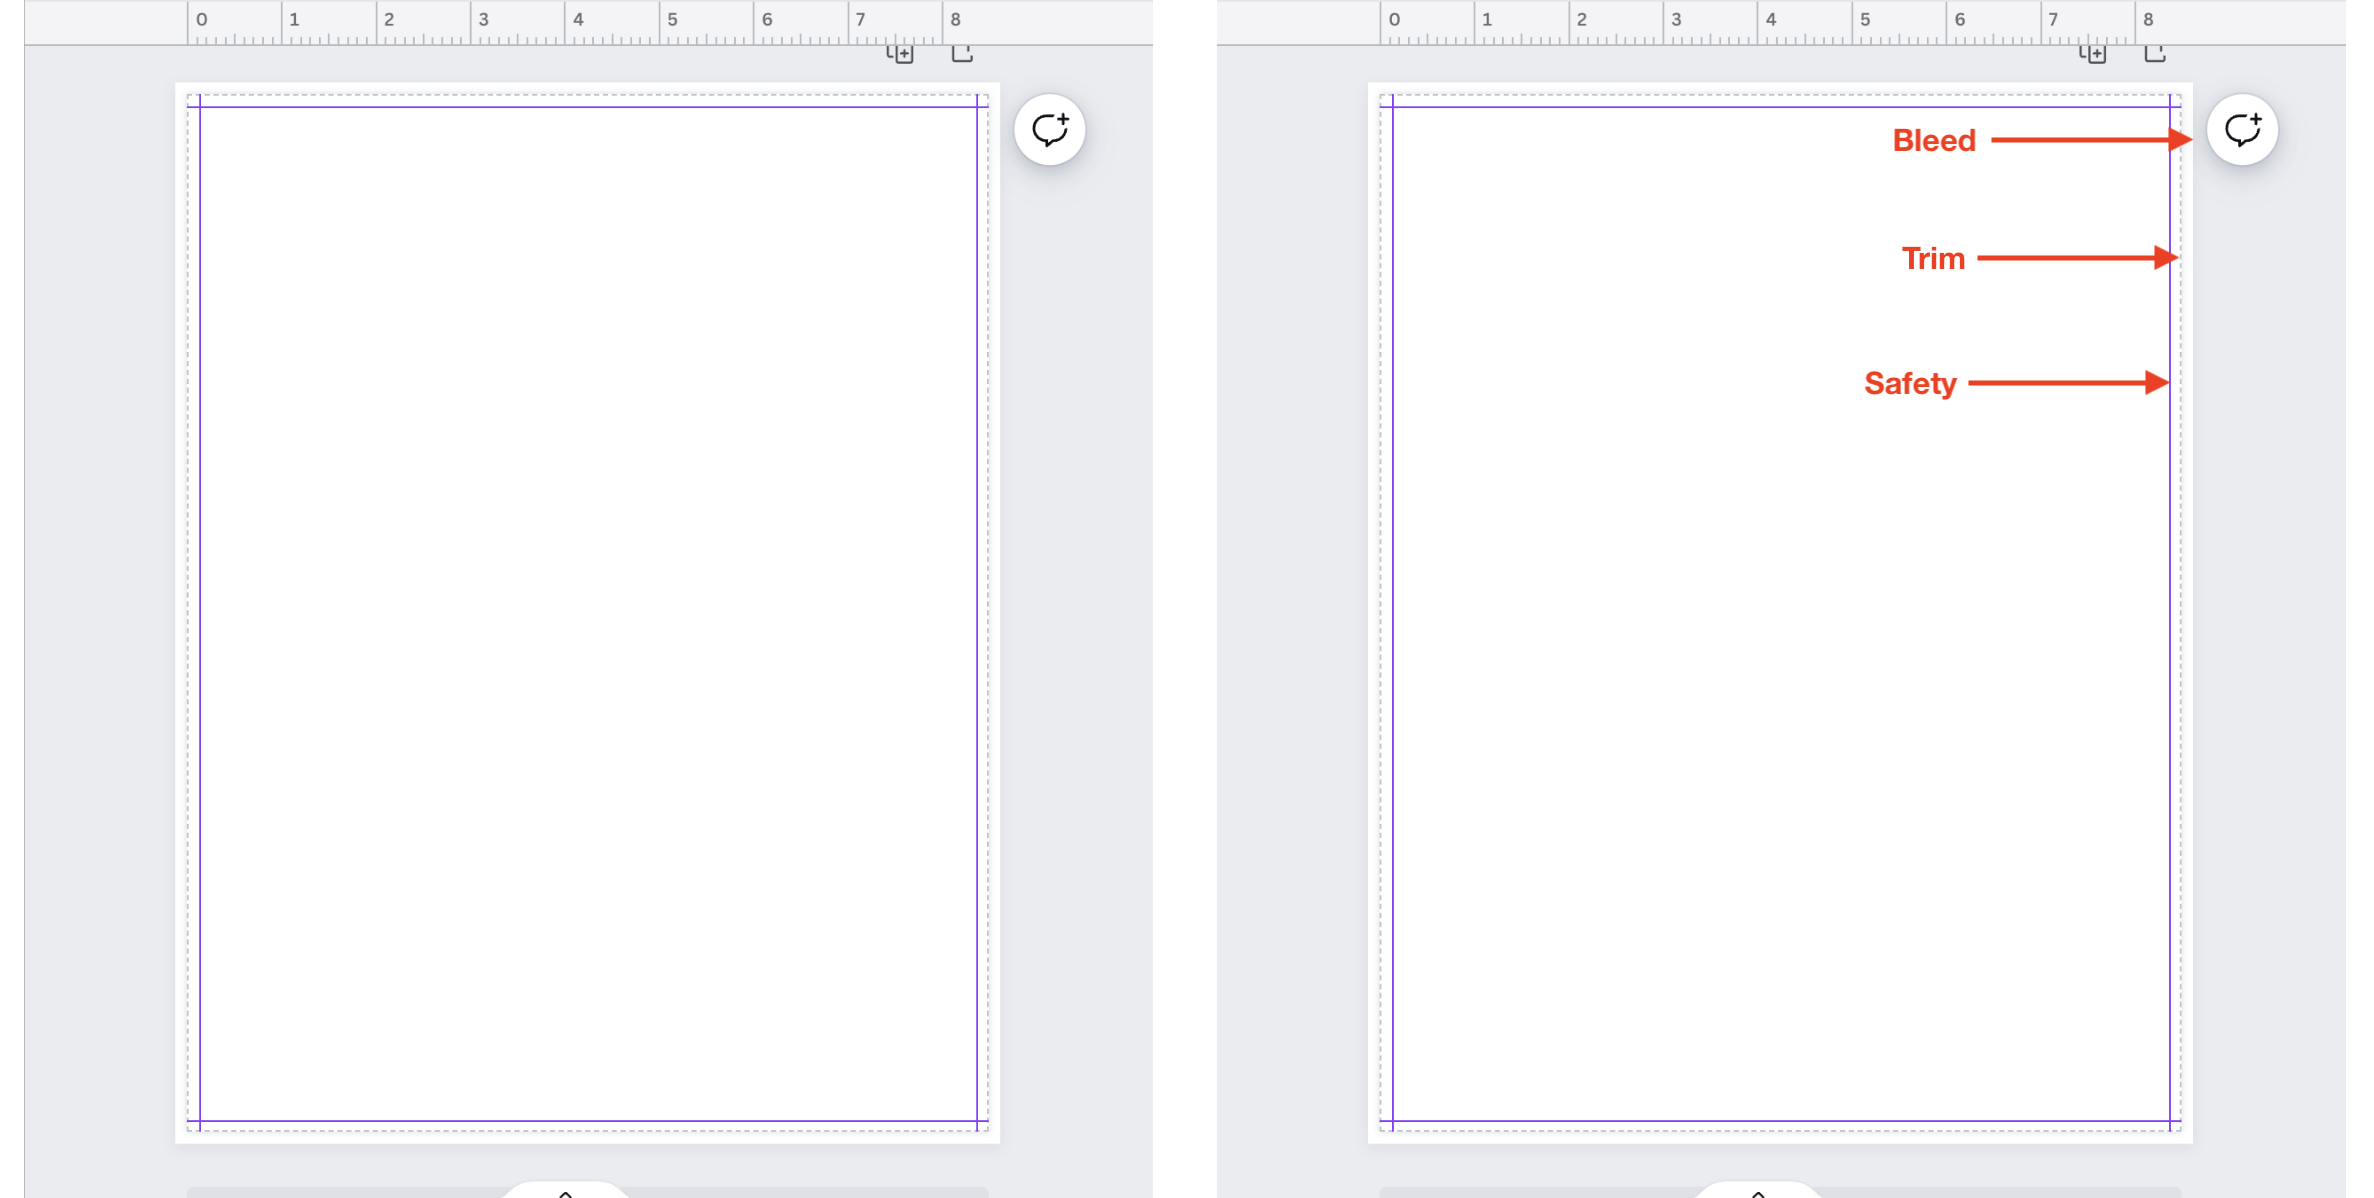
2. Your page should look similar to this:

3. Utilizing the Safety Line

Ensure all important elements are within the Safety and make sure your page goes fully out to the bleed lines to ensure no white slivers appear on your final product.

  • Trim line: You will want to ensure that none of your images/graphics line up with the trim line. This will create uneven cuts in your final product.
  • Borders: If you desire to have a border around your page, ensure that the border extends at least to the safe area line. (If you want a thicker border, you can adjust it to fill further into the safe area)

File Preparation | Bleeds | Photoshop

Bleeds: Photoshop

Checklist

  1. Open Canvas Size
  2. Change Canvas Size to Account for Bleed
  3. Turn on Rulers
  4. Set Safety Line
  5. Utilizing the Bleed Line
  6. Utilizing the Safety Line

1. Open Canvas Size

From the top menu: Click Edit > Canvas Size

This will prompt the Canvas Size window to open where you will adjust the size of your document to account for bleed.

2. Change Canvas Size to Account for Bleed

There is no place in Photoshop to setup your bleeds.

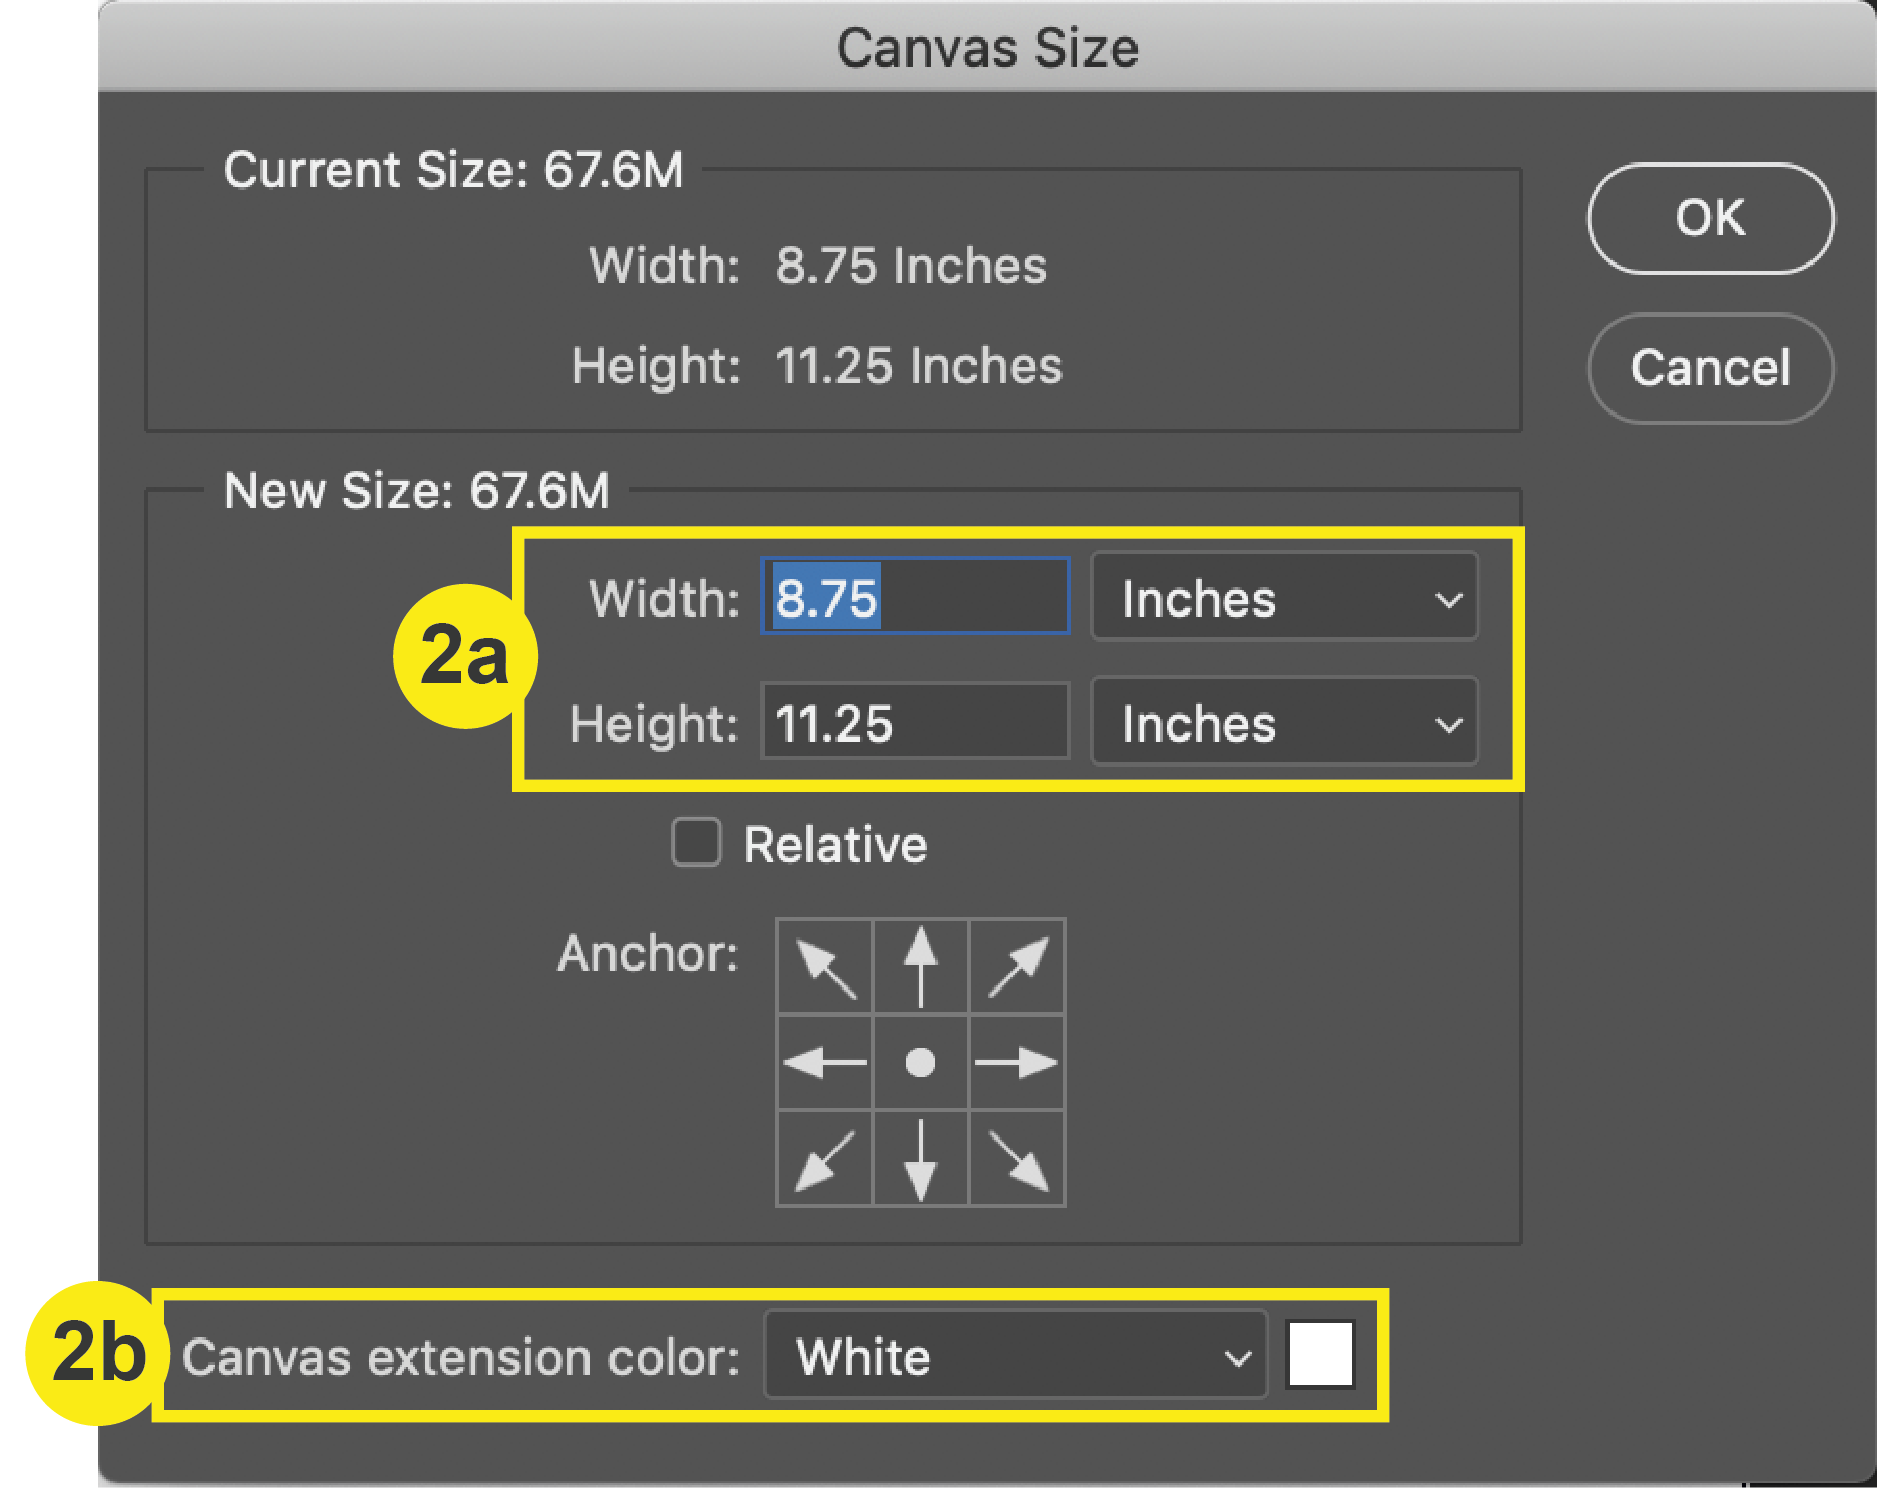
a. You must add bleeds by adding .25 inches to both the length and width of the final trim size of your document within the Canvas Size window. This is how you make room on your canvas for .125 inch bleeds on each side.
Example: For an 8.5” x 11” Letterhead, your document size should be 8.75” x 11.25”

b. Be sure to select the canvas extension color to white.

Photoshop_Canvas Size

3. Turn on Rulers

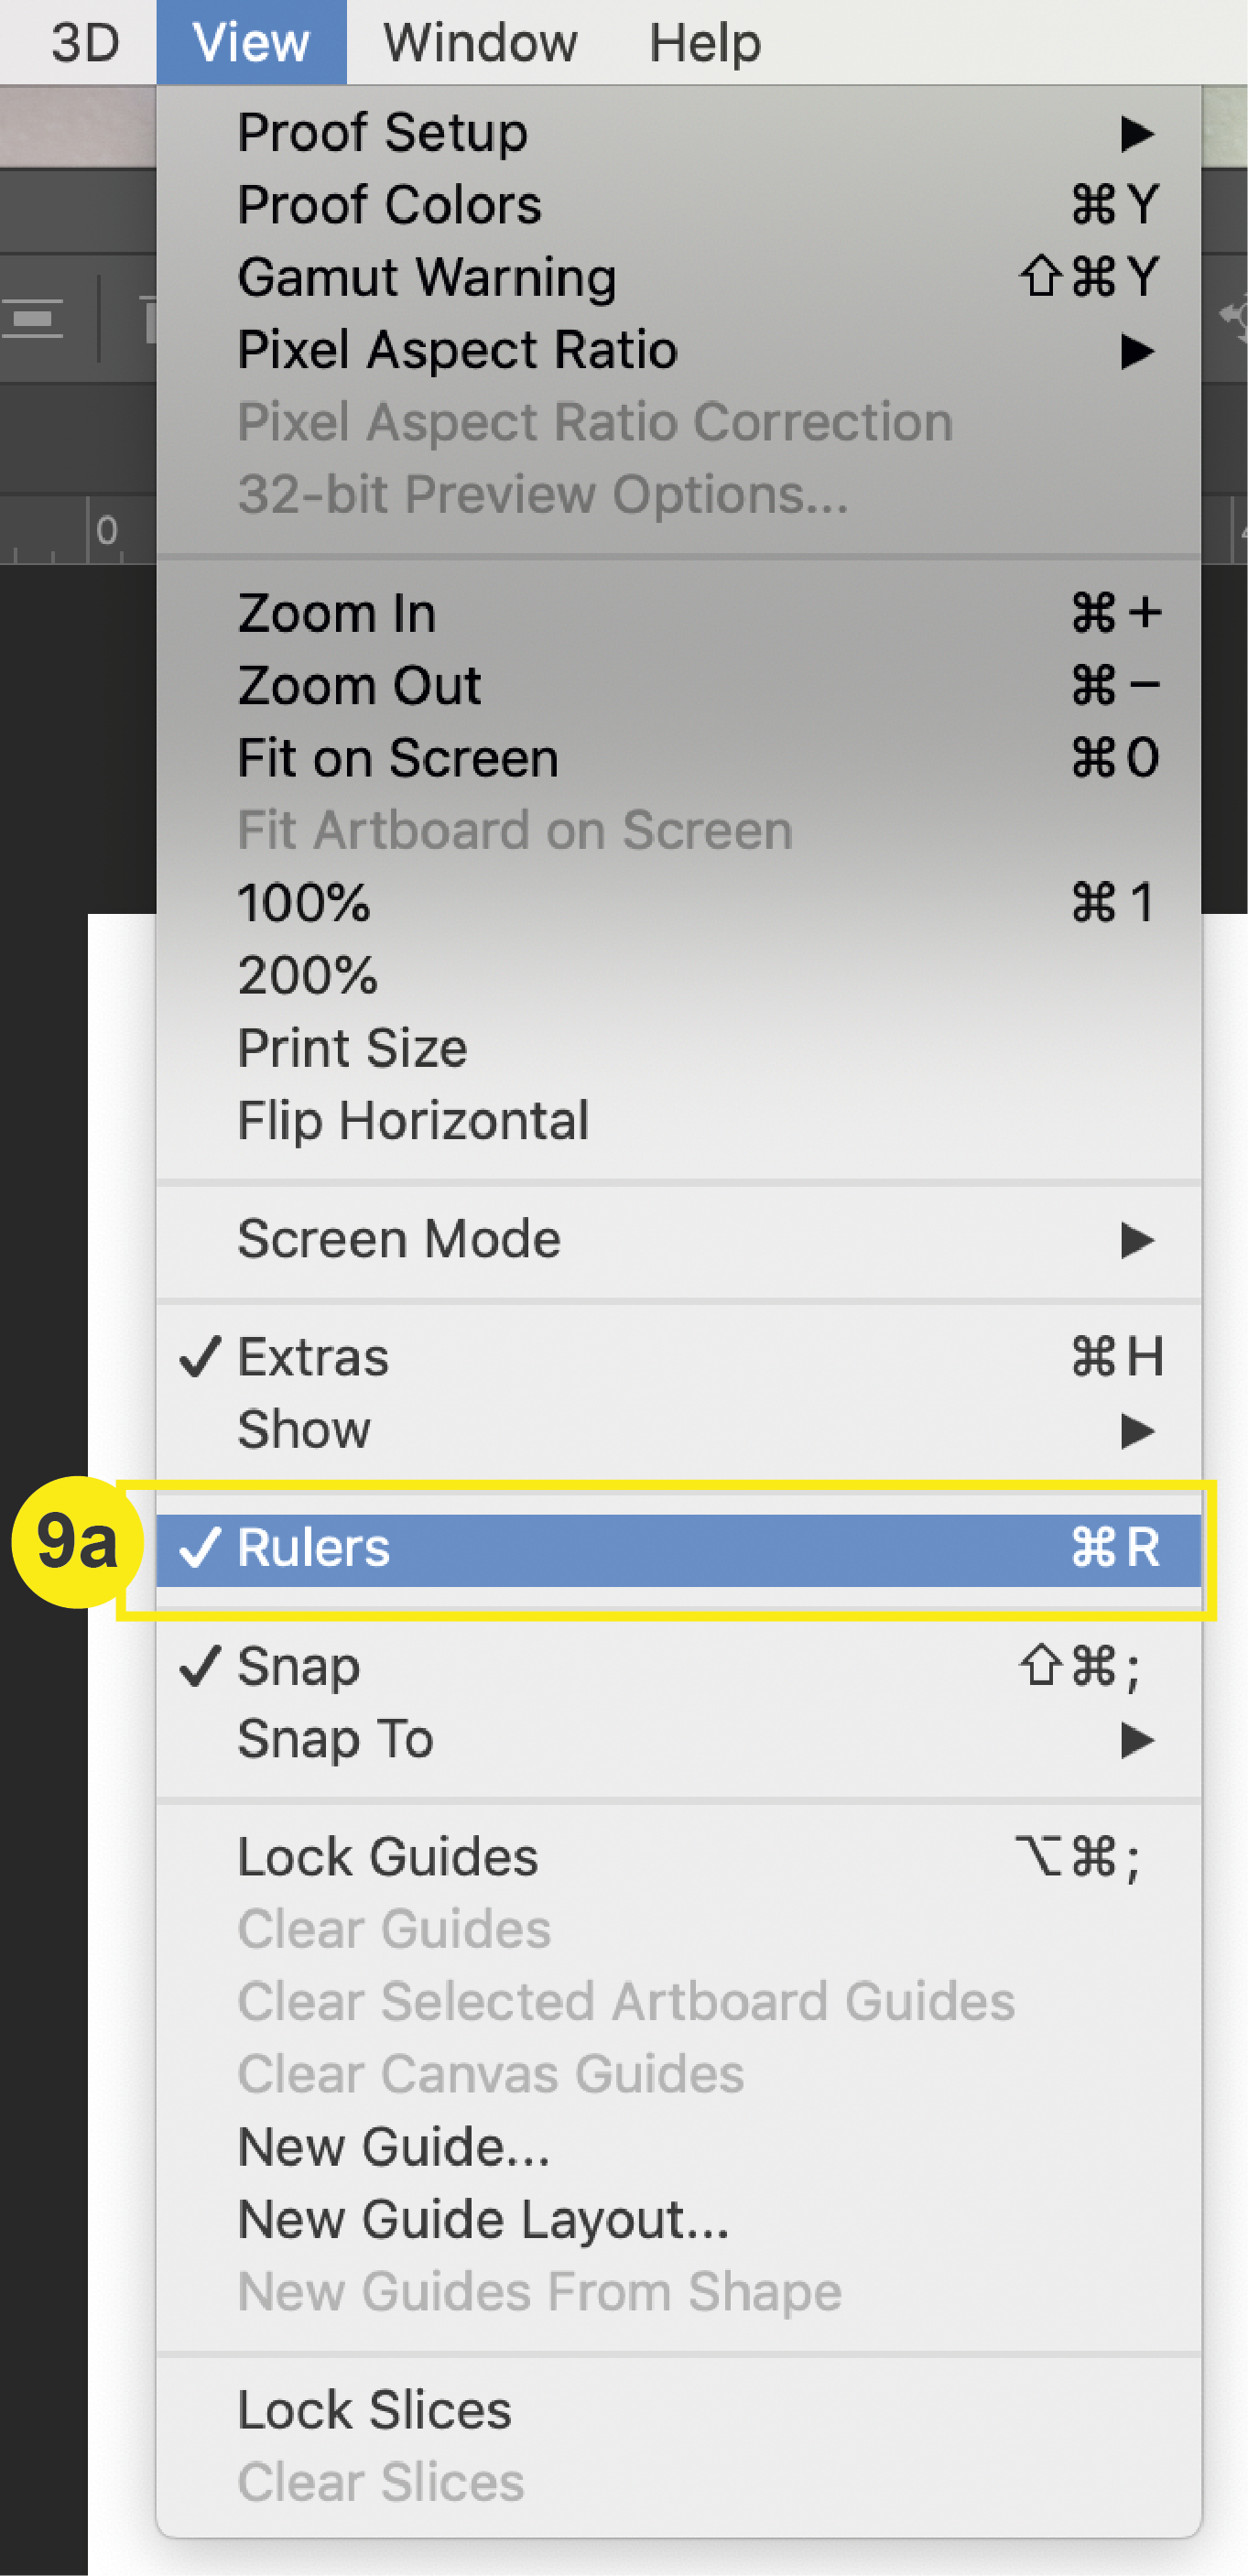
In the top menu go to View > Rulers

4. Set Safety Lines

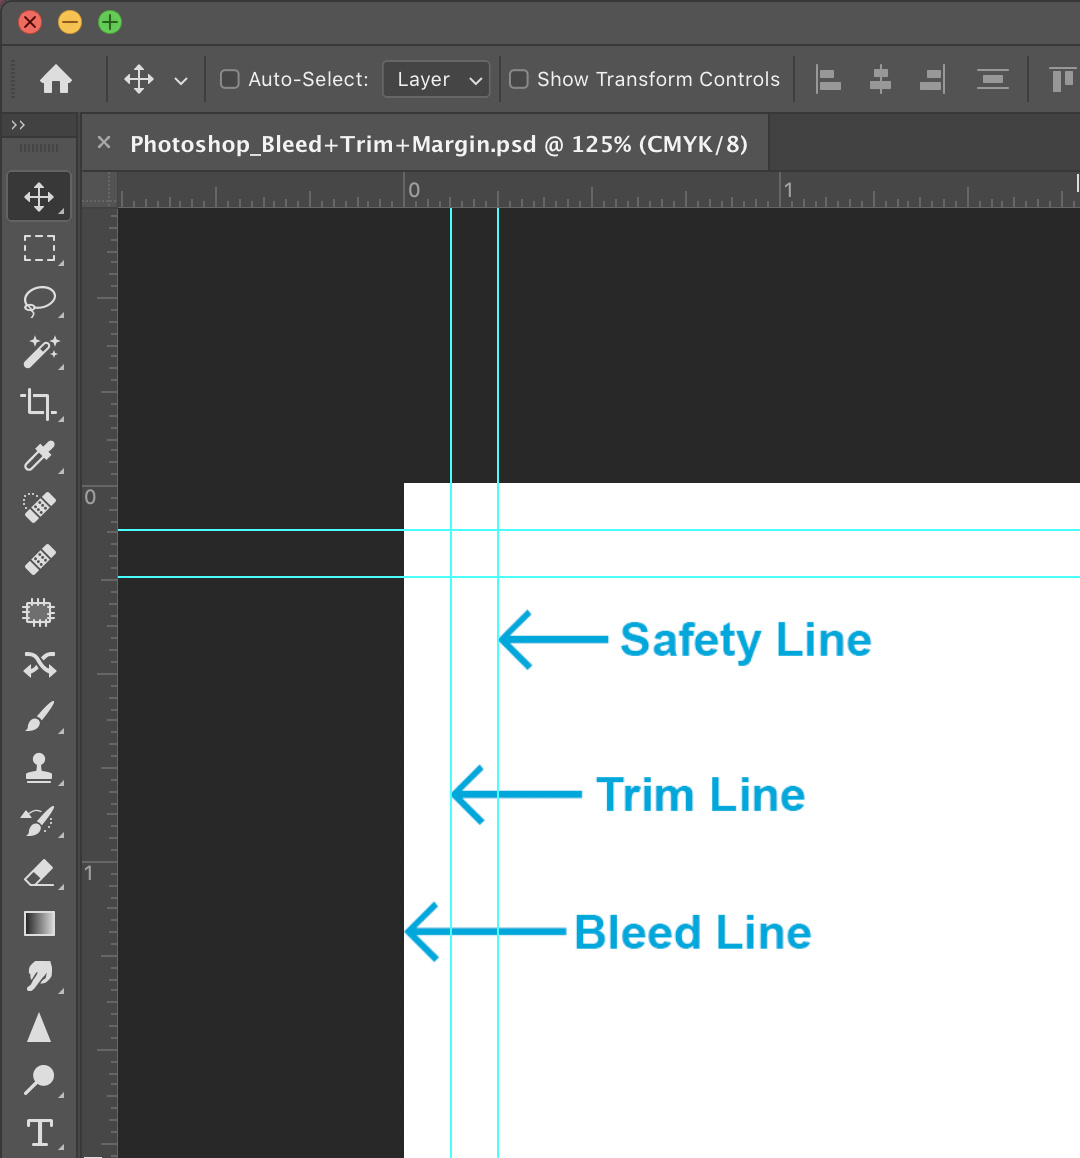
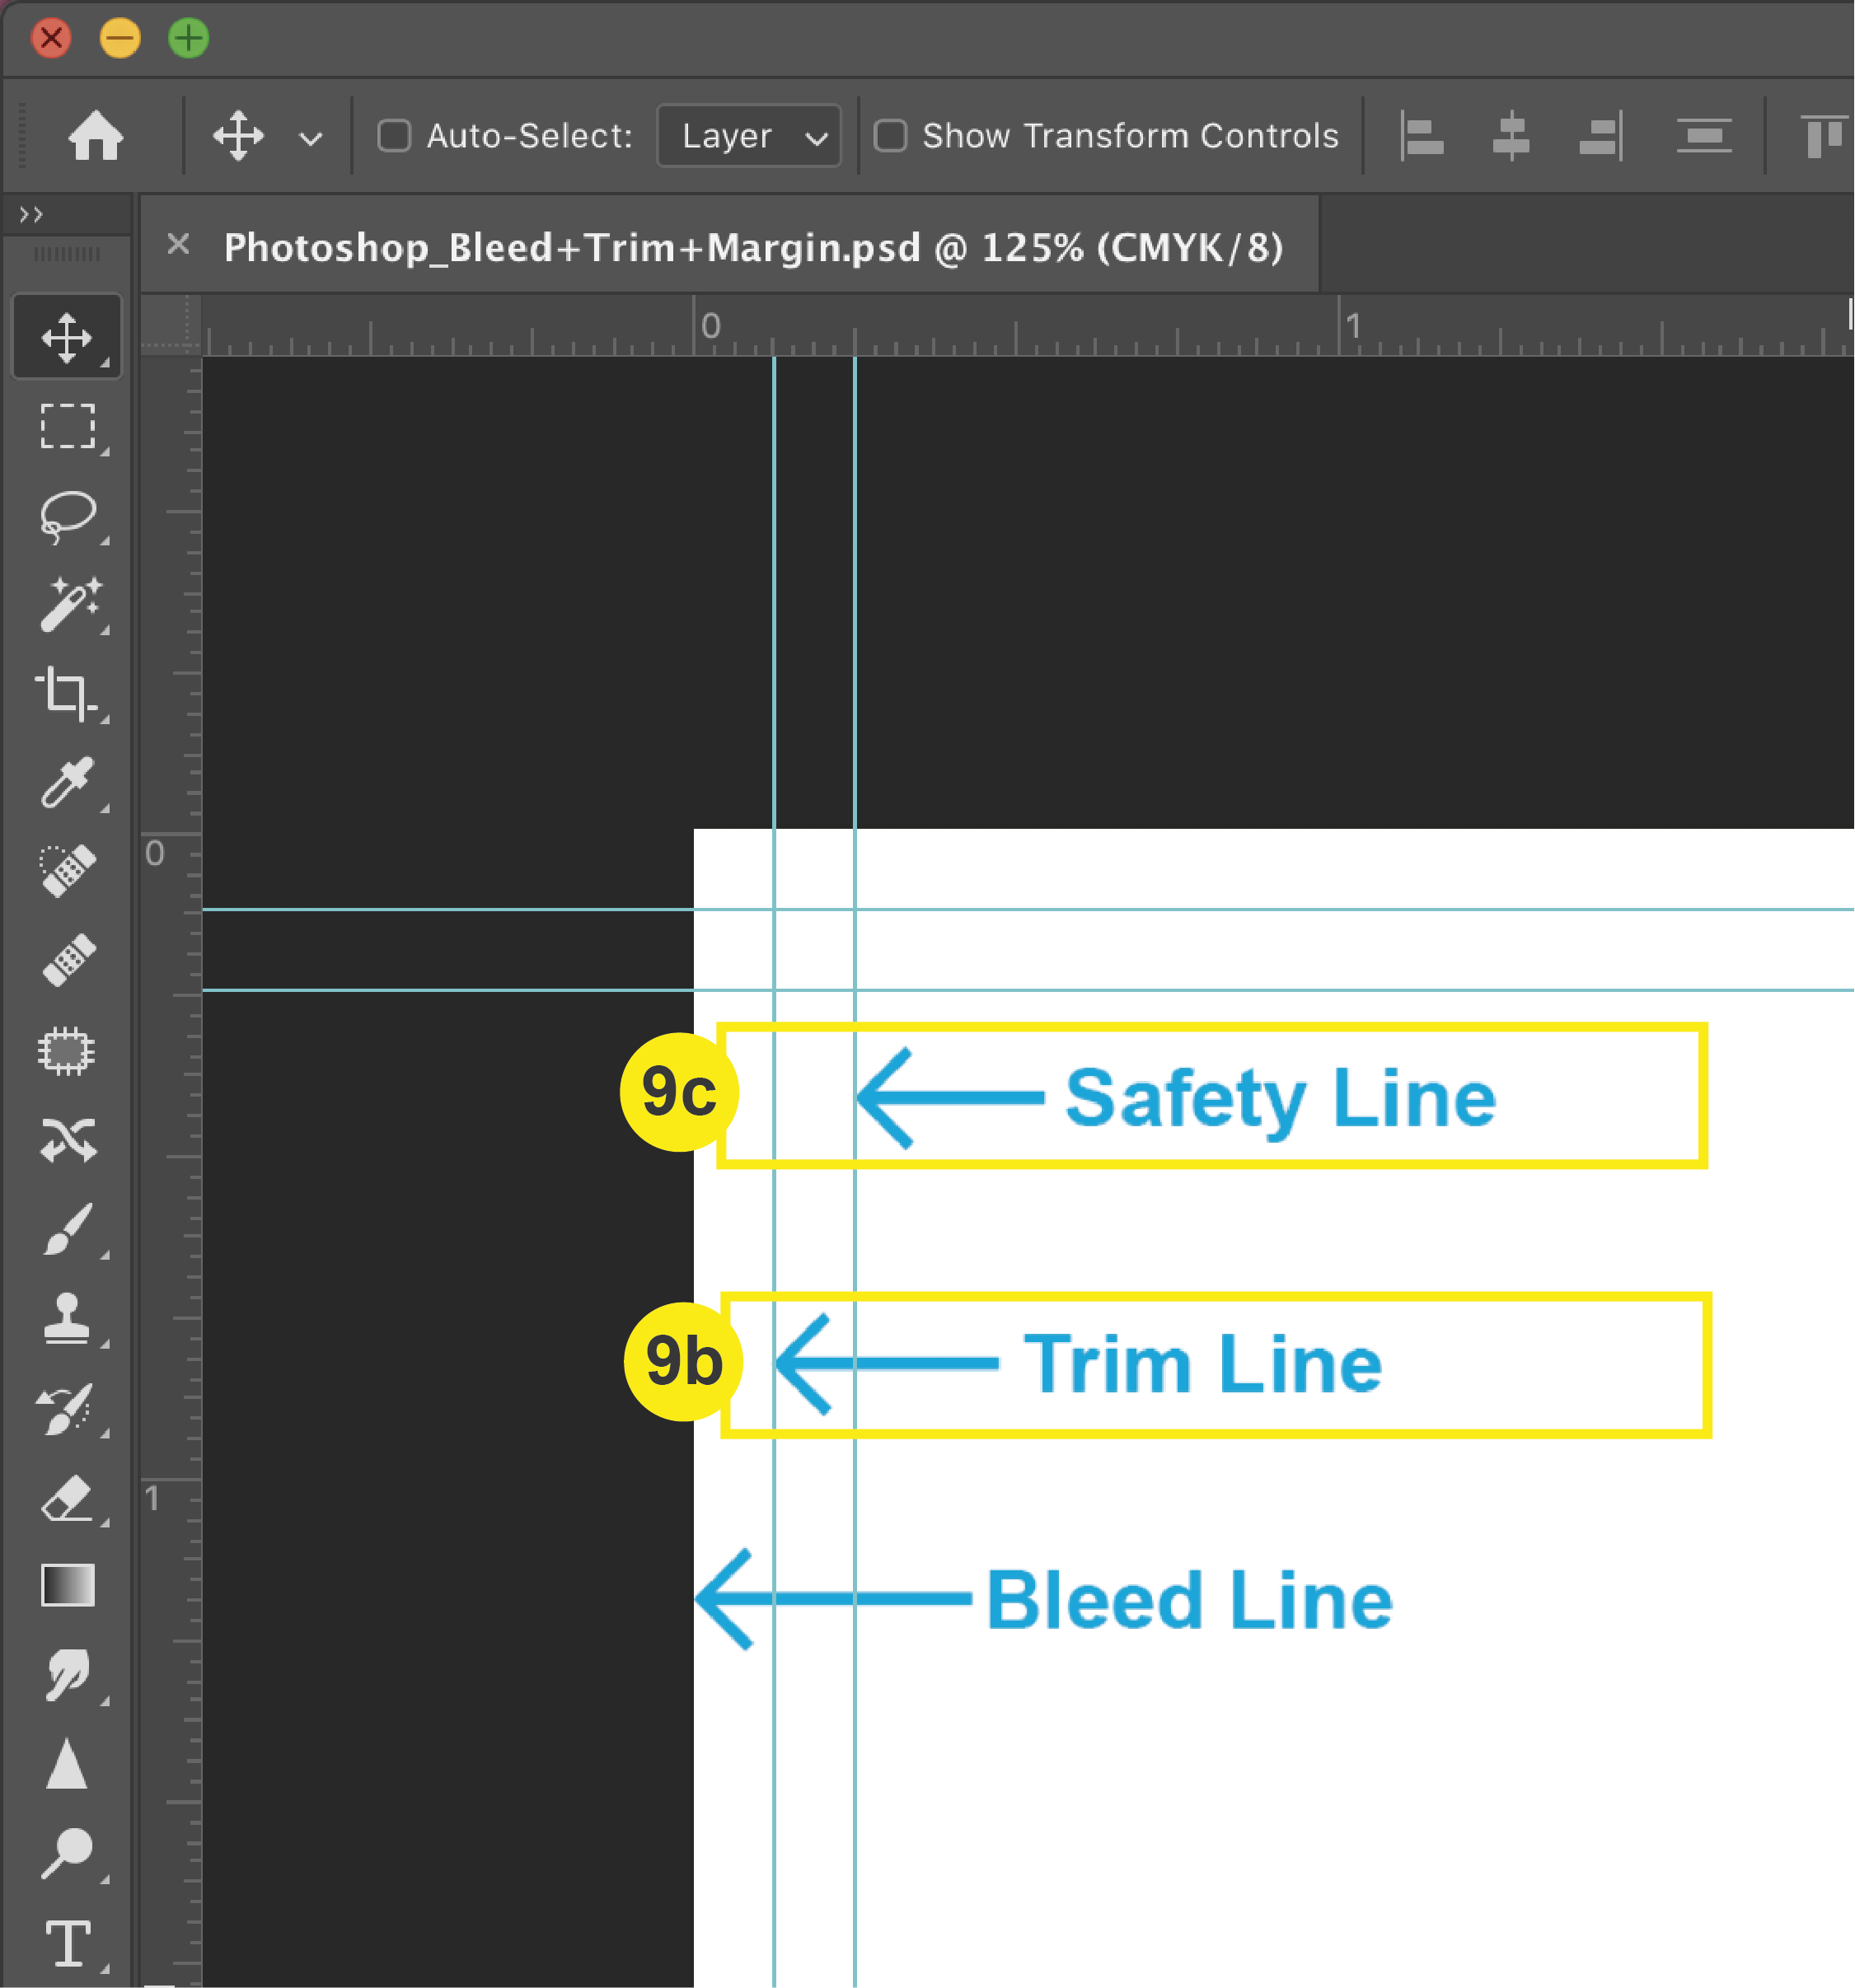
Click + Drag your safety lines (margins) from the rulers to 0.125 inches within the document on each edge.

Note: to get your lines as exact as possible, you will need to zoom in very close to the edge during this process.

Photoshop_Safety_Trim_Bleed

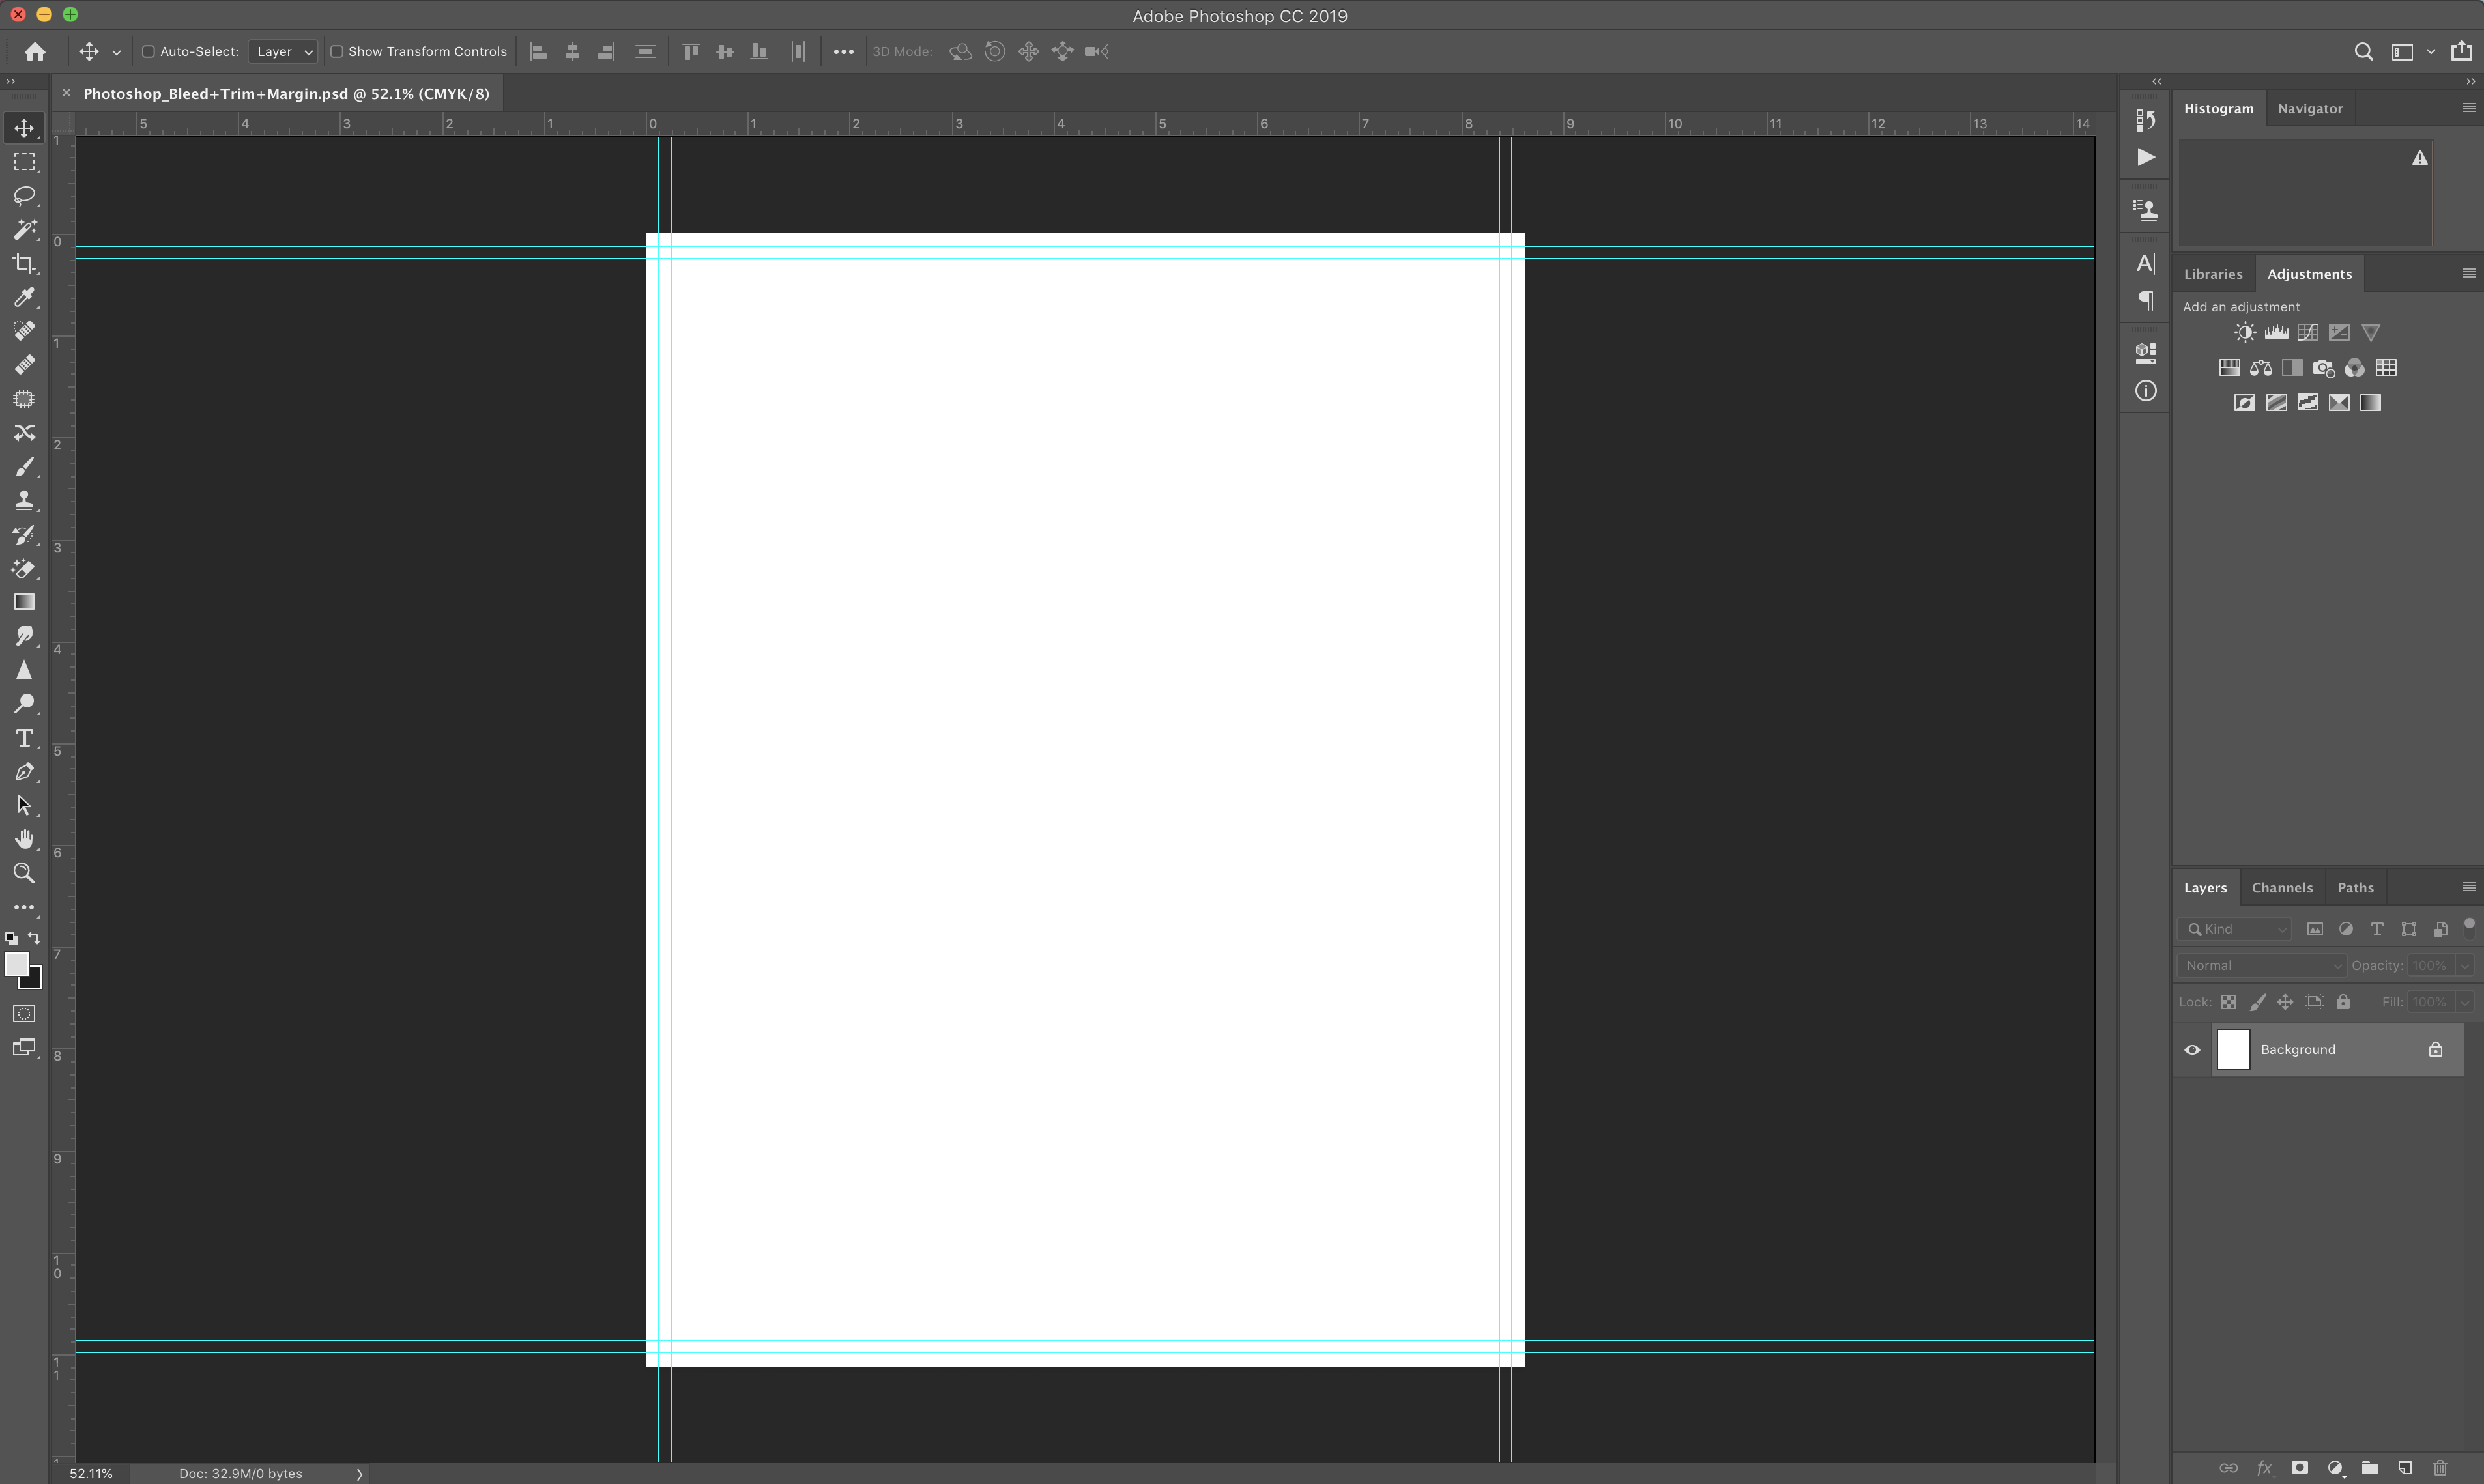
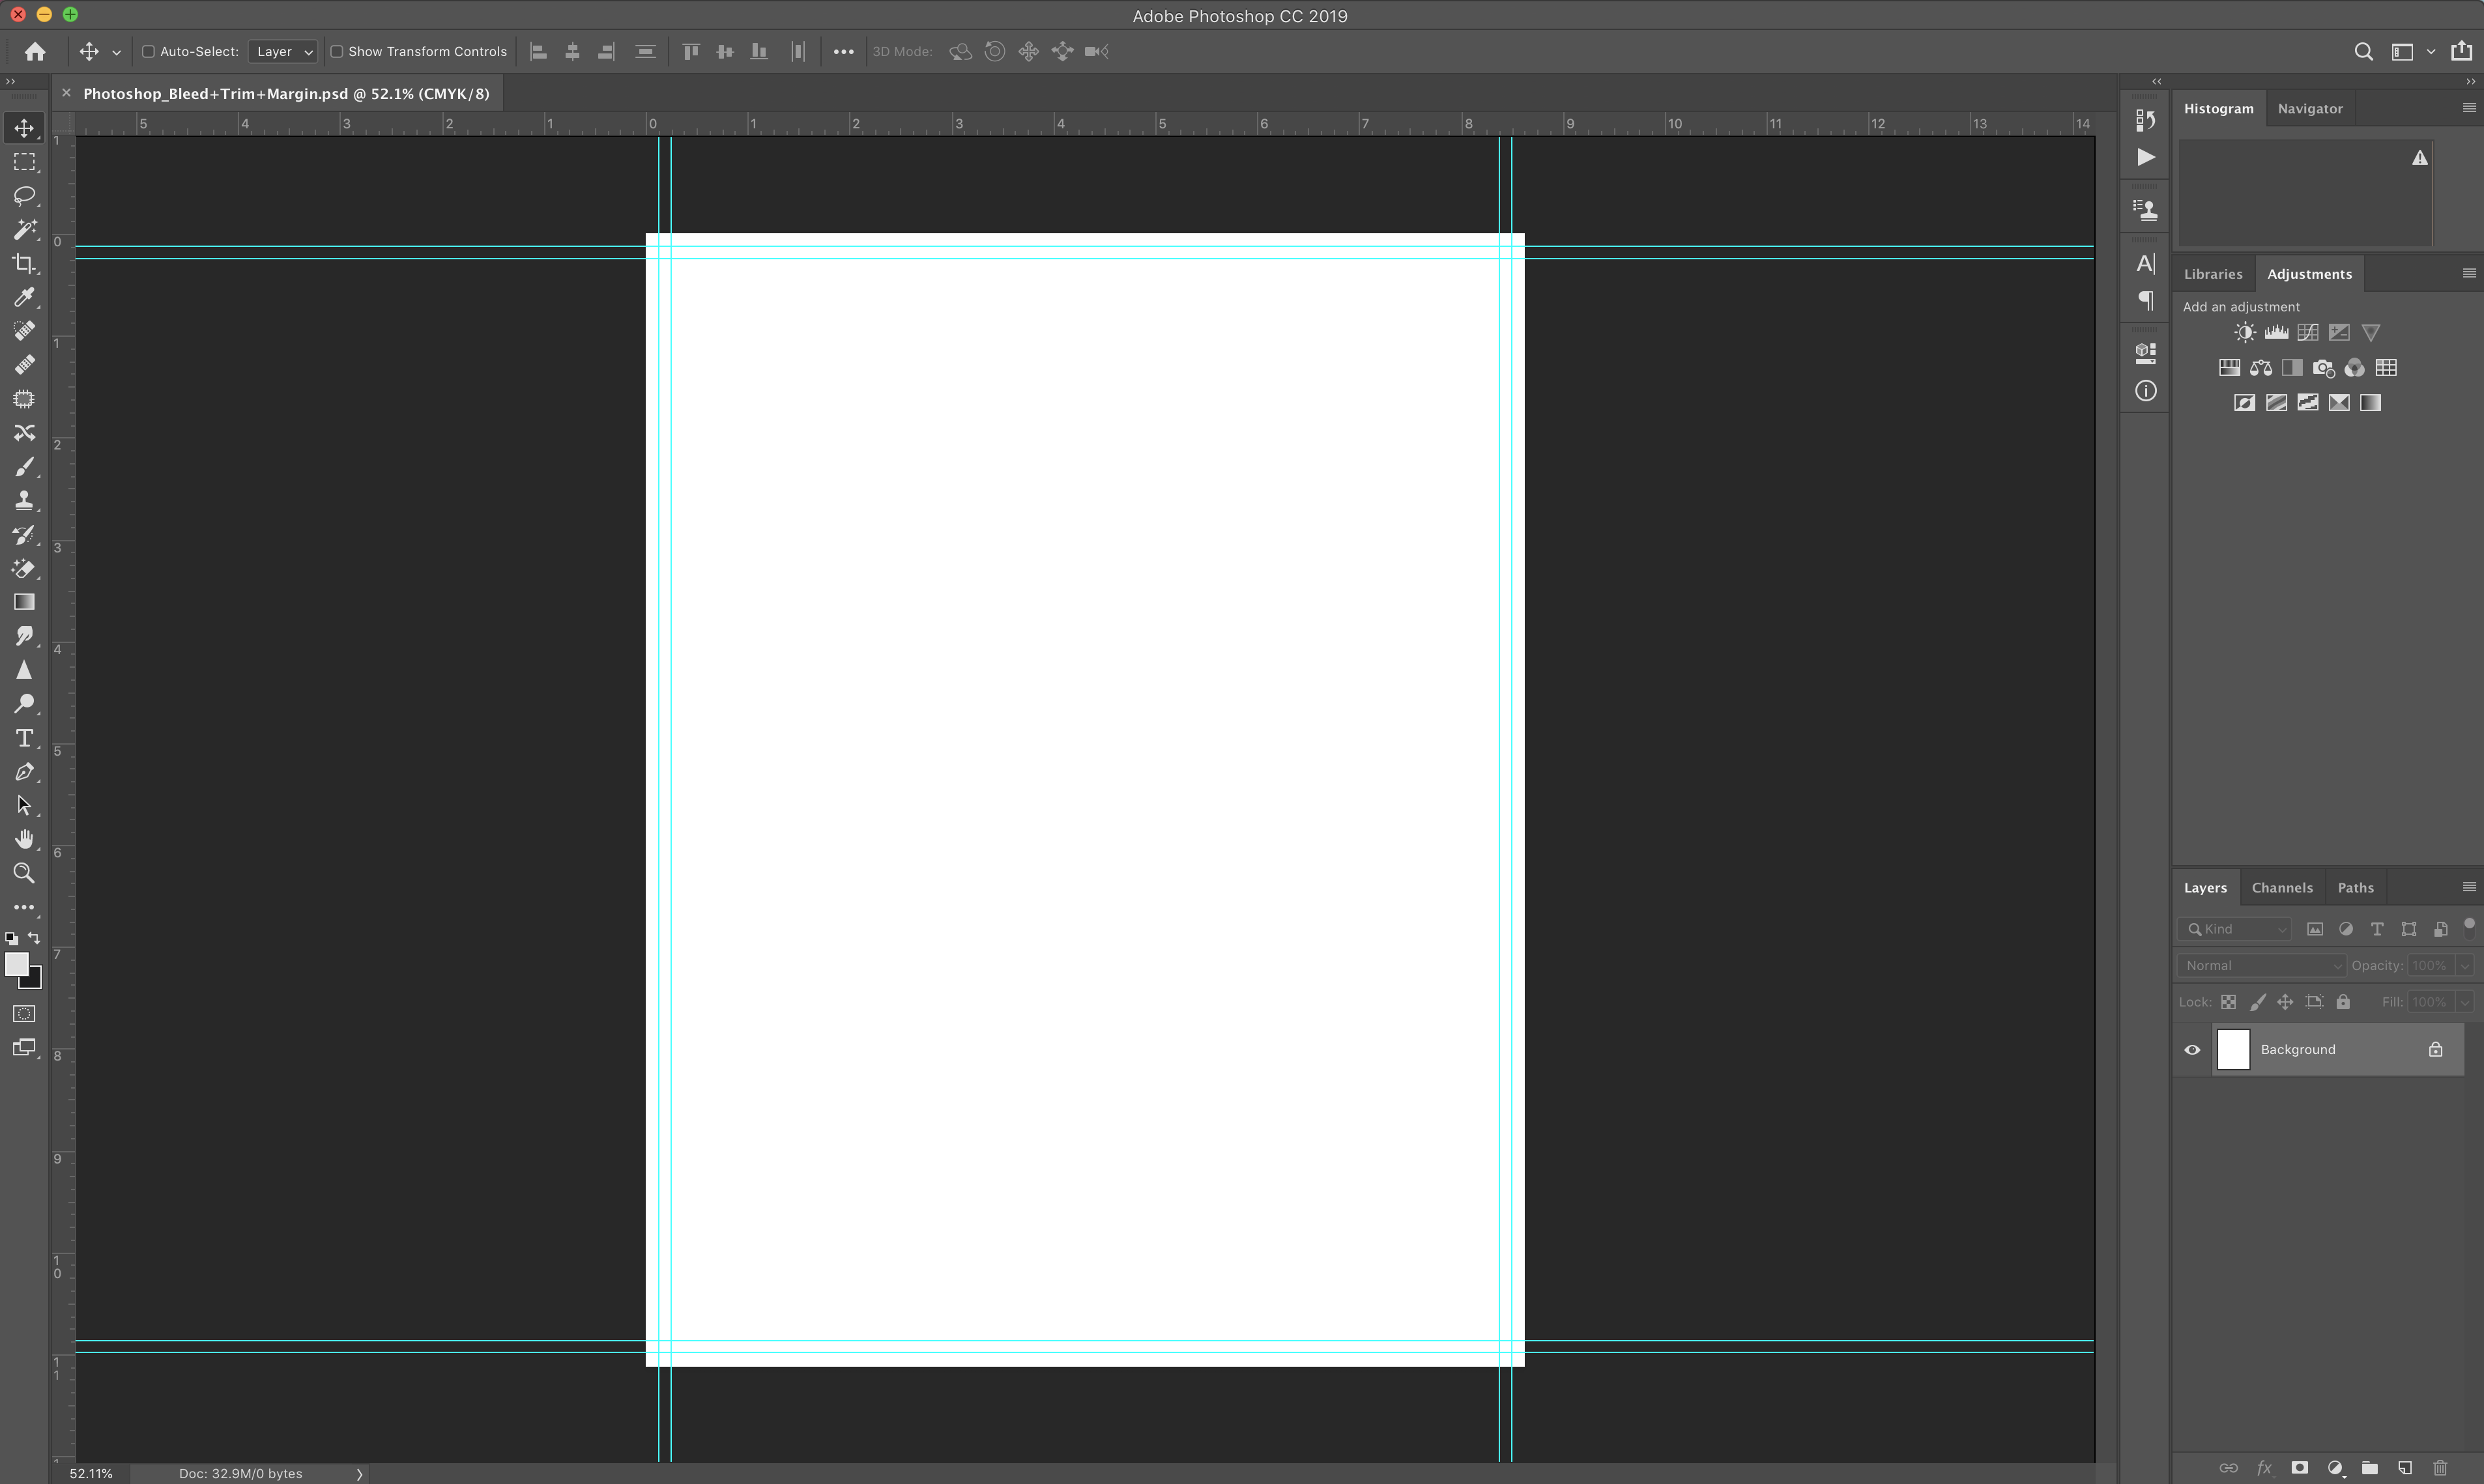
Now that your document is set up properly with bleeds and safety lines, it should look similar to this:

Photoshop_NewDocument

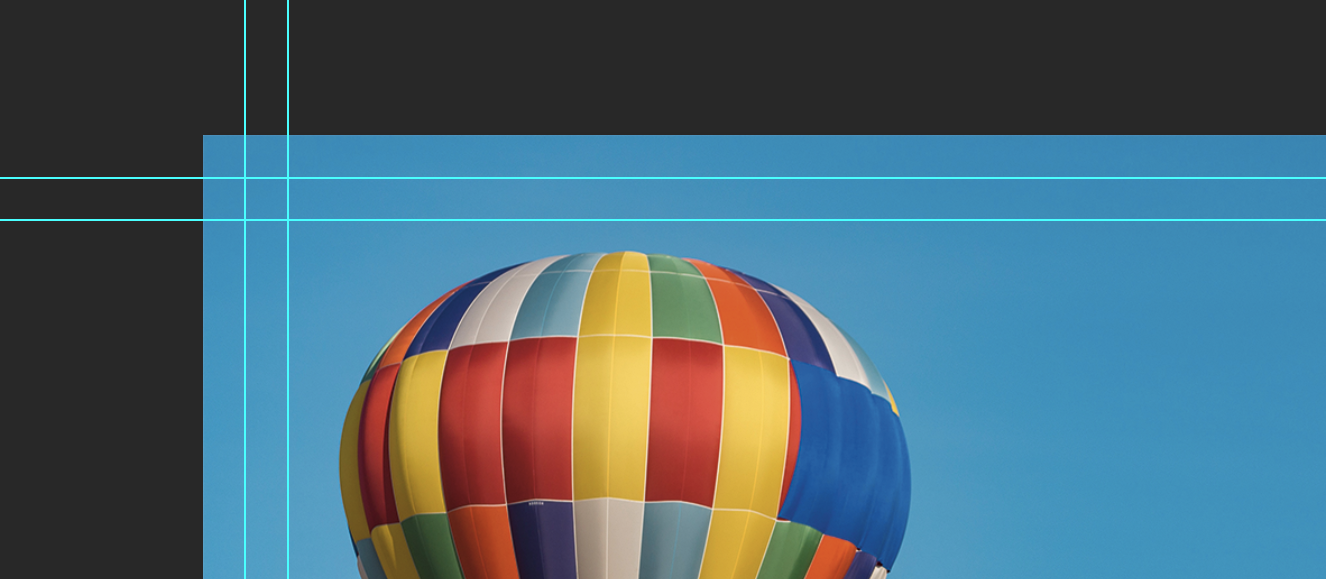
5. Utilizing the Bleed Line

To utilize your bleeds when designing, extend your graphics and/or images (that you want to print up to the edge) beyond the trim line and to bleed line.

Photoshop_Utilizing Bleed

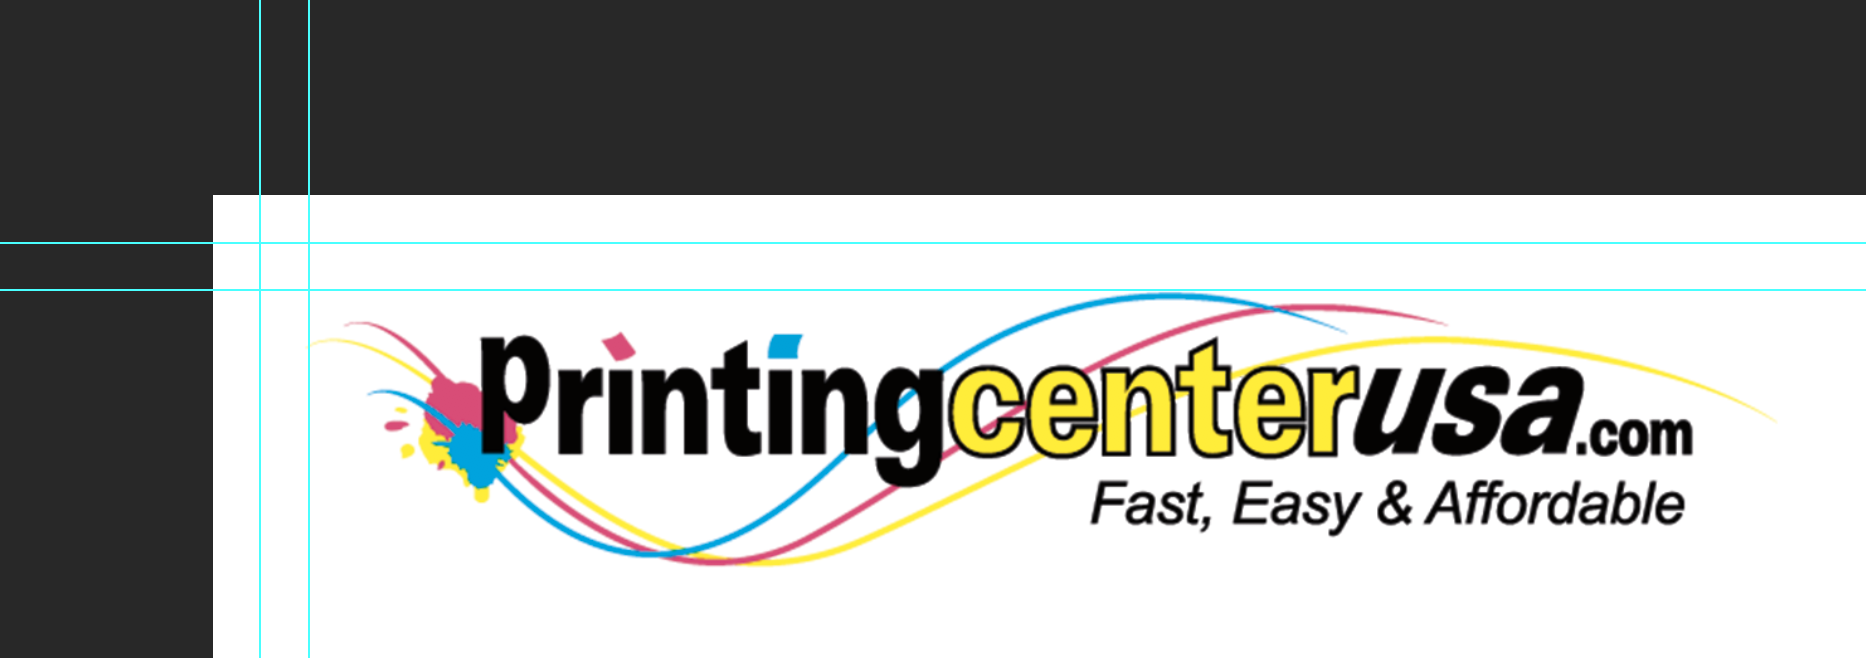
6. Utilizing the Safety Line

Place your important information (Page numbers, logos, text, etc.) within the safety line to ensure that you don’t lose any of it during the trimming process.
Photoshop_Utilizing Safety Line

File Preparation | Bleeds | Illustrator

Bleeds: Illustrator

Checklist

  1. Open Document Setup
  2. Add 0.125 in Bleed
  3. Turn on Rulers
  4. Set Safety Line
  5. Utilizing the Bleed Line
  6. Utilizing the Safety Line

1. Open Document Setup

At the top of your Illustrator Document, click Document Setup

Illustrator_Document Setup

This will prompt the Document Setup window to open where you will add your bleed settings.

Note: If you do not see this Document Setup button, you can find it in File > Document Setup.

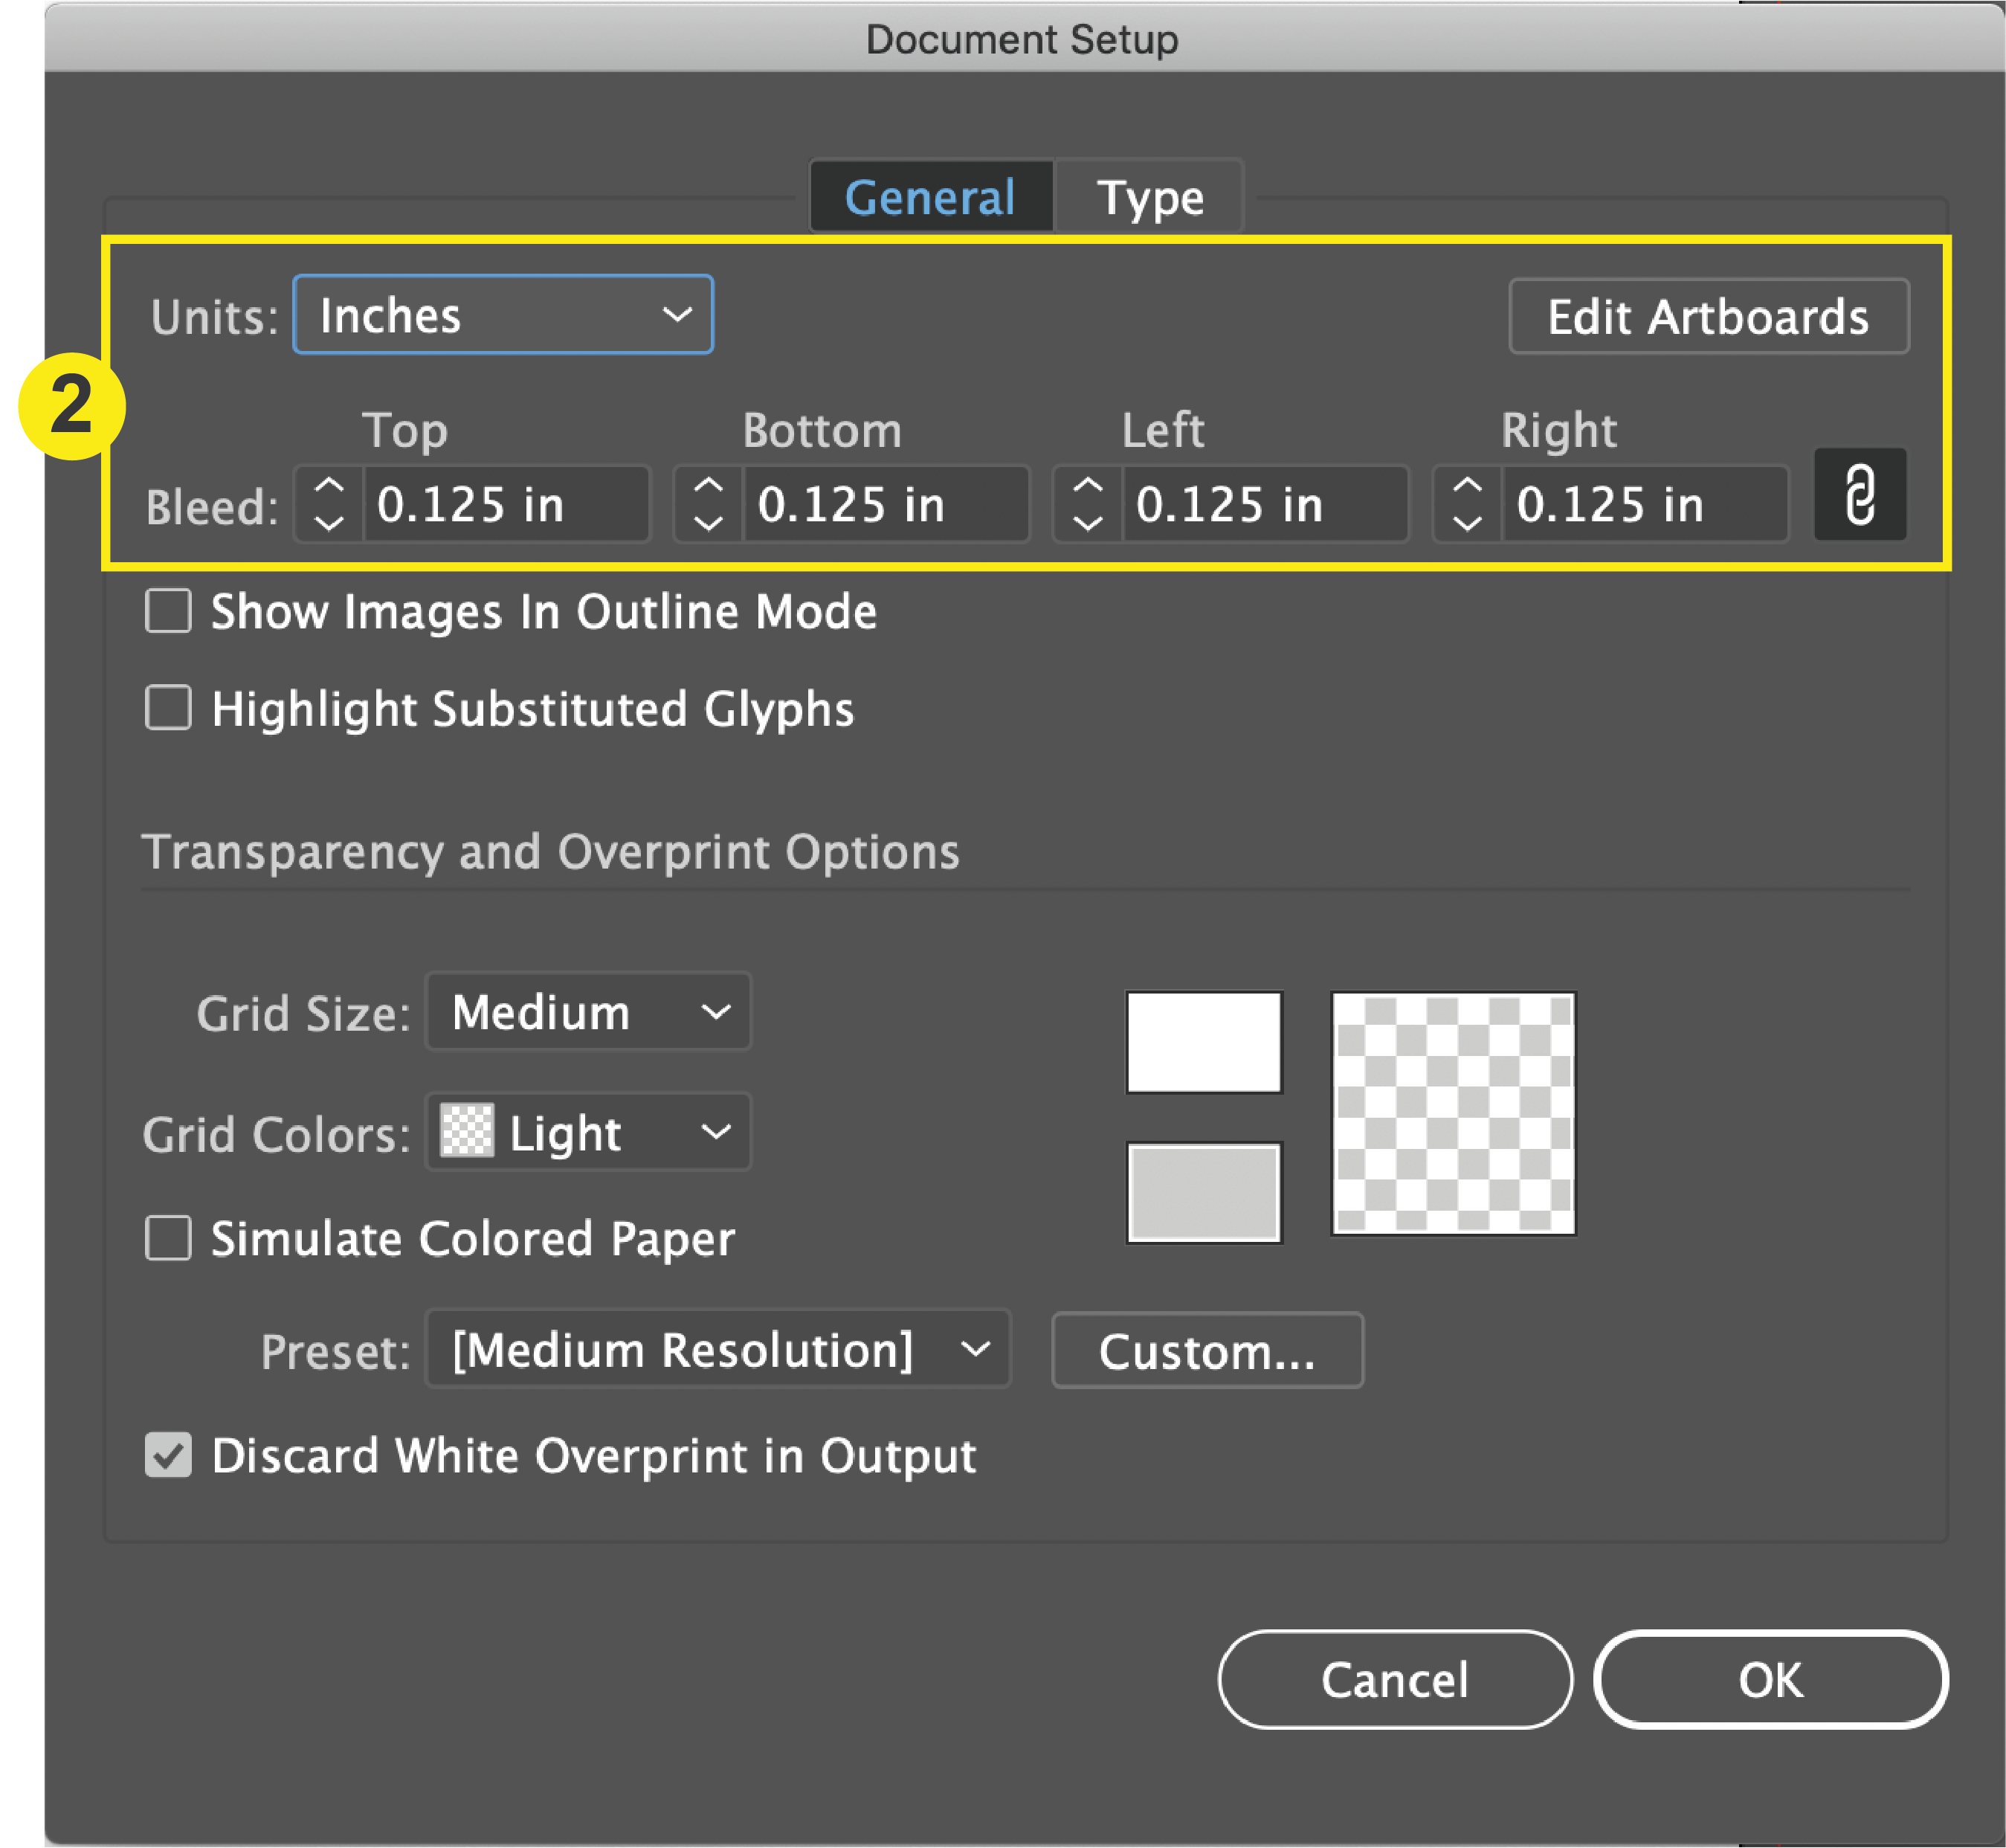
2. Add Bleed

In the “Bleed” section, add 0.125 inch bleed to the top, bottom, left, and right. Click OK.

Illustrator_Document Setup Window

3. Turn on your Rulers

In the top menu, go to View > Rulers > Show Rulers

4. Set Safety Line

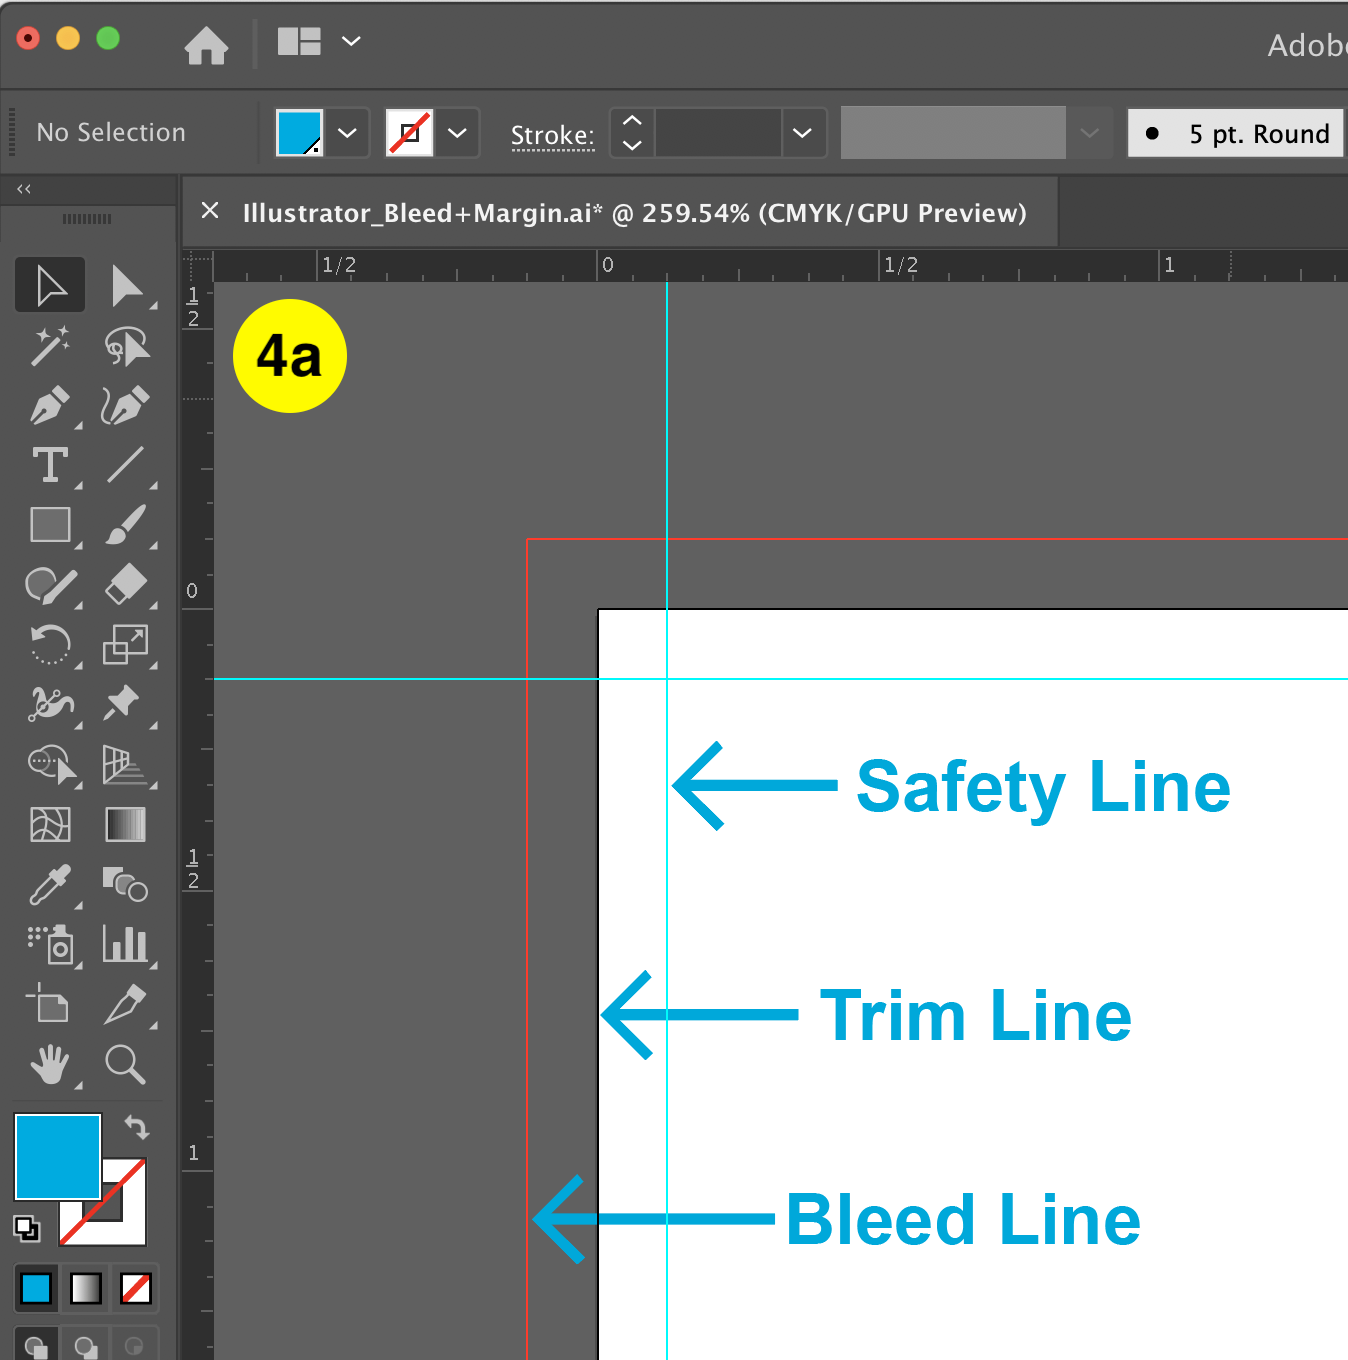
a. Click + Drag your safety lines (margins) from the rulers to 0.125 in within the document on each edge.
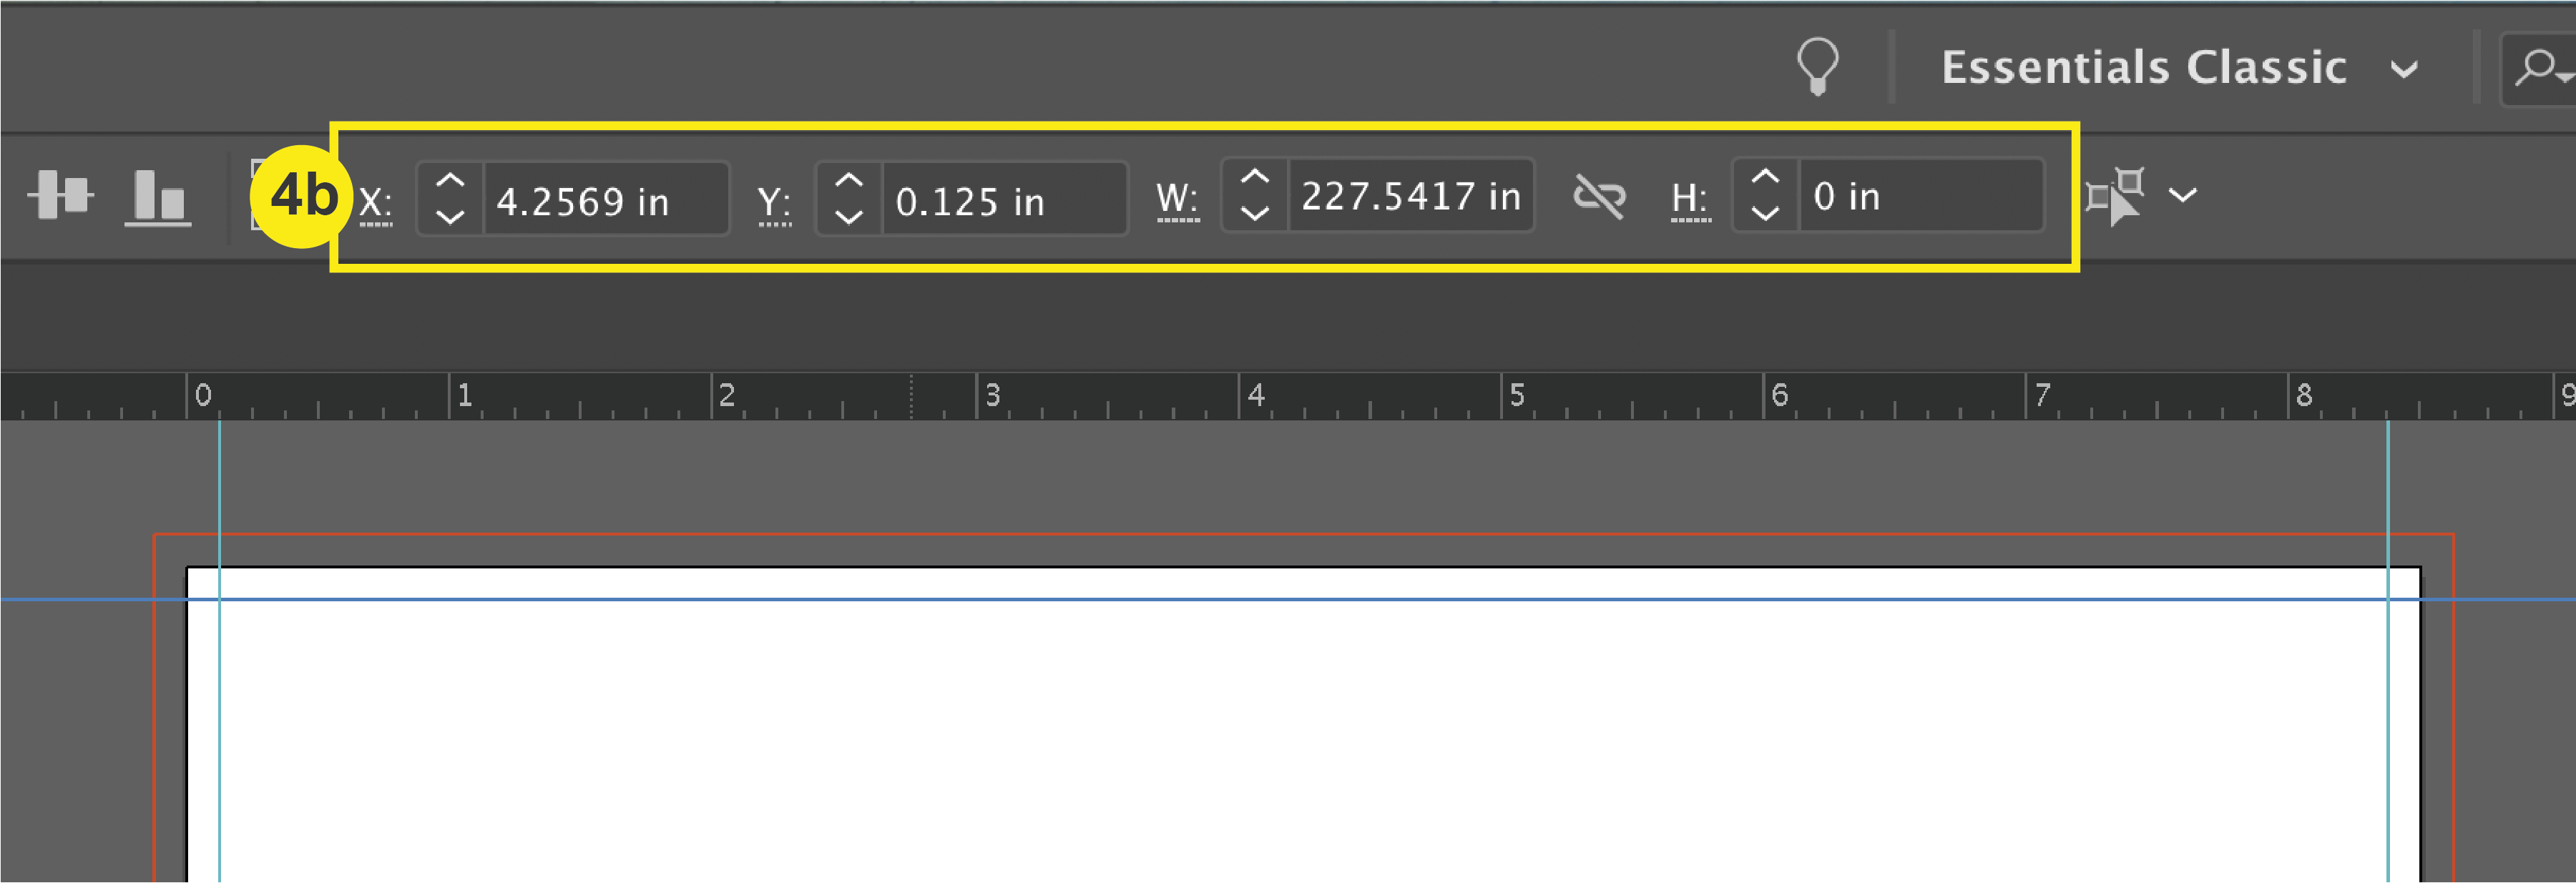
b. You can check the measurements of the safety lines at the top of your Illustrator document.

Illustrator_Safety_Trim_Bleed
Illustrator_Check Measurements

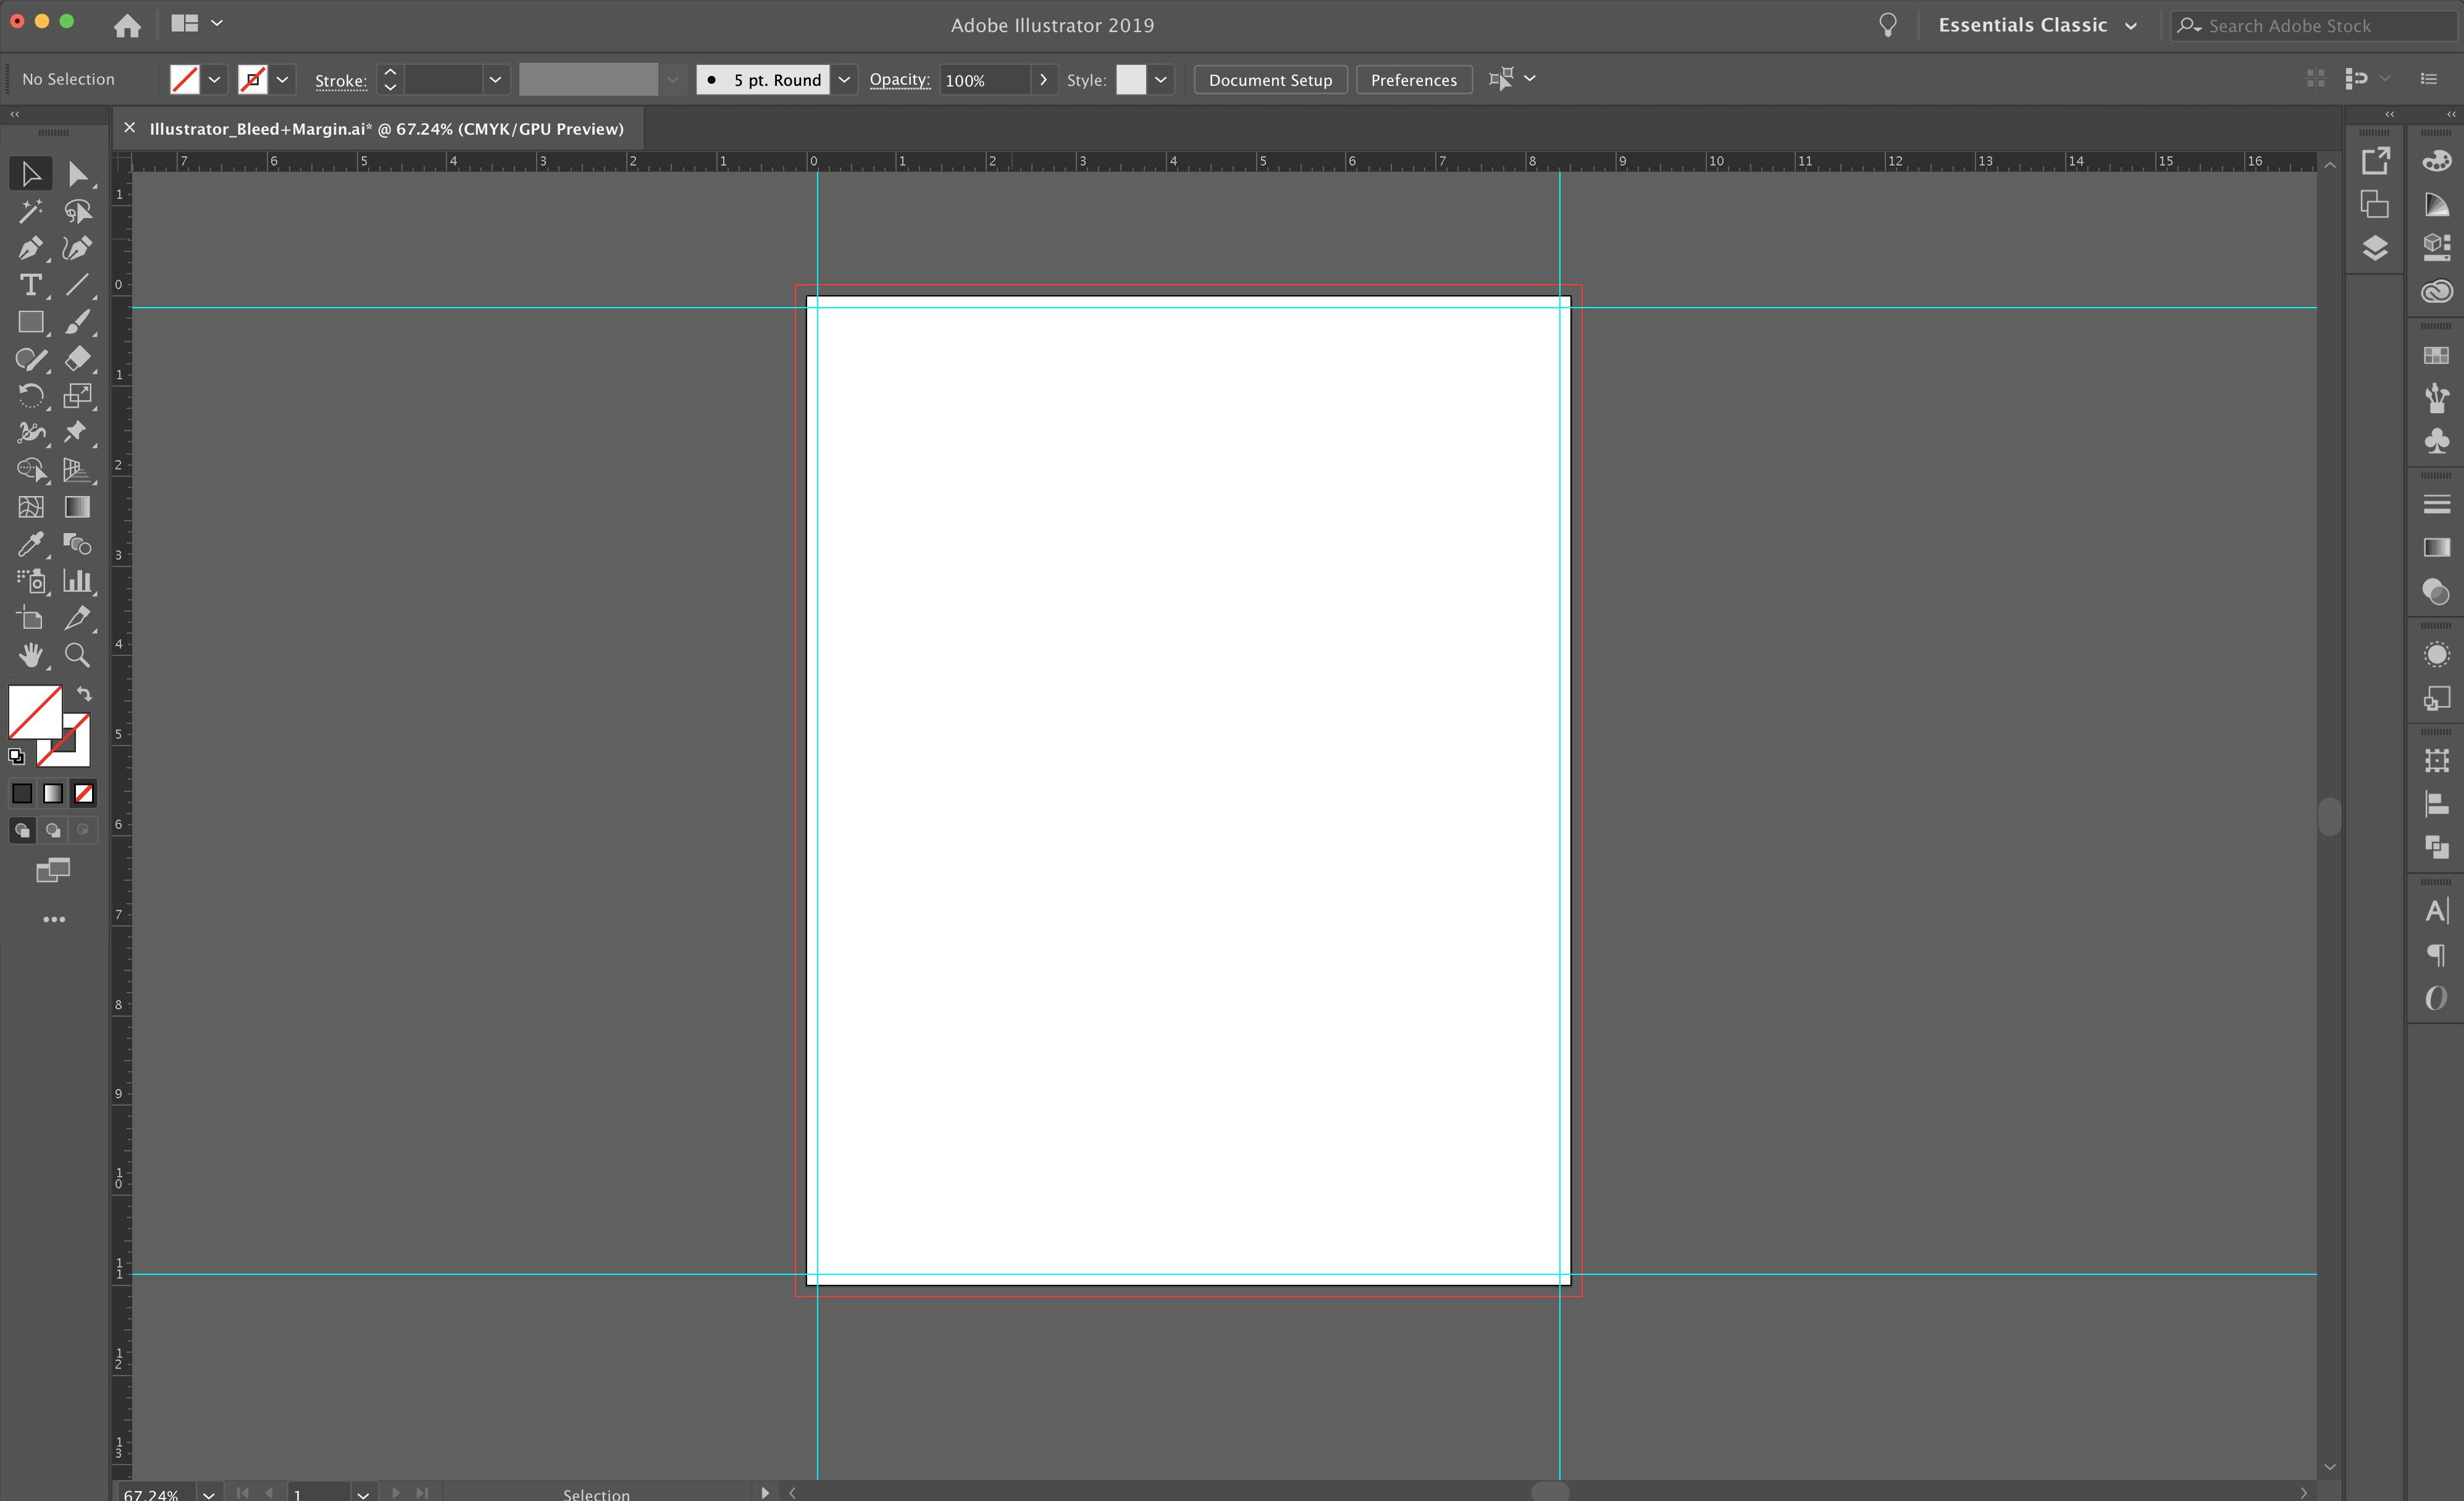
Now that your document is set up properly with bleeds and safety lines, it should look similar to this:

Illustrator_New Document

5. Utilizing the Bleed Line

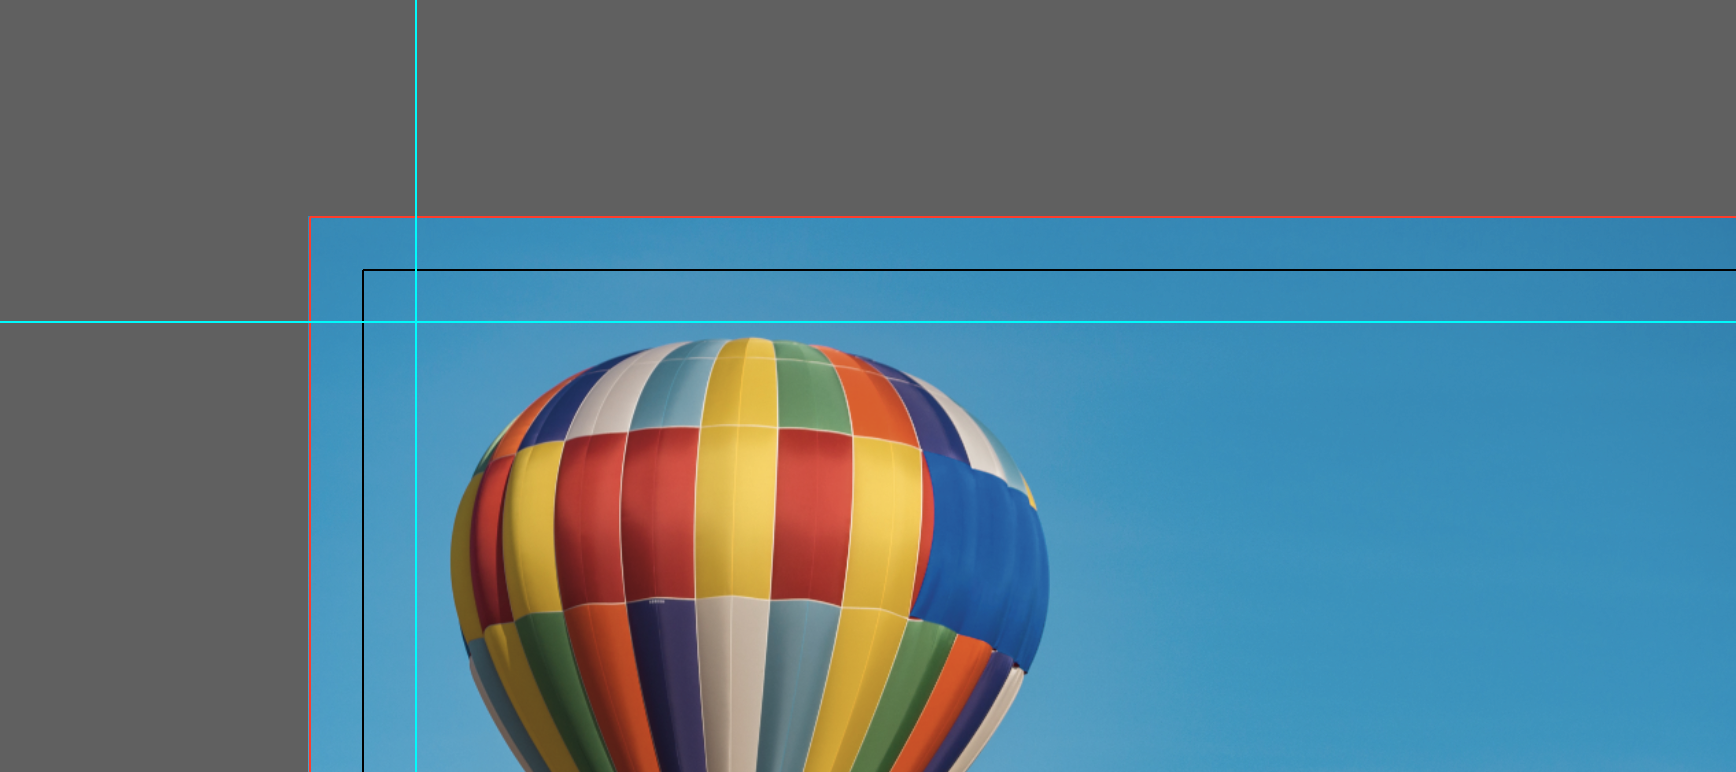
To utilize your bleeds when designing, extend your graphics and/or images (that you want to print up to the edge) beyond the edge of the page to the bleed line.

Illustrator_Utilizing the Bleed Line

File Preparation | Bleeds | InDesign

Bleeds: InDesign

Checklist

  1. Open Document Setup
  2. Add Bleed & Margins (Safety Lines)
  3. Utilizing the Bleed Line
  4. Utilizing the Safety Line

1. Open Document Setup

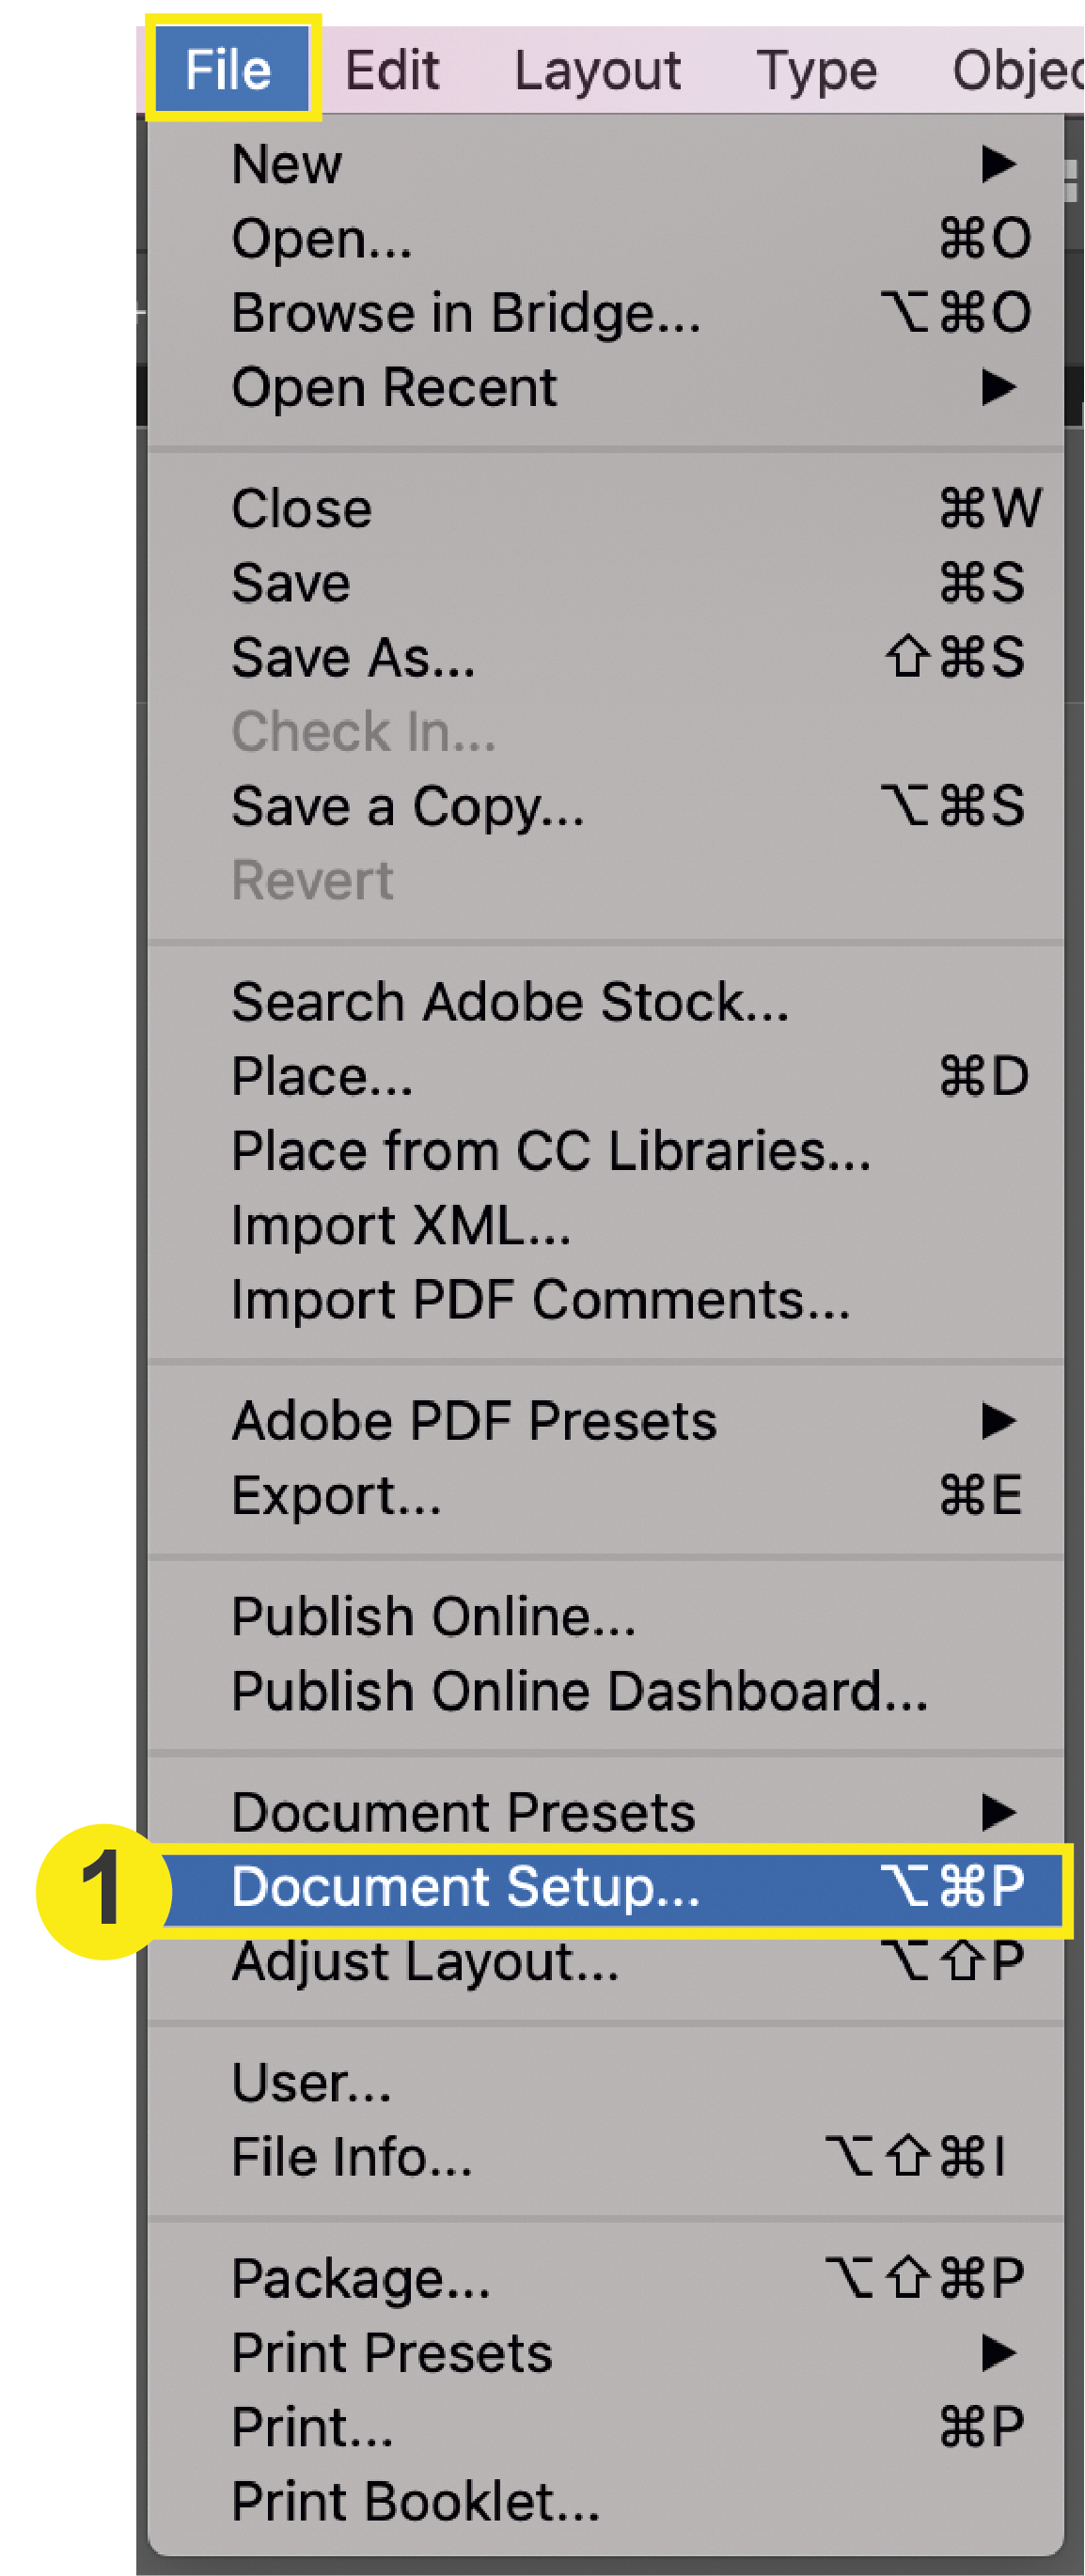
From the top menu: Click File > Document Setup

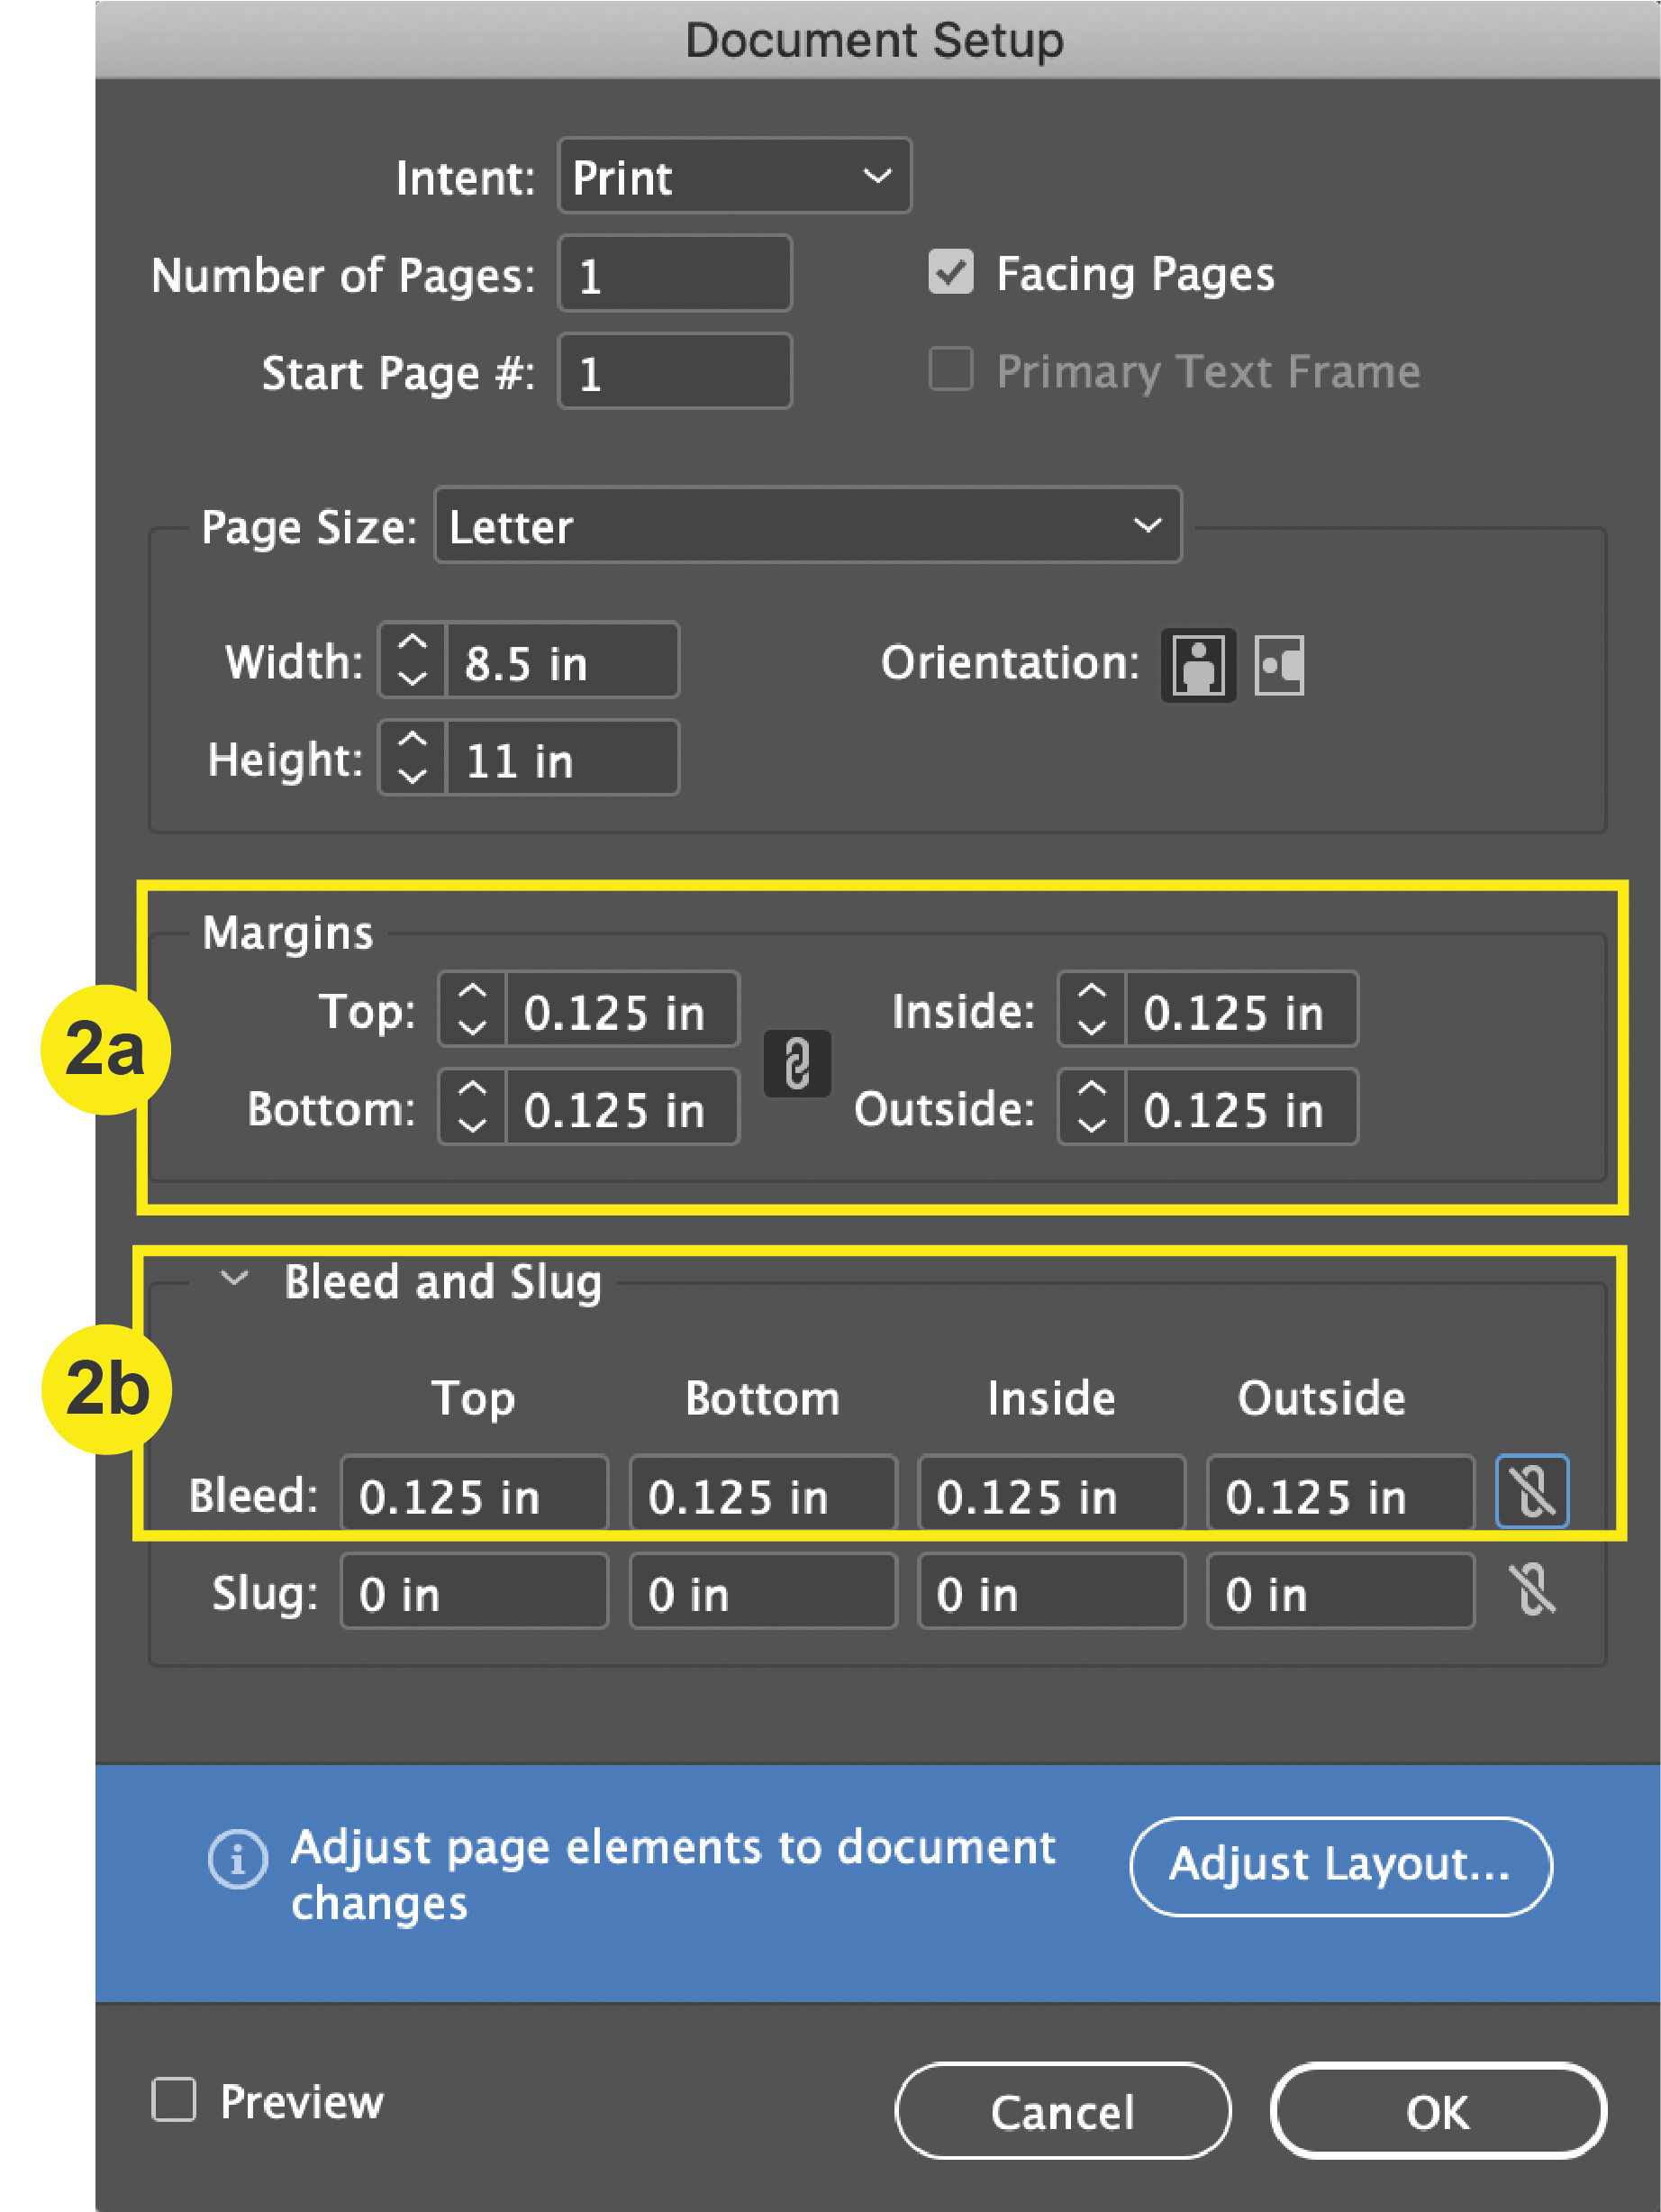
This will prompt the Document Setup window to open where you will add your bleed and margins (safety lines) settings.

2. Add Bleed & Margins (Safety Lines)

a. In the “Margins” section, change all edges (top, bottom, inside, & outside) to 0.125 inches.
b. In the “Bleed and Slug” section, input 0.125 inches to all edges (top, bottom, inside & outside). You do not need to add slug.

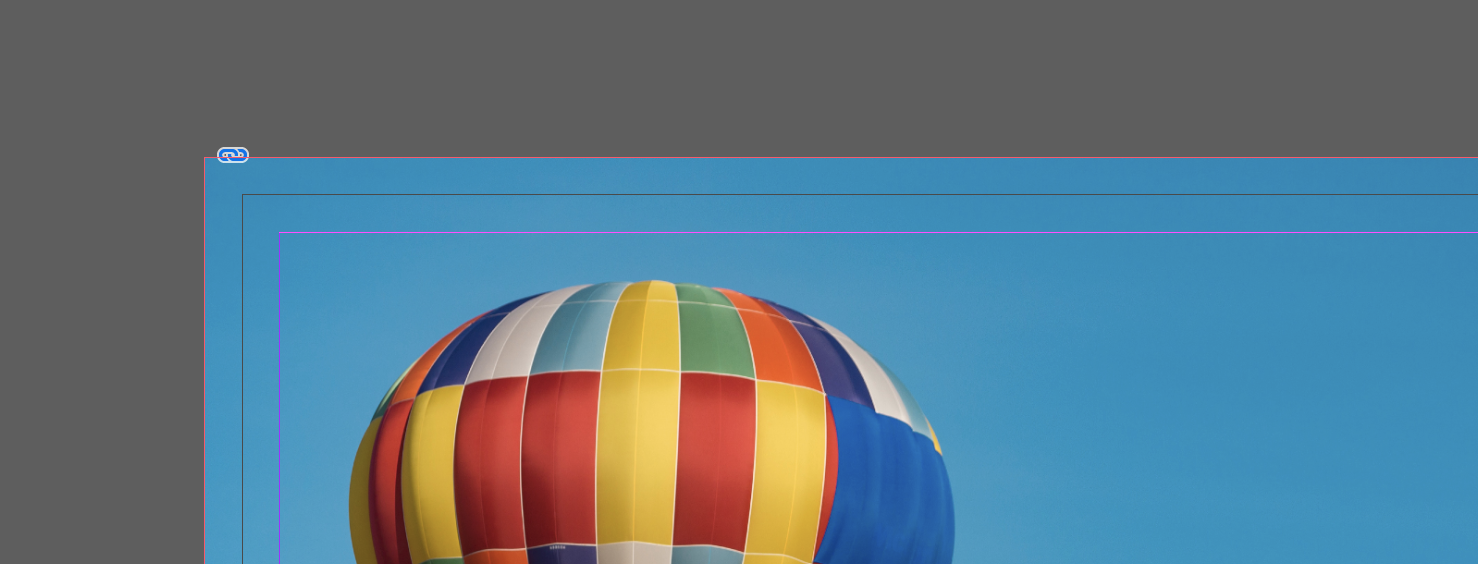
3. Utilizing the Bleed Line

To utilize your bleeds when designing, extend your graphics and/or images (that you want to print up to the edge) beyond the edge of the page to the bleed line.

Utilizing the Bleed Line

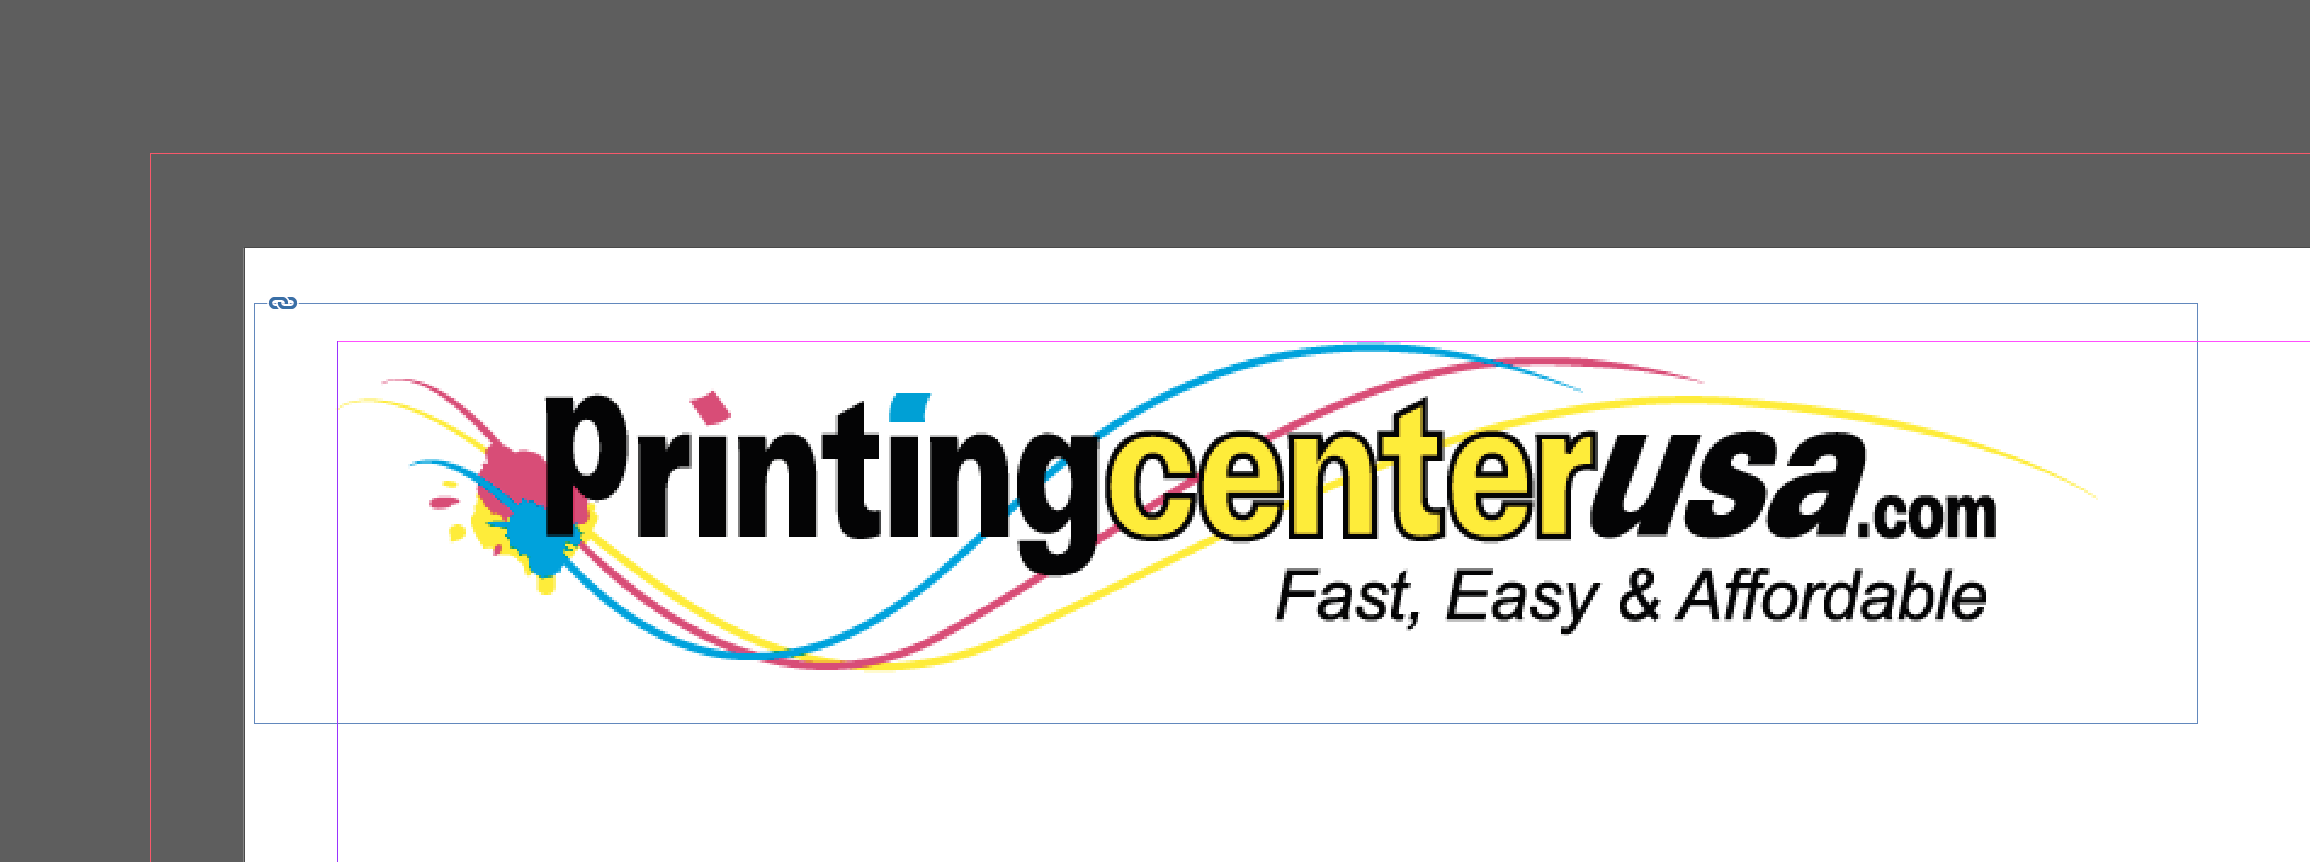
4. Utilizing the Safety Line

Place your important information (Page numbers, logos, text, etc.) within the safety line to ensure that you don’t lose any of it during the trimming process.
Utilizing the Safety Line

File Preparation | Bleeds | Overview

Bleeds: Overview

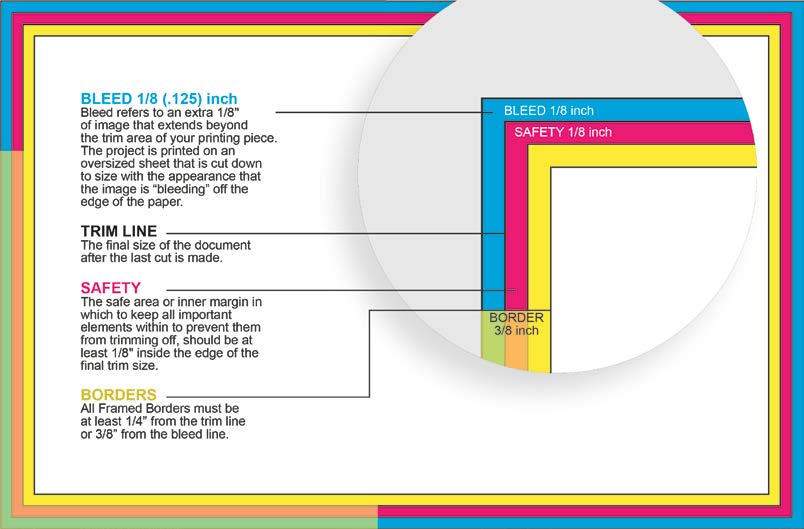
To prevent your printed product from having unsightly white lines around the border, you must set your document up with bleeds. Bleed refers to an extra 1/8″ of image that extends beyond the trim area of your printing piece. The project is printed on an oversized sheet that is cut down to size with the appearance that the image is “bleeding” off the edge of the paper.
It is best practice to set up your bleeds at the very beginning of your project so you don’t have to adjust at the end.

A few terms you must understand along with bleed are trim line, safety, and borders.

Bleed
Bleed refers to an extra 1/8″ of an image that extends beyond the trim area of your printing piece. The project is printed on an oversized sheet that is cut down to size with the appearance that the image is “bleeding” off the edge of the paper.

Trim Line
The final size of the document after the last cut is made.

Safety
The safe area or inner margin in which to keep all important elements within to prevent them from trimming off, should be at least 1/8″ inside the edge of the final trim size.

Borders
All framed borders must be at least 1/4″ from the trim line or 3/8″ from the bleed line.

For a step-by-step tutorial on setting up your bleeds, select from one of the following programs:
InDesign, Illustrator, Photoshop, Canva, Publisher, and Word.

Have more questions? Check our Bleed FAQ.

File Preparation | Print Ready File Creation | Publisher

Checklist

  1. Open a New Blank Document
  2. Open Page Setup
  3. Add Bleeds and Margins (Safety Lines)
  4. Use Rulers to Create a Trim Guide

1. Open a New Blank Document

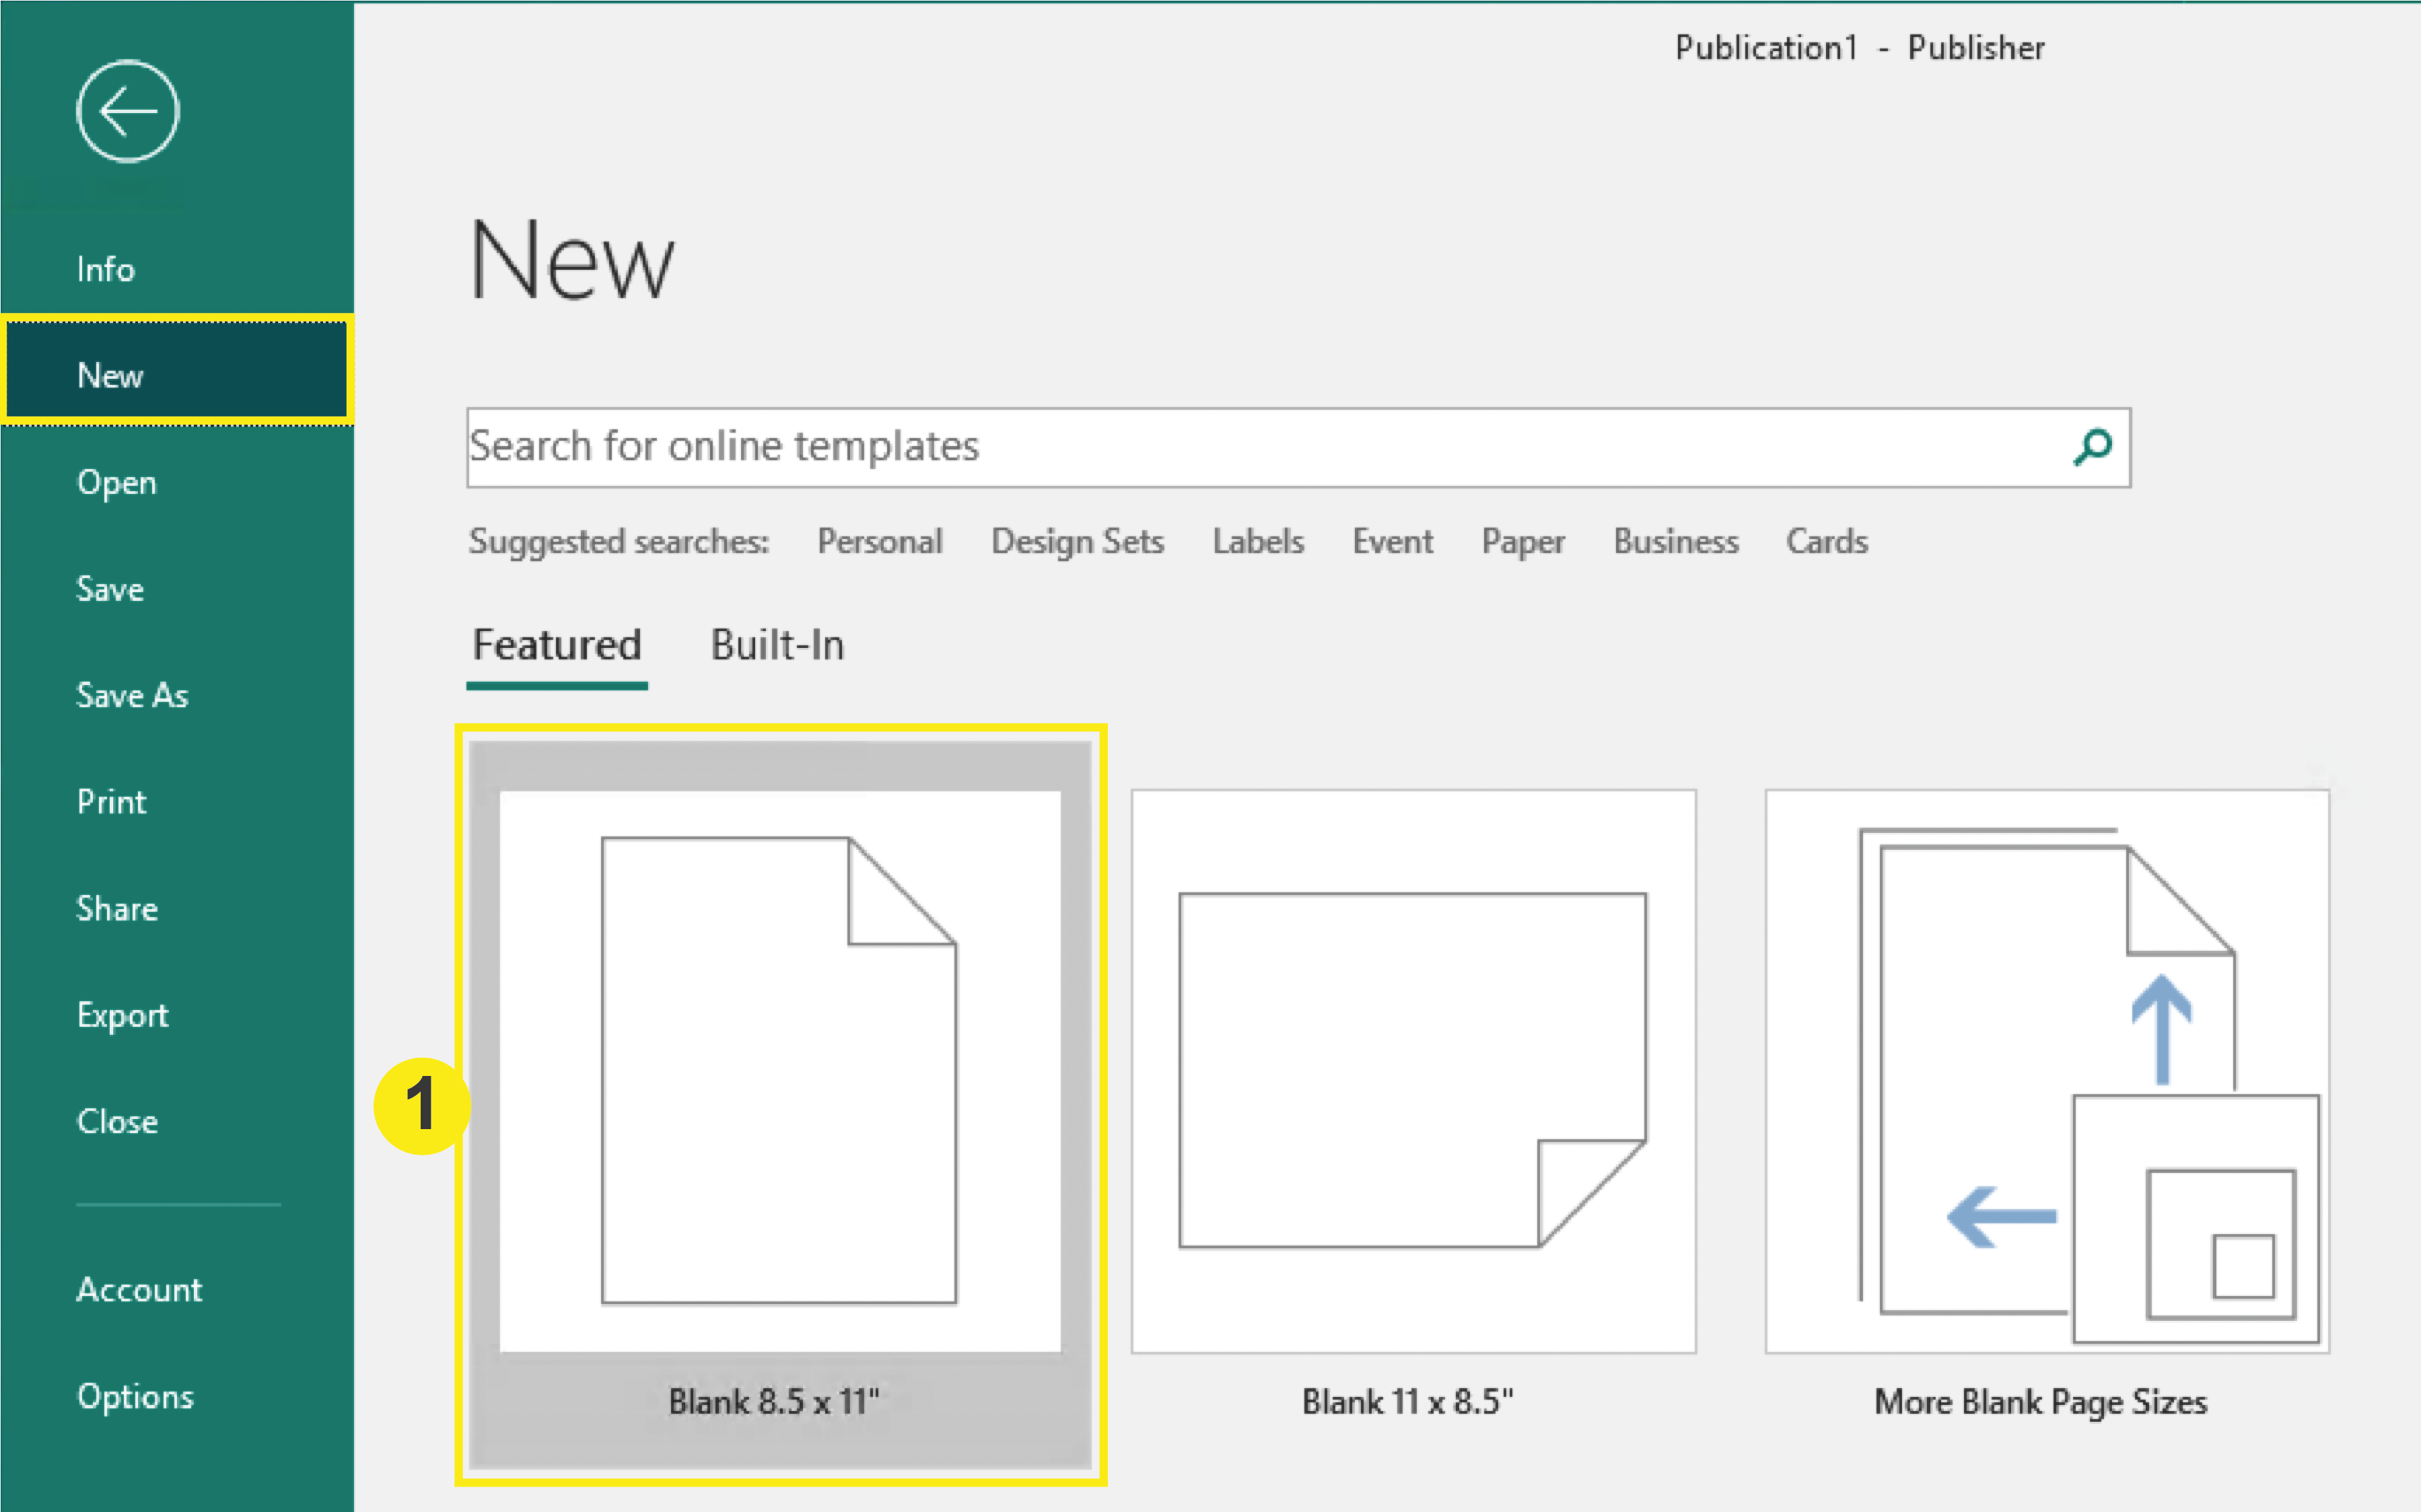
Once you have opened Publisher, click New > Blank 8.5” x 11.” If this is not your desired document size, you can look through more standard sizes in “More Blank Page Sizes,” but you can always adjust the size of the document within the Page Setup.

2. Open Page Setup

In the top menu, navigate to Page Design > Size > Page Setup. This will prompt the Page Setup window to open where you will input your document settings.

3. Add Bleeds and Margins (Safety Lines)

  1. In the “Page” section, input the bleed size of your document. To determine the bleed size, add .25 inches to both the width and height. For Example: An 8.5” x 11” Letterhead plus bleed would be 8.75” x 11.25”
  2. In the “Margin guides” section, change the value to .25 inches for each side (top, left, bottom, right). Click OK. Note: Note that your Target Paper Size (Final Trim Size) remains 8.5” x 11”
Publisher_PageSetup

4. Use Rulers to Add a Trim Guide

After adding bleed to and margins (safety lines) to your document, you still will not be able to see where your trim line will be. To add a Trim Guide to your document, Click + Drag your mouse from the rulers to create a .125 inch guide within the document. This should fall directly between the edge of the document and the innermost margins (safety lines).

Publisher_Safety_Trim_Bleed

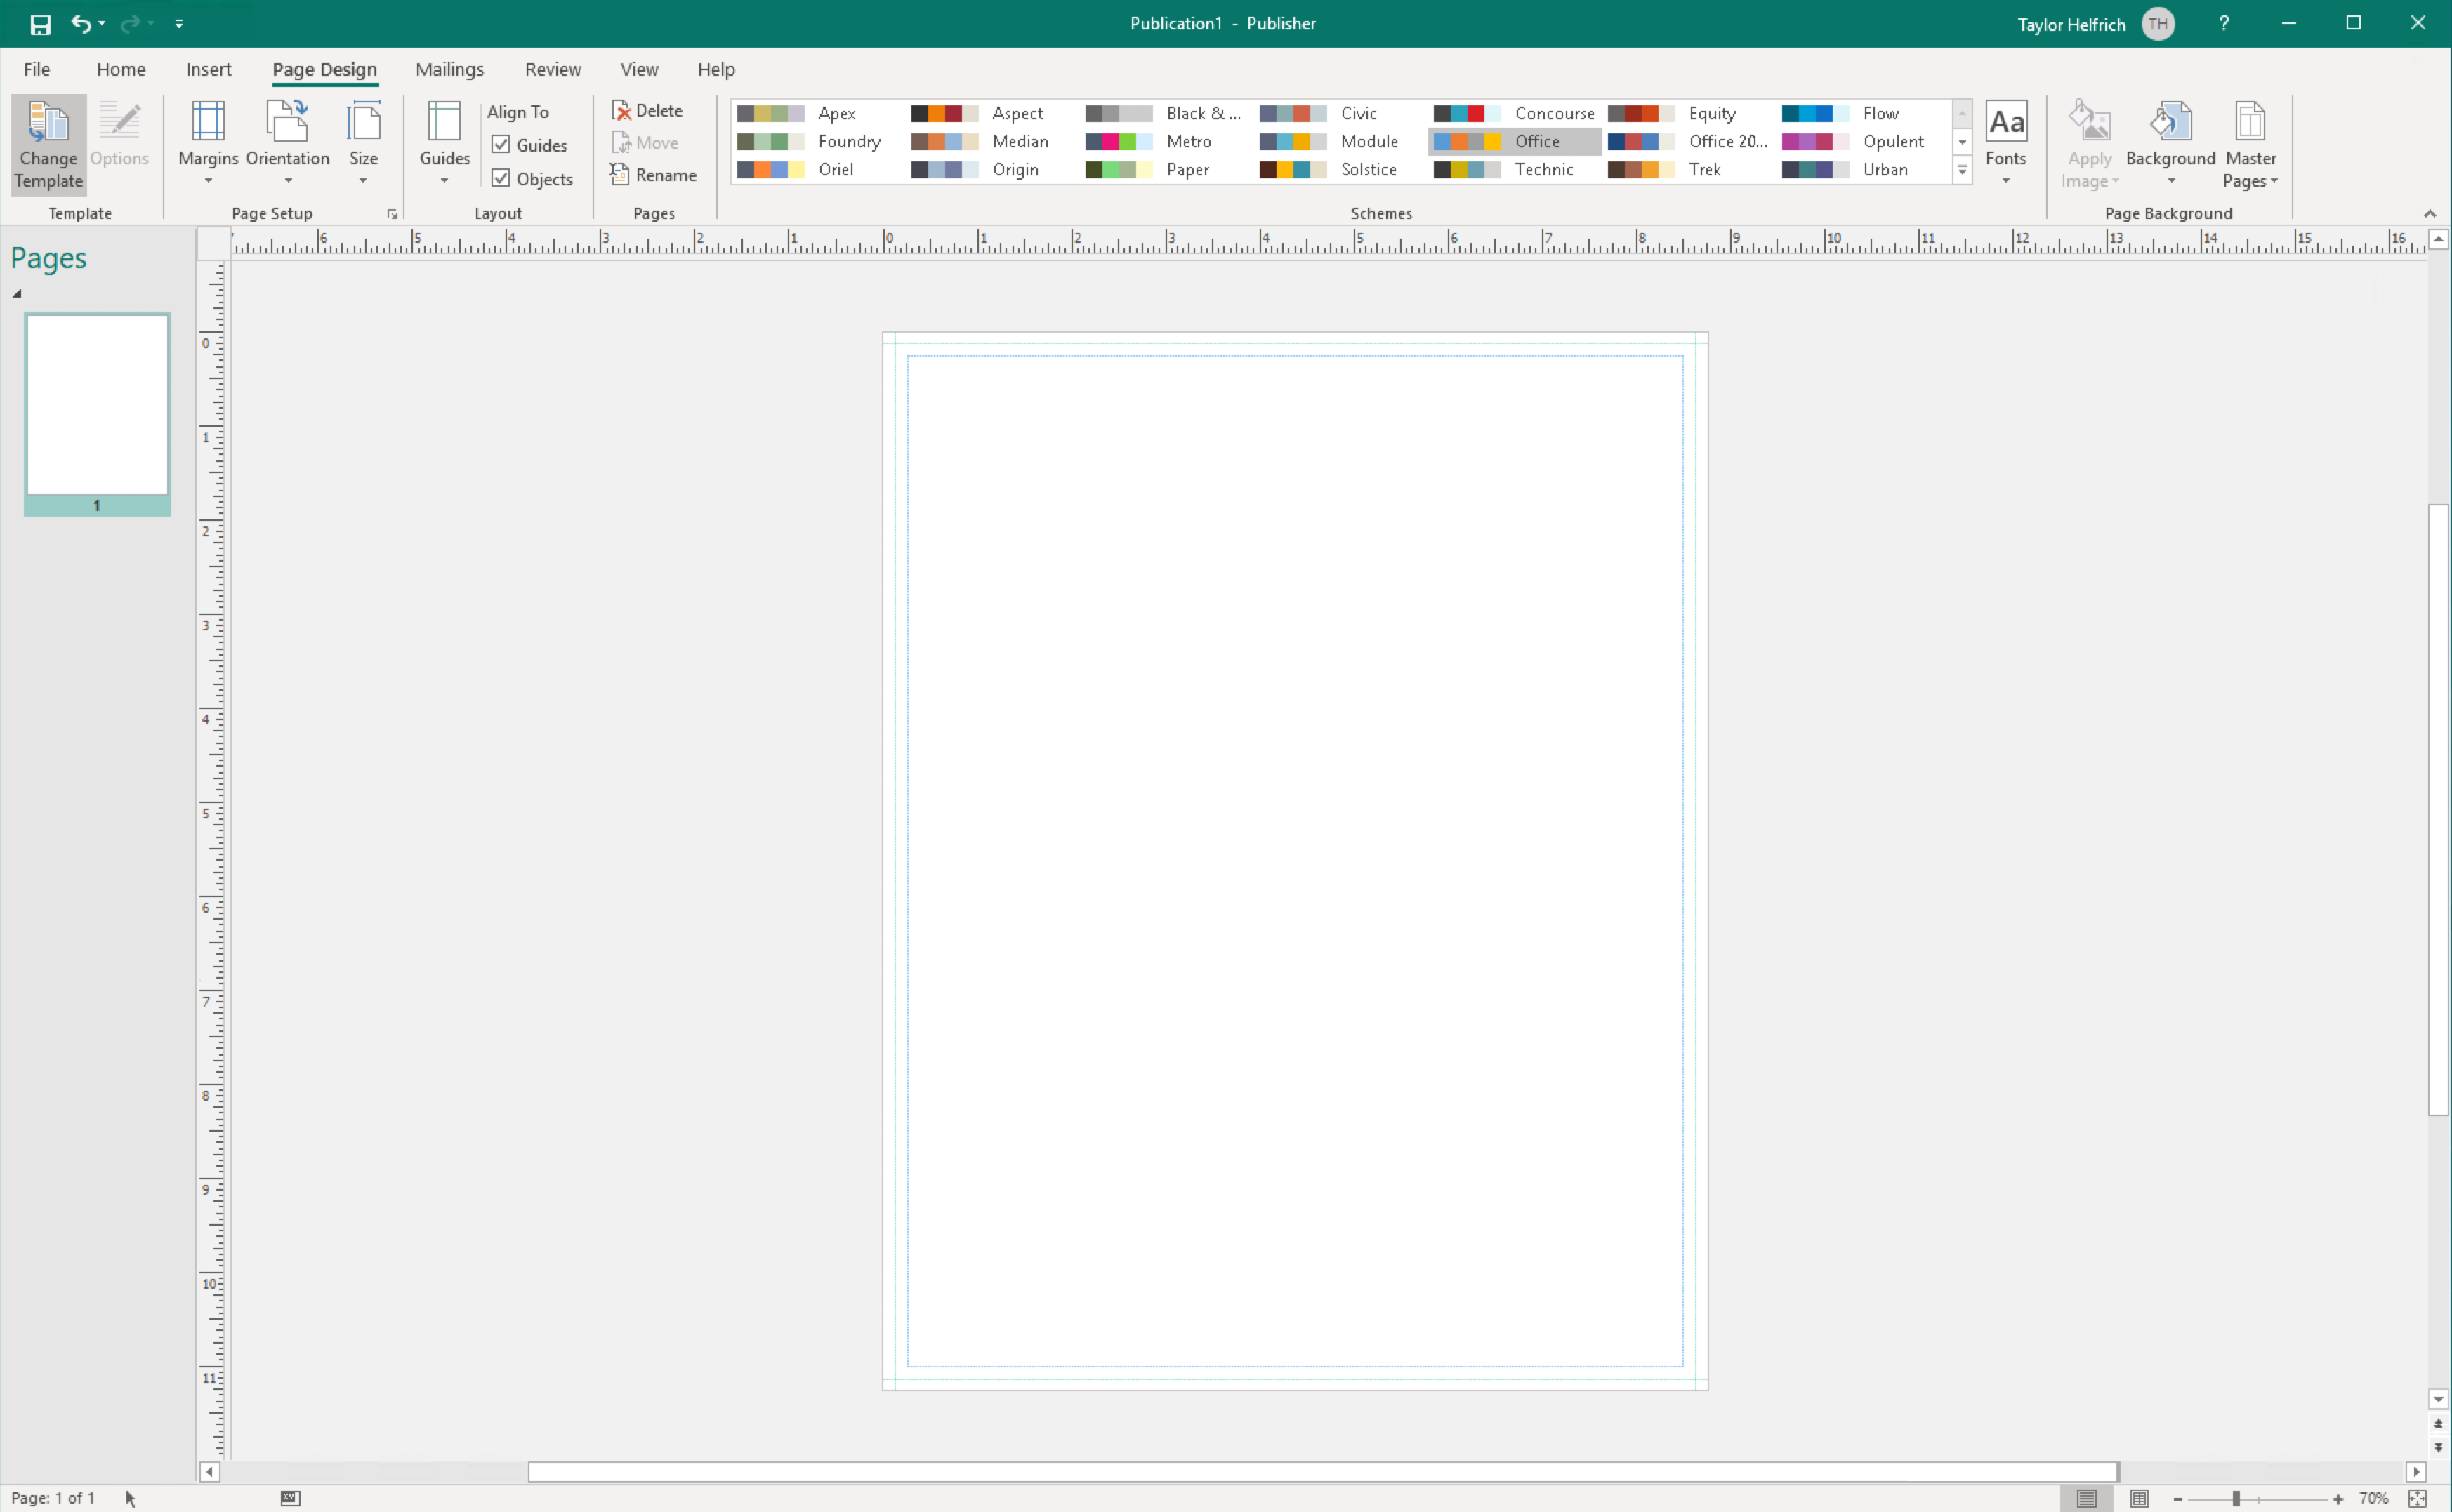
Once you are complete with steps 1-4, your document with bleeds, trim line, and safety lines set up will look similar to this:

Now you’re ready to begin designing your product for print in Publisher!

Please refer to our File Saving section for a tutorial on saving your project once you are done.

File Preparation | Print Ready File Creation | Canva

Checklist

  1. Create a design
  2. Input Custom Dimensions
  3. Add Bleed / Show Guides
  4. Warnings

1. Create a design

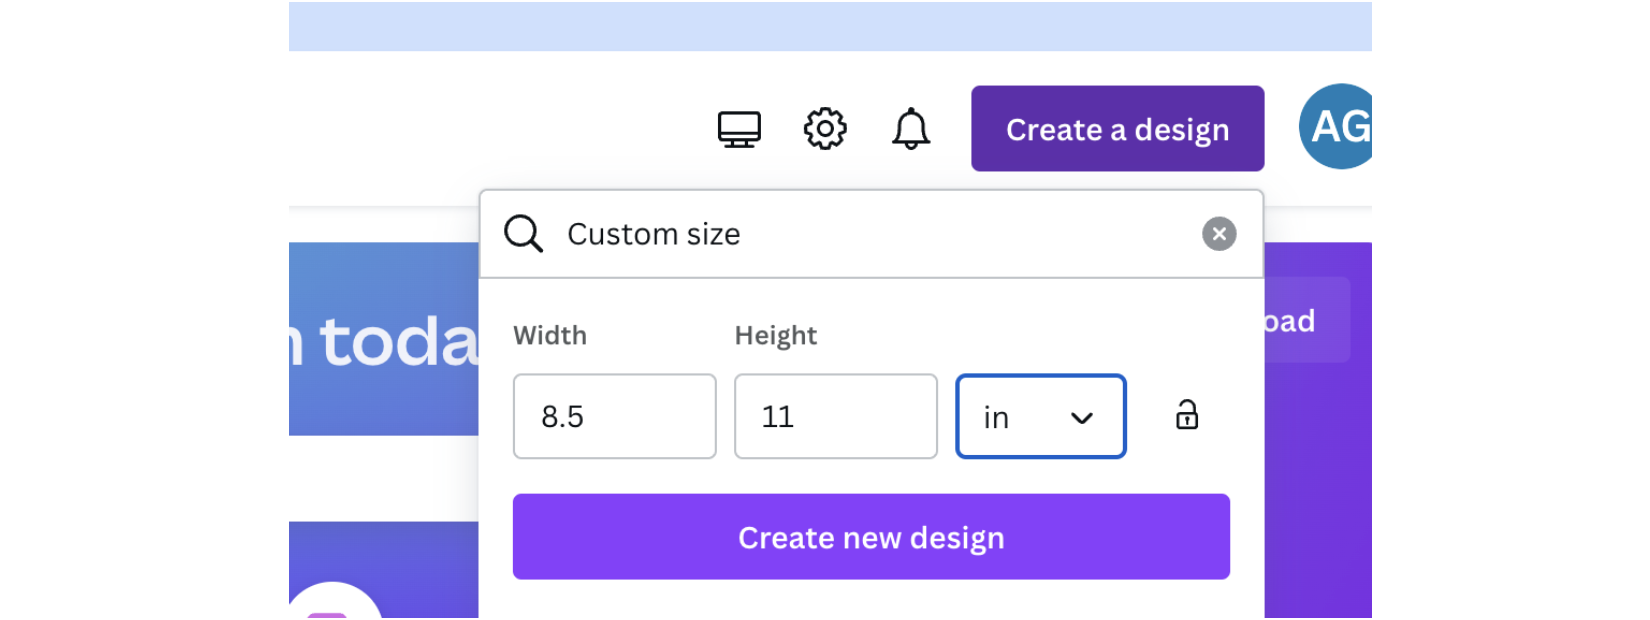
Click “Create a design” in the top right corner.

2. Input Custom Dimensions

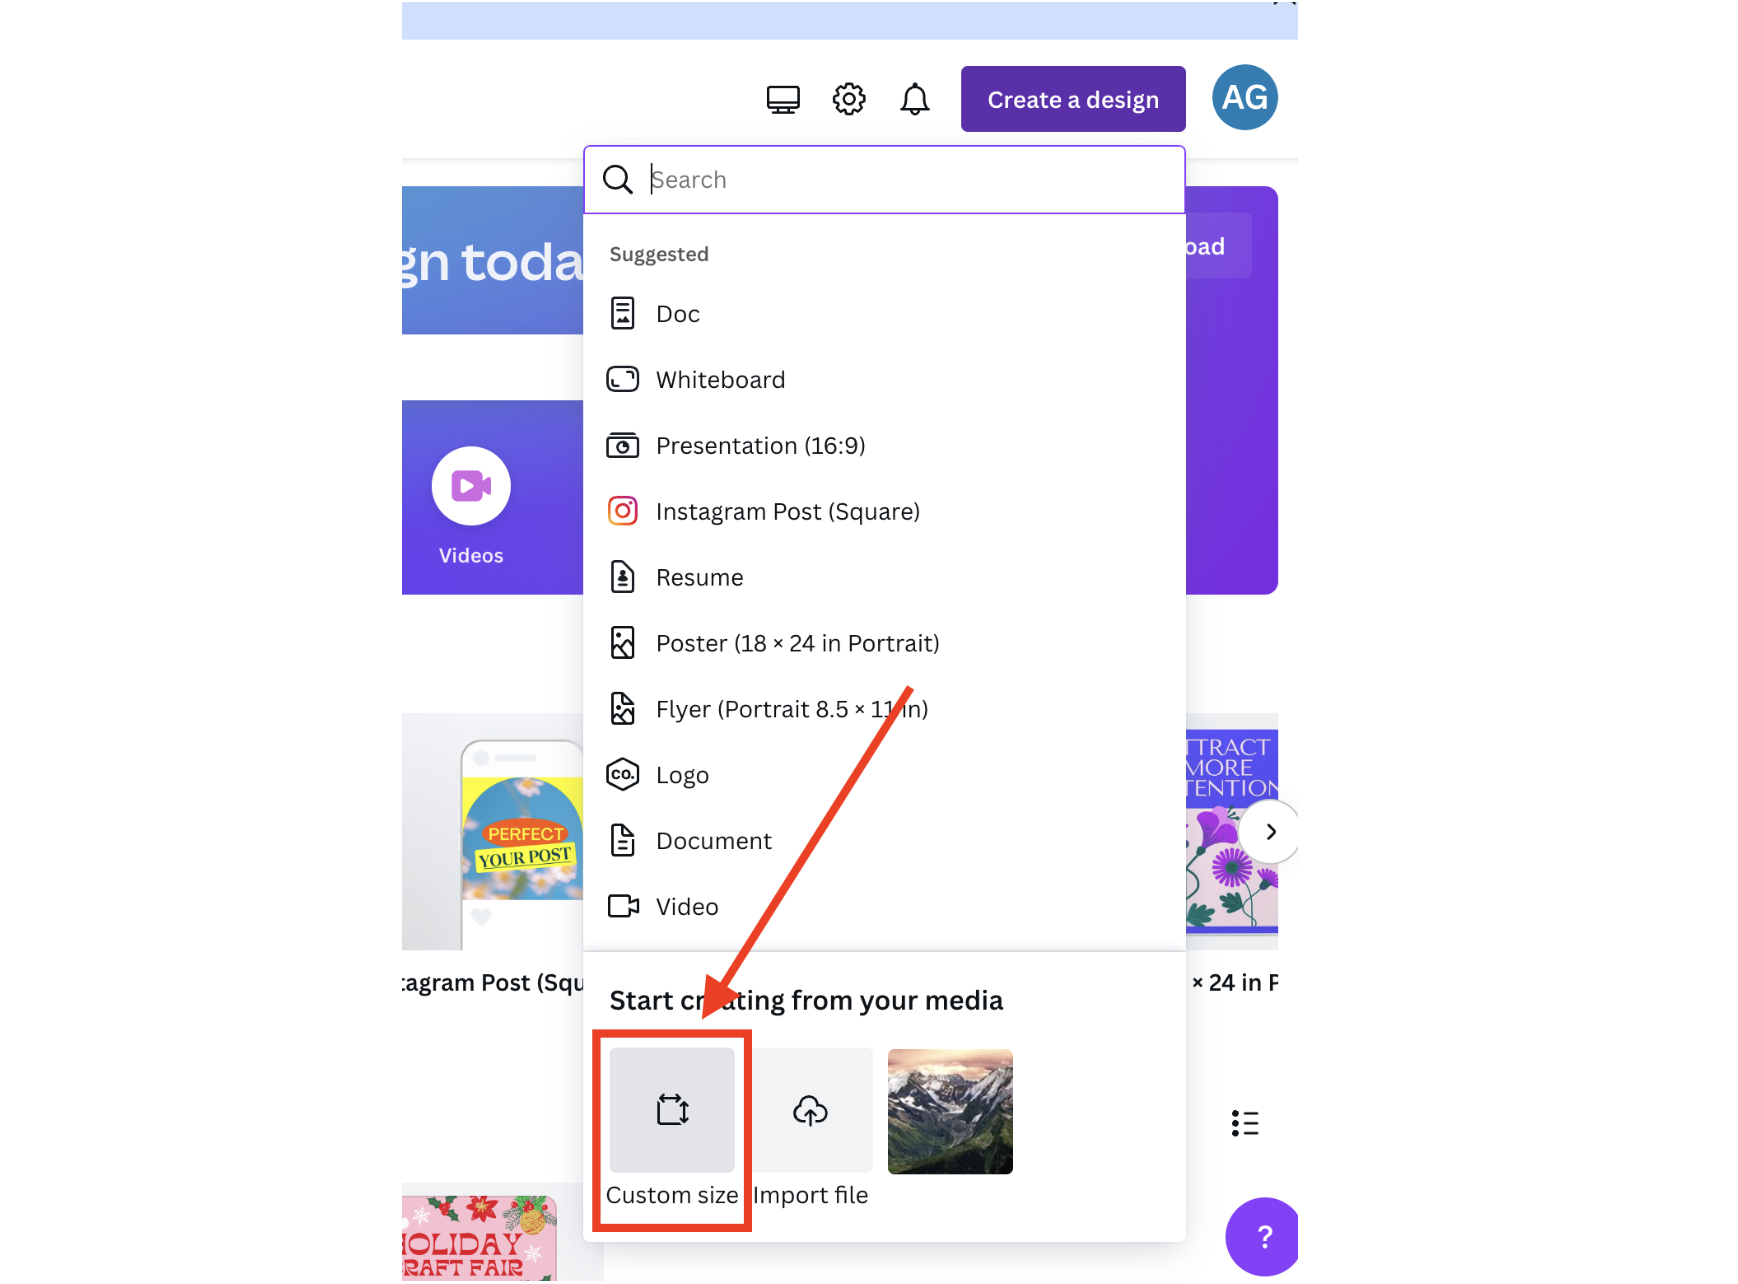
Choose “Custom Size at the bottom of the dropdown.

Input the width and height of your desired size in inches (make sure your order matches this size) and click “Create new design”.

3. Add Bleed / Show Guides

On this page, before you begin designing, click “File” at the top left side of the screen. Click “View settings” and ensure the following options have a checkmark next to them: “Show rulers and guides”, and “Show print bleed”.

After this, click on File > View settings > “Add guides”.

In the next screen (shown below),  under the “Margin” boxes, enter “0.13” for both boxes. Make sure the “Columns”, “Rows” AND “Gap” are all set to 0.

Click “Add guides”.

Your page should look similar to this:

4. Warnings

Since Canva is an online design tool that is not necessarily a program designed to create print-ready files, there are a few caveats to using this tool that you should be aware of.

  1. Margins: The margins are un-editable in Canva. The default size of these margins are much more than PrintingCenterUSA’s recommended 0.125 in. to mark your safety line. You do not need to keep all of your content within these margins. Do your best to keep in mind that the safe zone is the same size of the bleed, just within the document.
  2. Color: Canva does not provide a CMYK color option. All documents will automatically save as RGB. This may cause inconsistencies between your design and the printed product. Our prepress department will have to convert your RGB file to our CMYK printing profile. This may cause our prepress department to have to spend more time on your file.
  3. Crop Marks: PrintingCenterUSA does not recommend saving your PDF file with crop marks. However, Canva requires you to include crop marks if you want to include the bleed in your document. This may cause our prepress department to have to spend more time on your file.
  4. The more issues with your PDF, the longer our prepress department will spend on your file. You will be charged for the excess time spent fixing your files.

Now you’re ready to begin designing your product for print in Canva!

Please refer to our File Saving section for a tutorial on saving your project once you are done.

File Preparation | Print Ready File Creation | Photoshop

Checklist

  1. Download & Install Color Profile
  2. File > New
  3. Name
  4. Size + .25 for Bleeds
  5. Resolution
  6. Color Mode
  7. Background Contents
  8. Color Profile
  9. Trim + Safety

1. Download & Install PrintingCenterUSA Color Profile

First, download our color profile here. You will be downloading a .zip folder. Double click the file to unzip the folder.

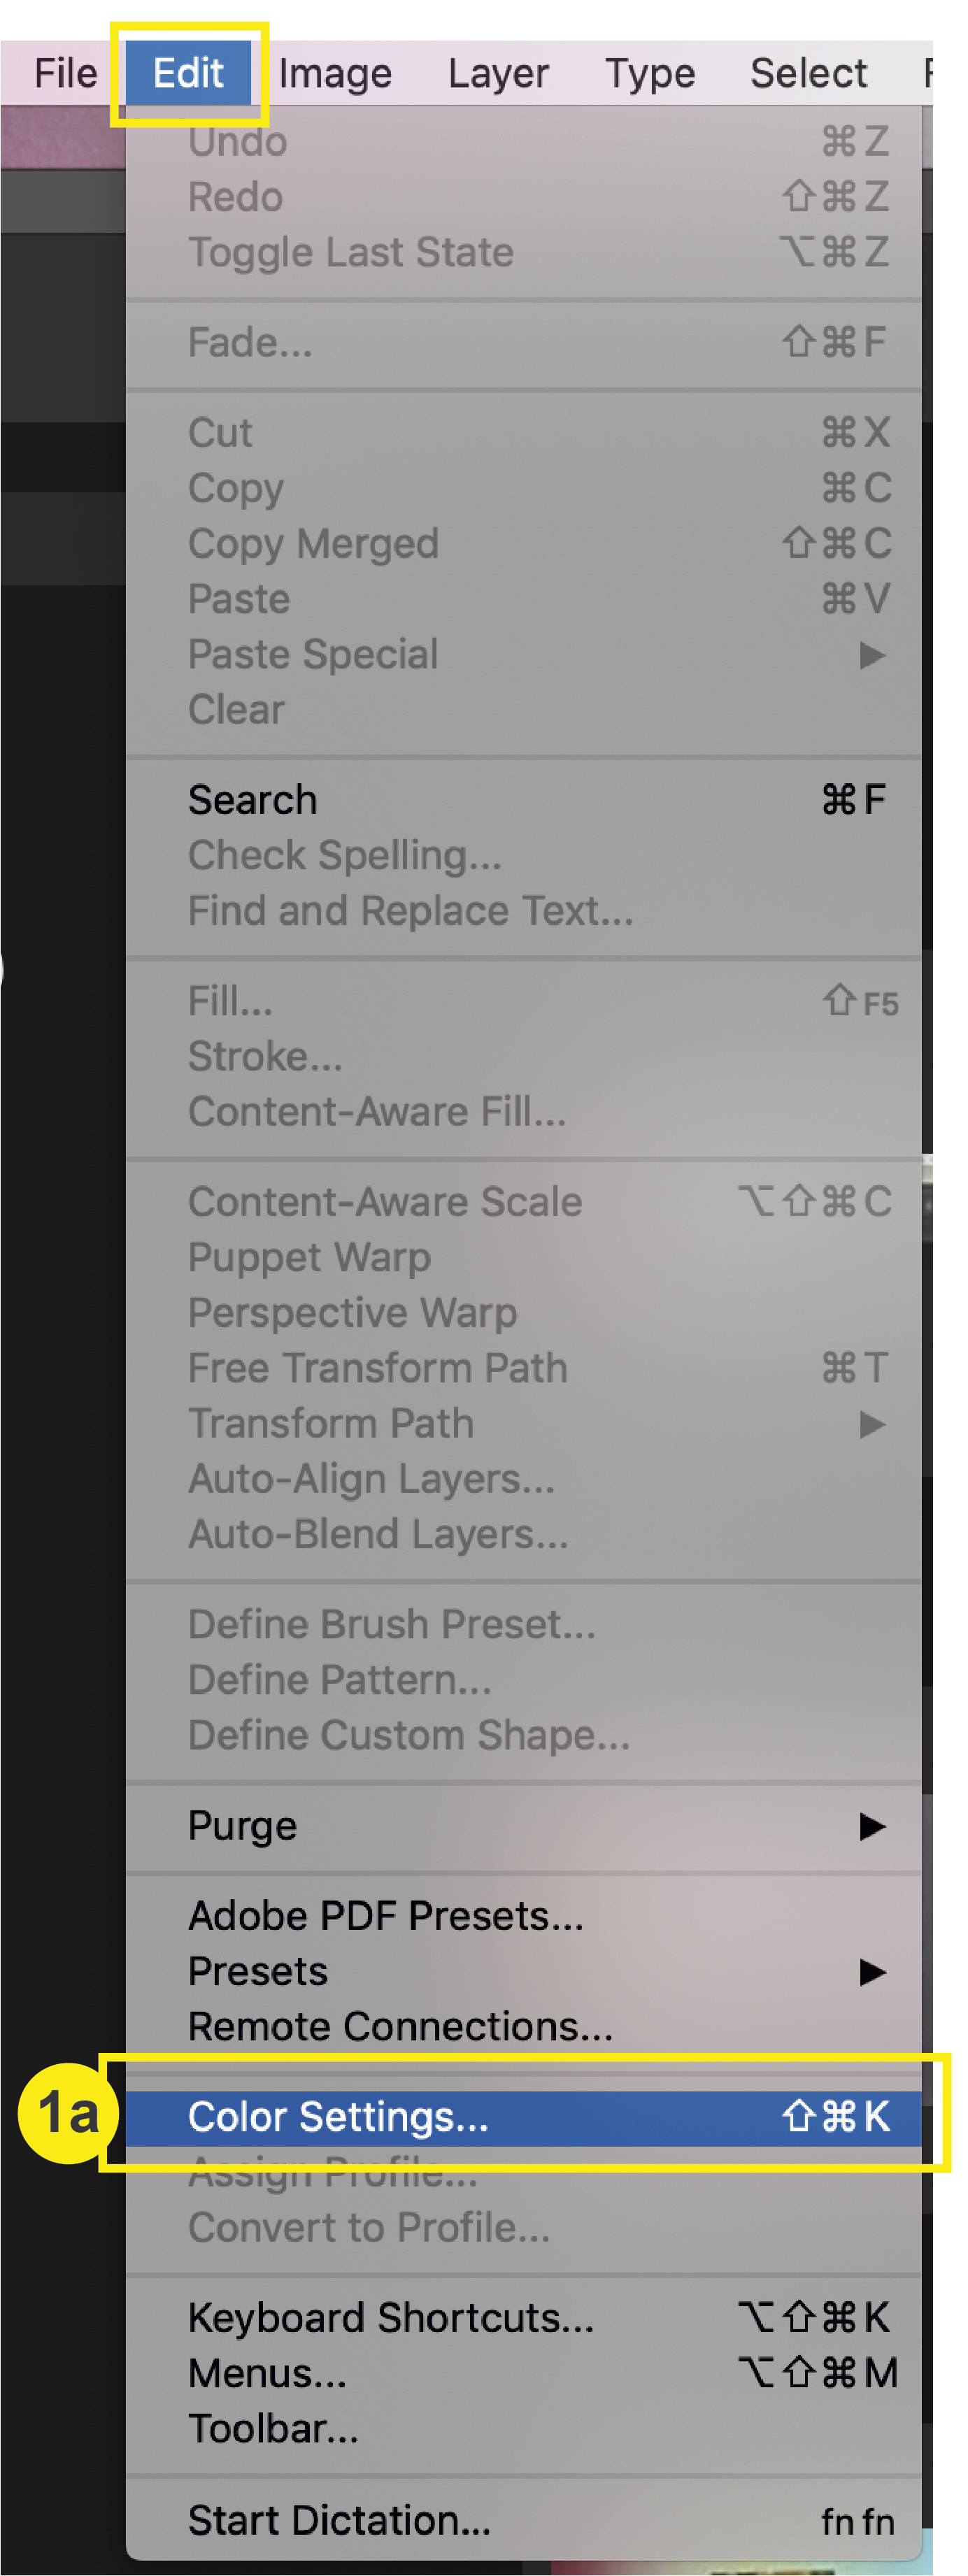
a. In Photoshop, go to Edit > Color Settings
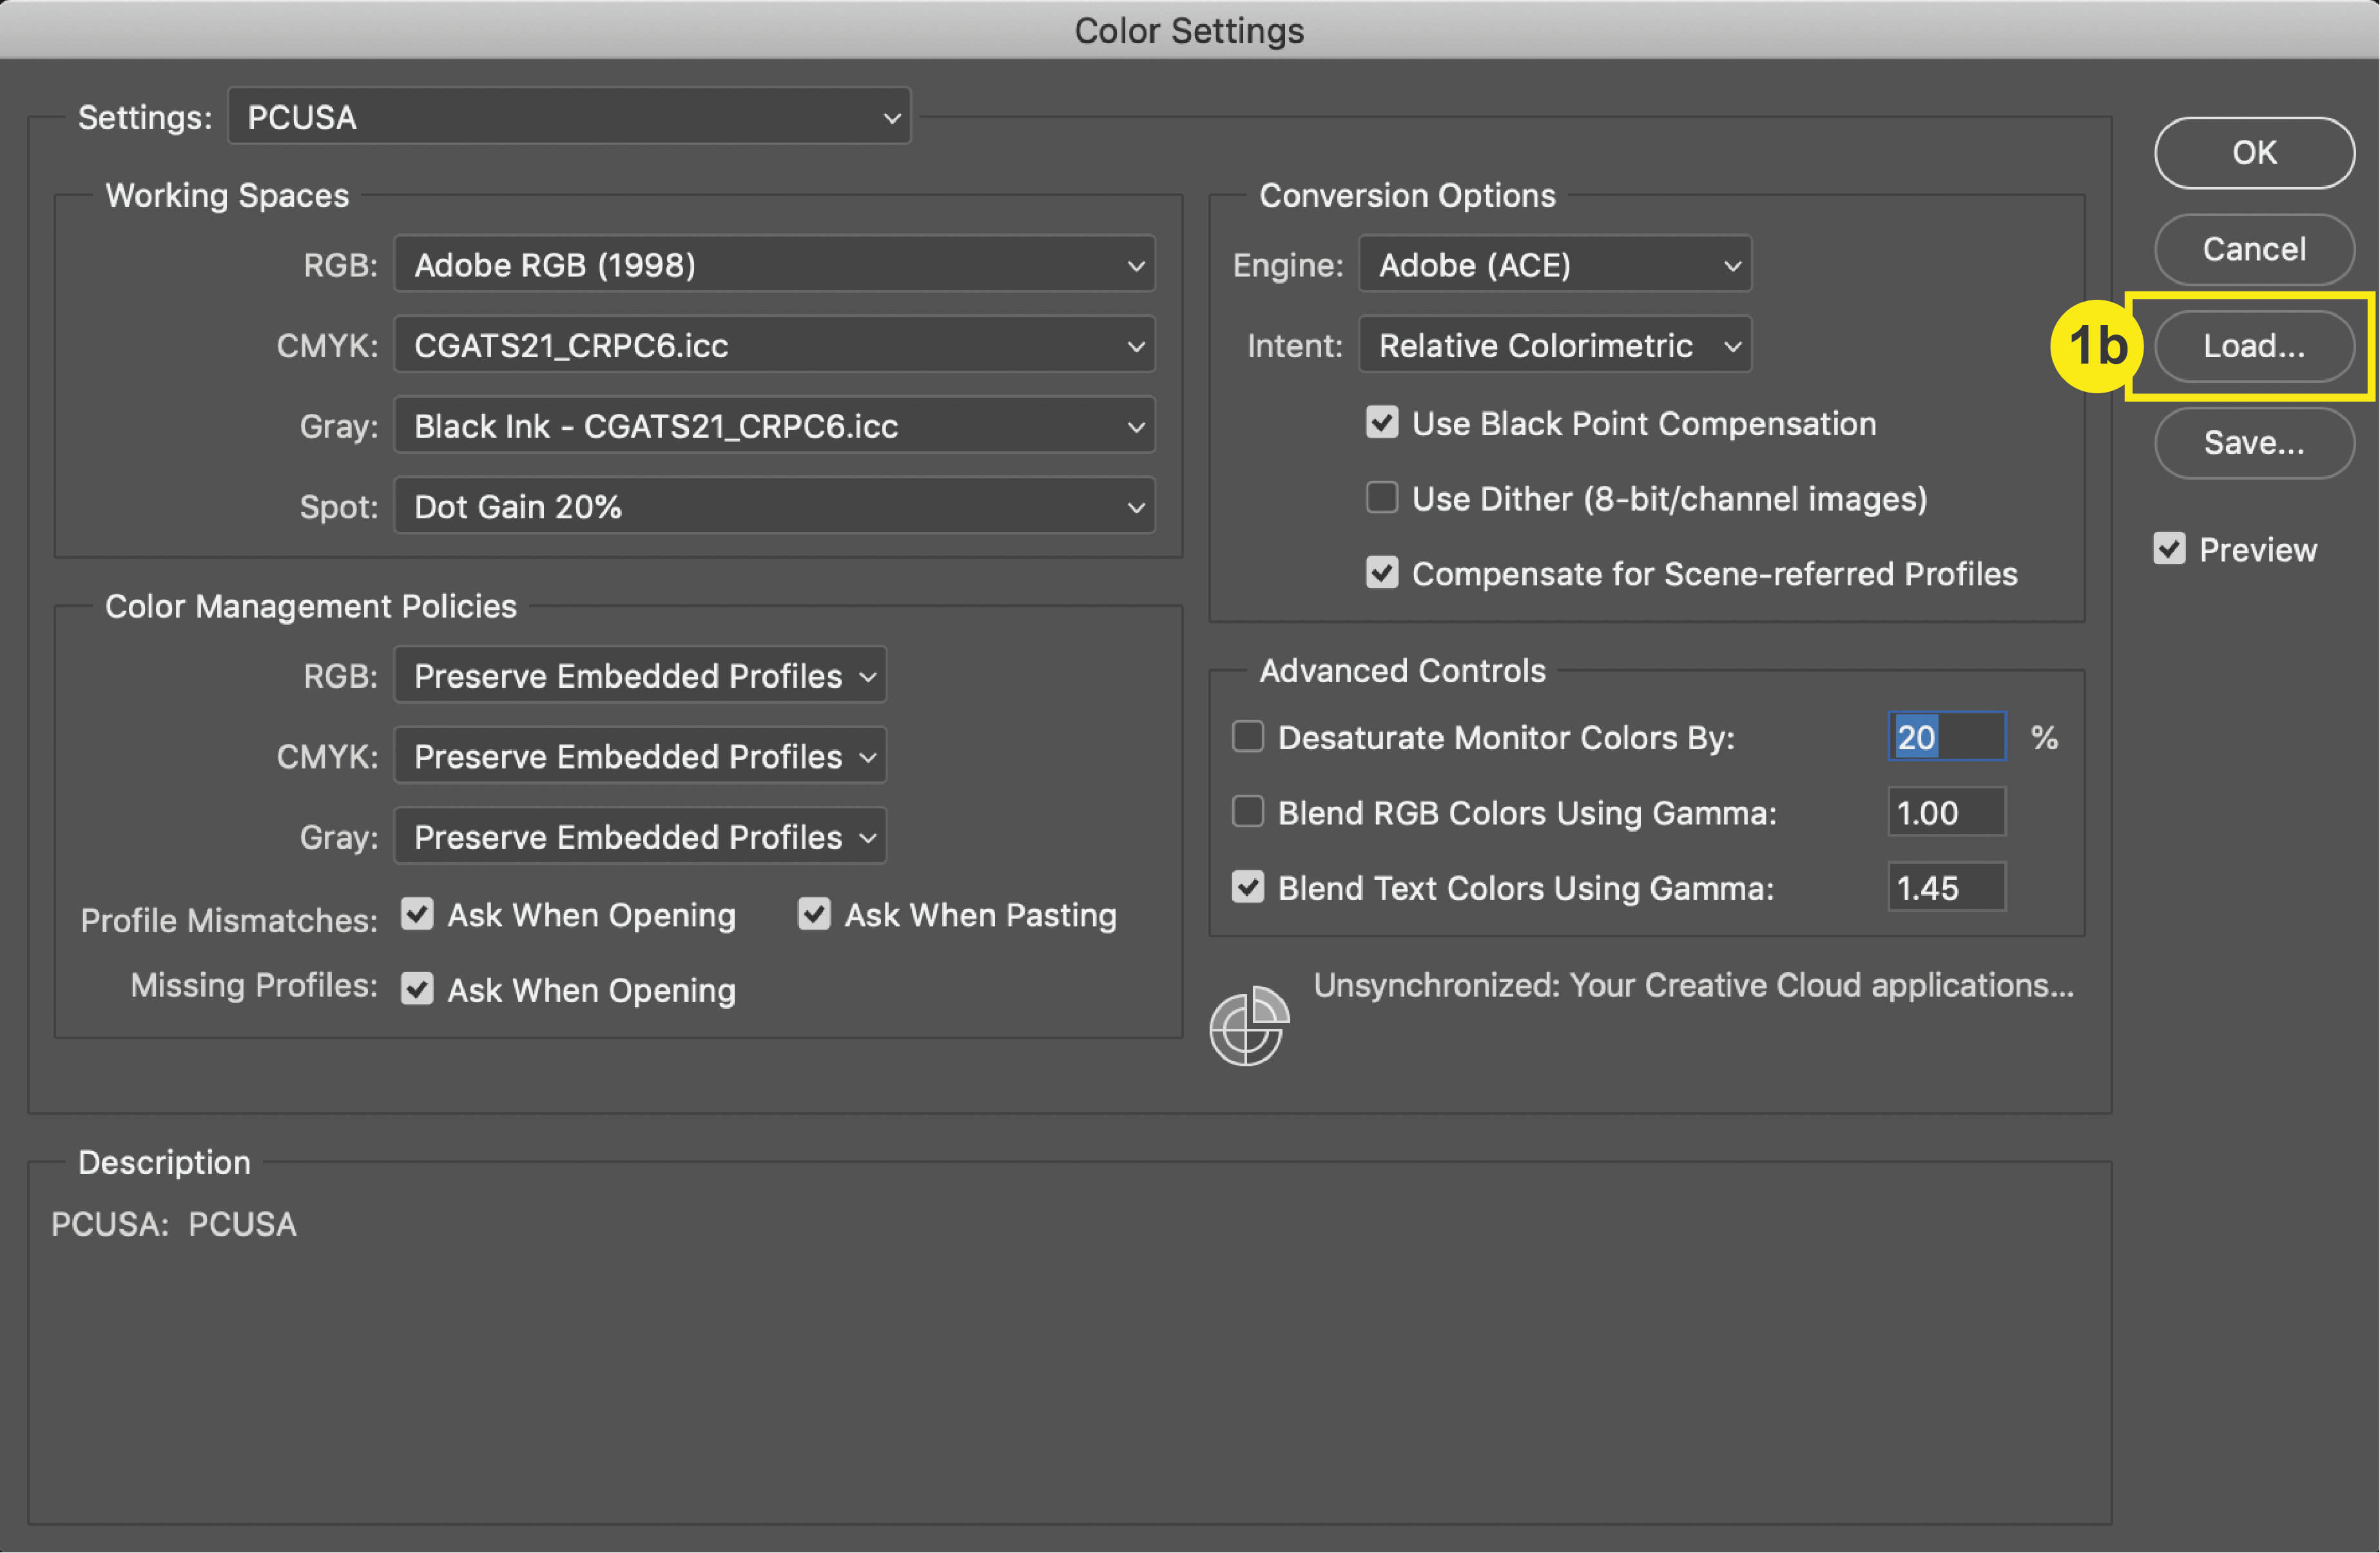
b. In the Color Settings window, select “Load” and select “PCUSA- load into color settings.csf” Click Save.
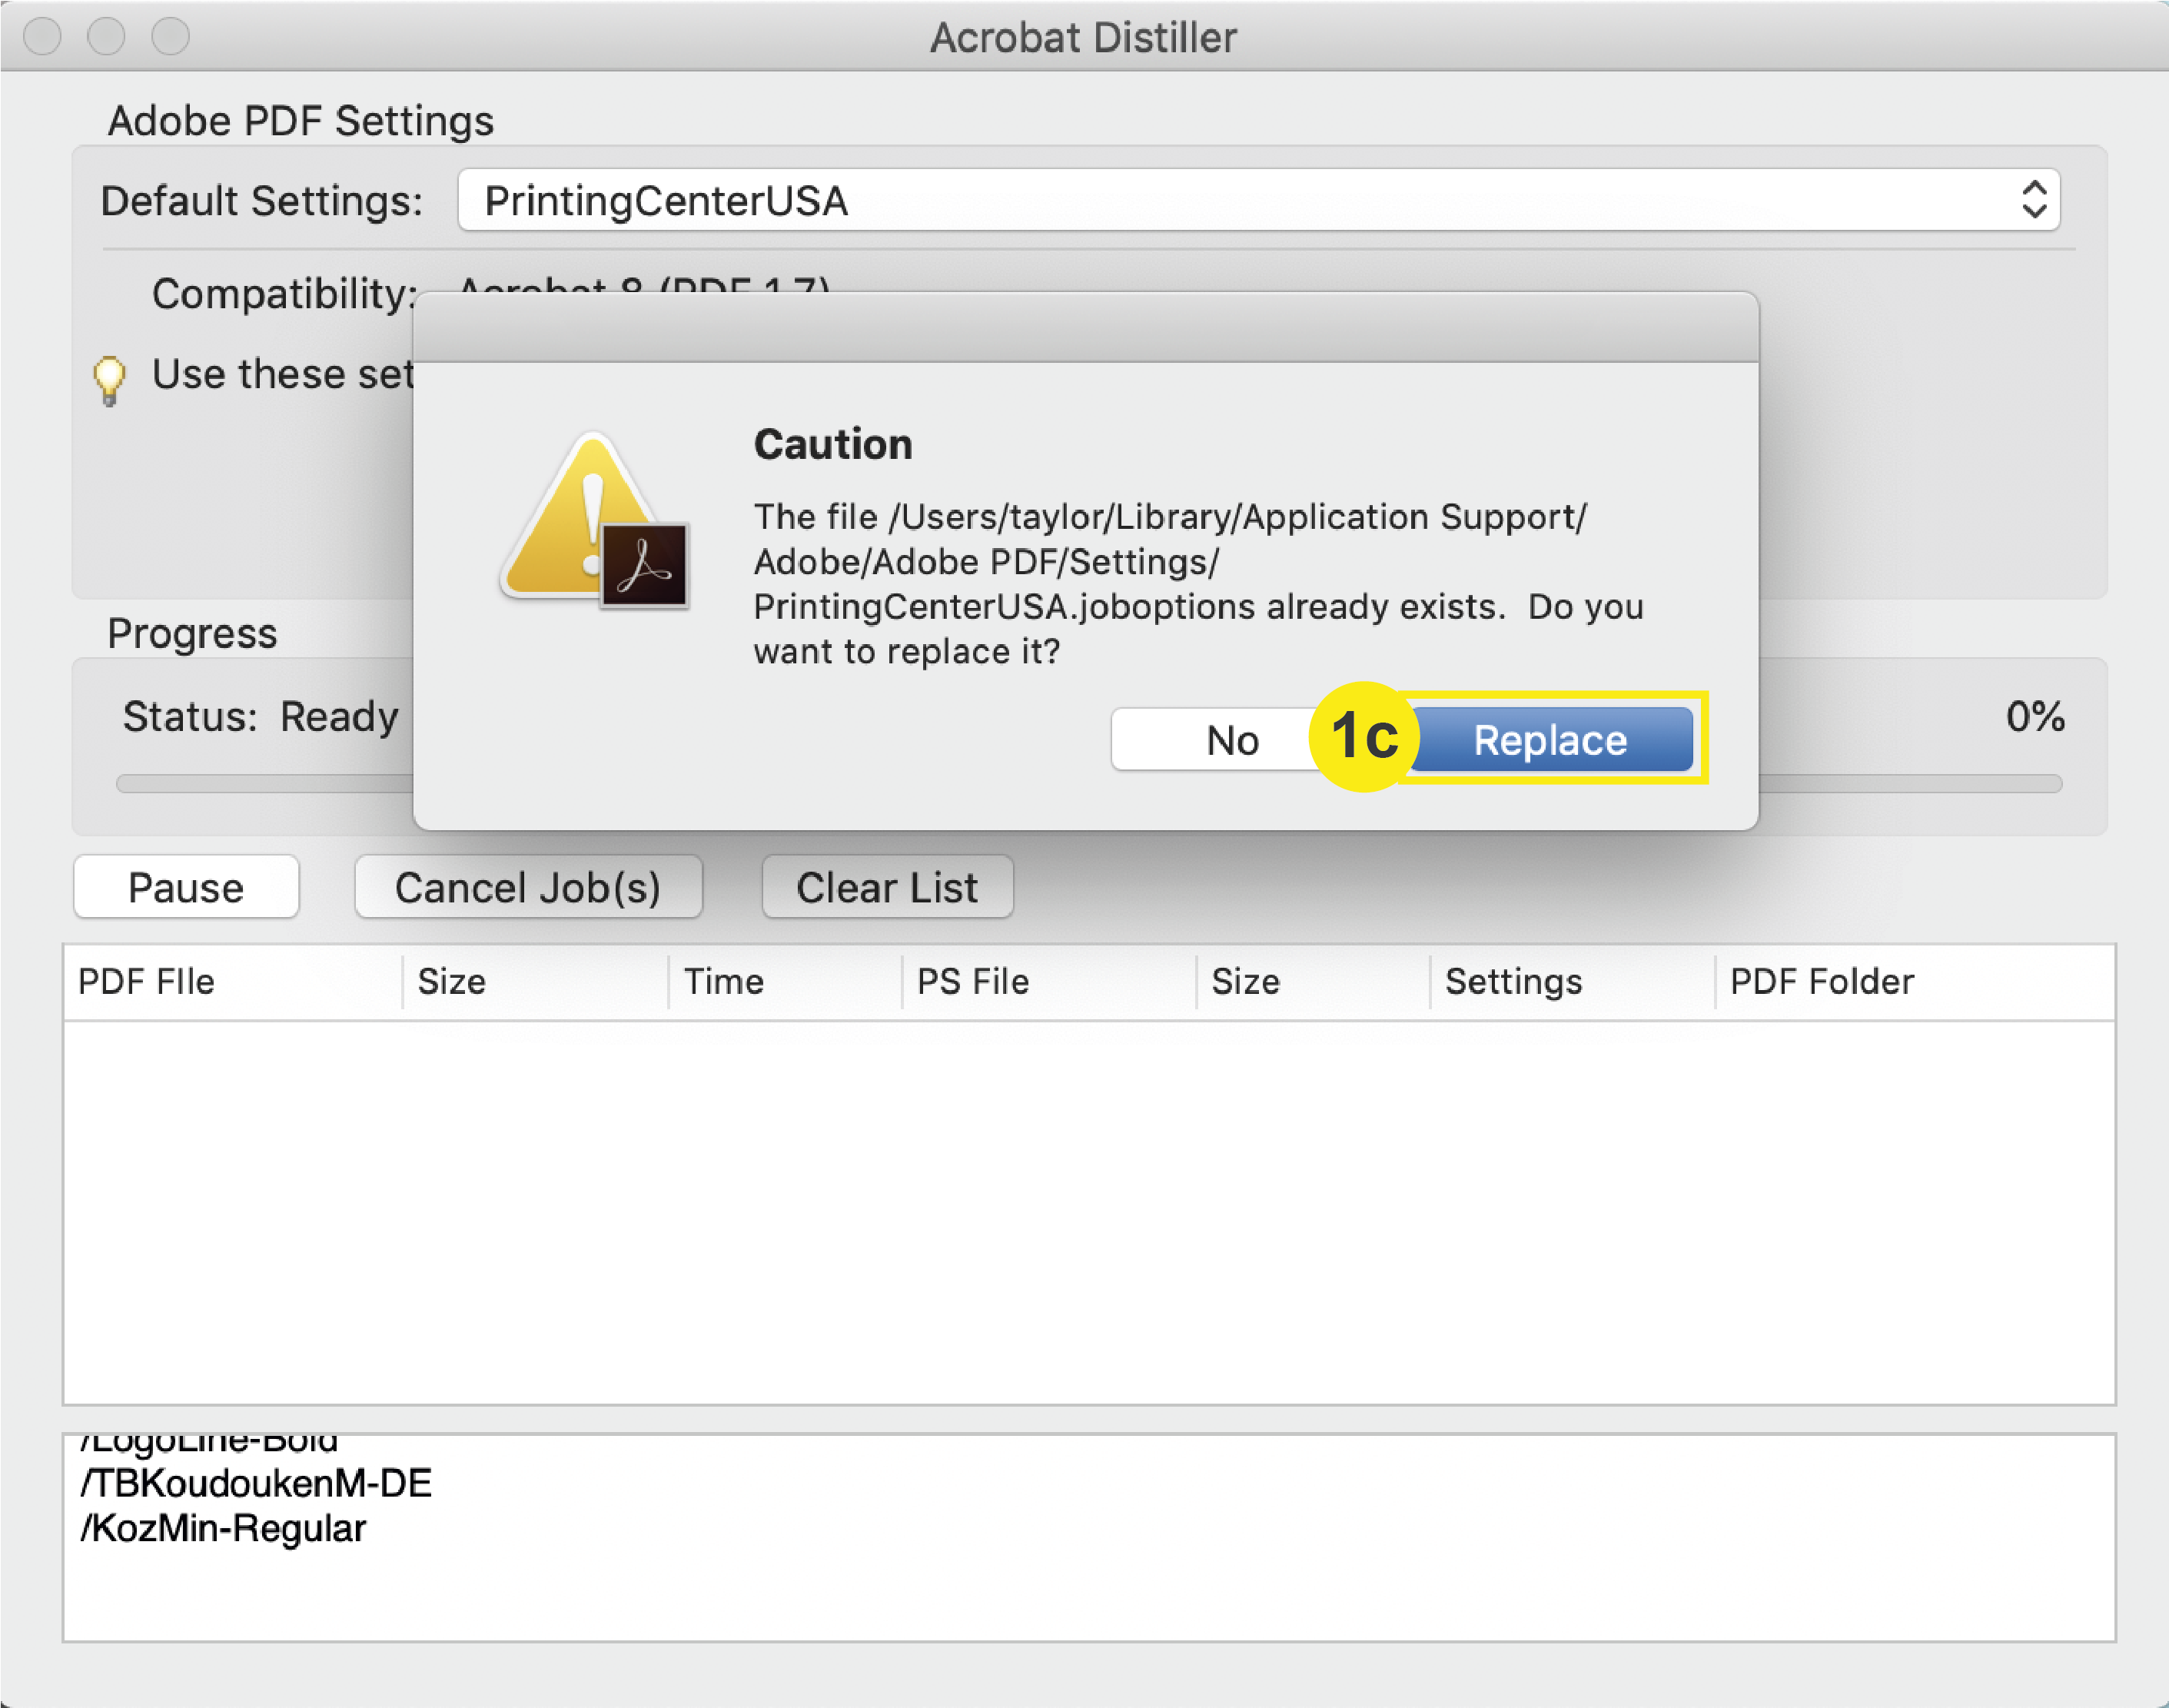
c. In the zip folder, double click PrintingCenterUSA.joboptions. Click “replace” if a caution window comes up. Click exit.

Note: To learn how to load PrintingCenterUSA’s PDF Preset for file saving, click here.

Snow
Forest

Once completed, continue with steps 2-9.

2. File > New

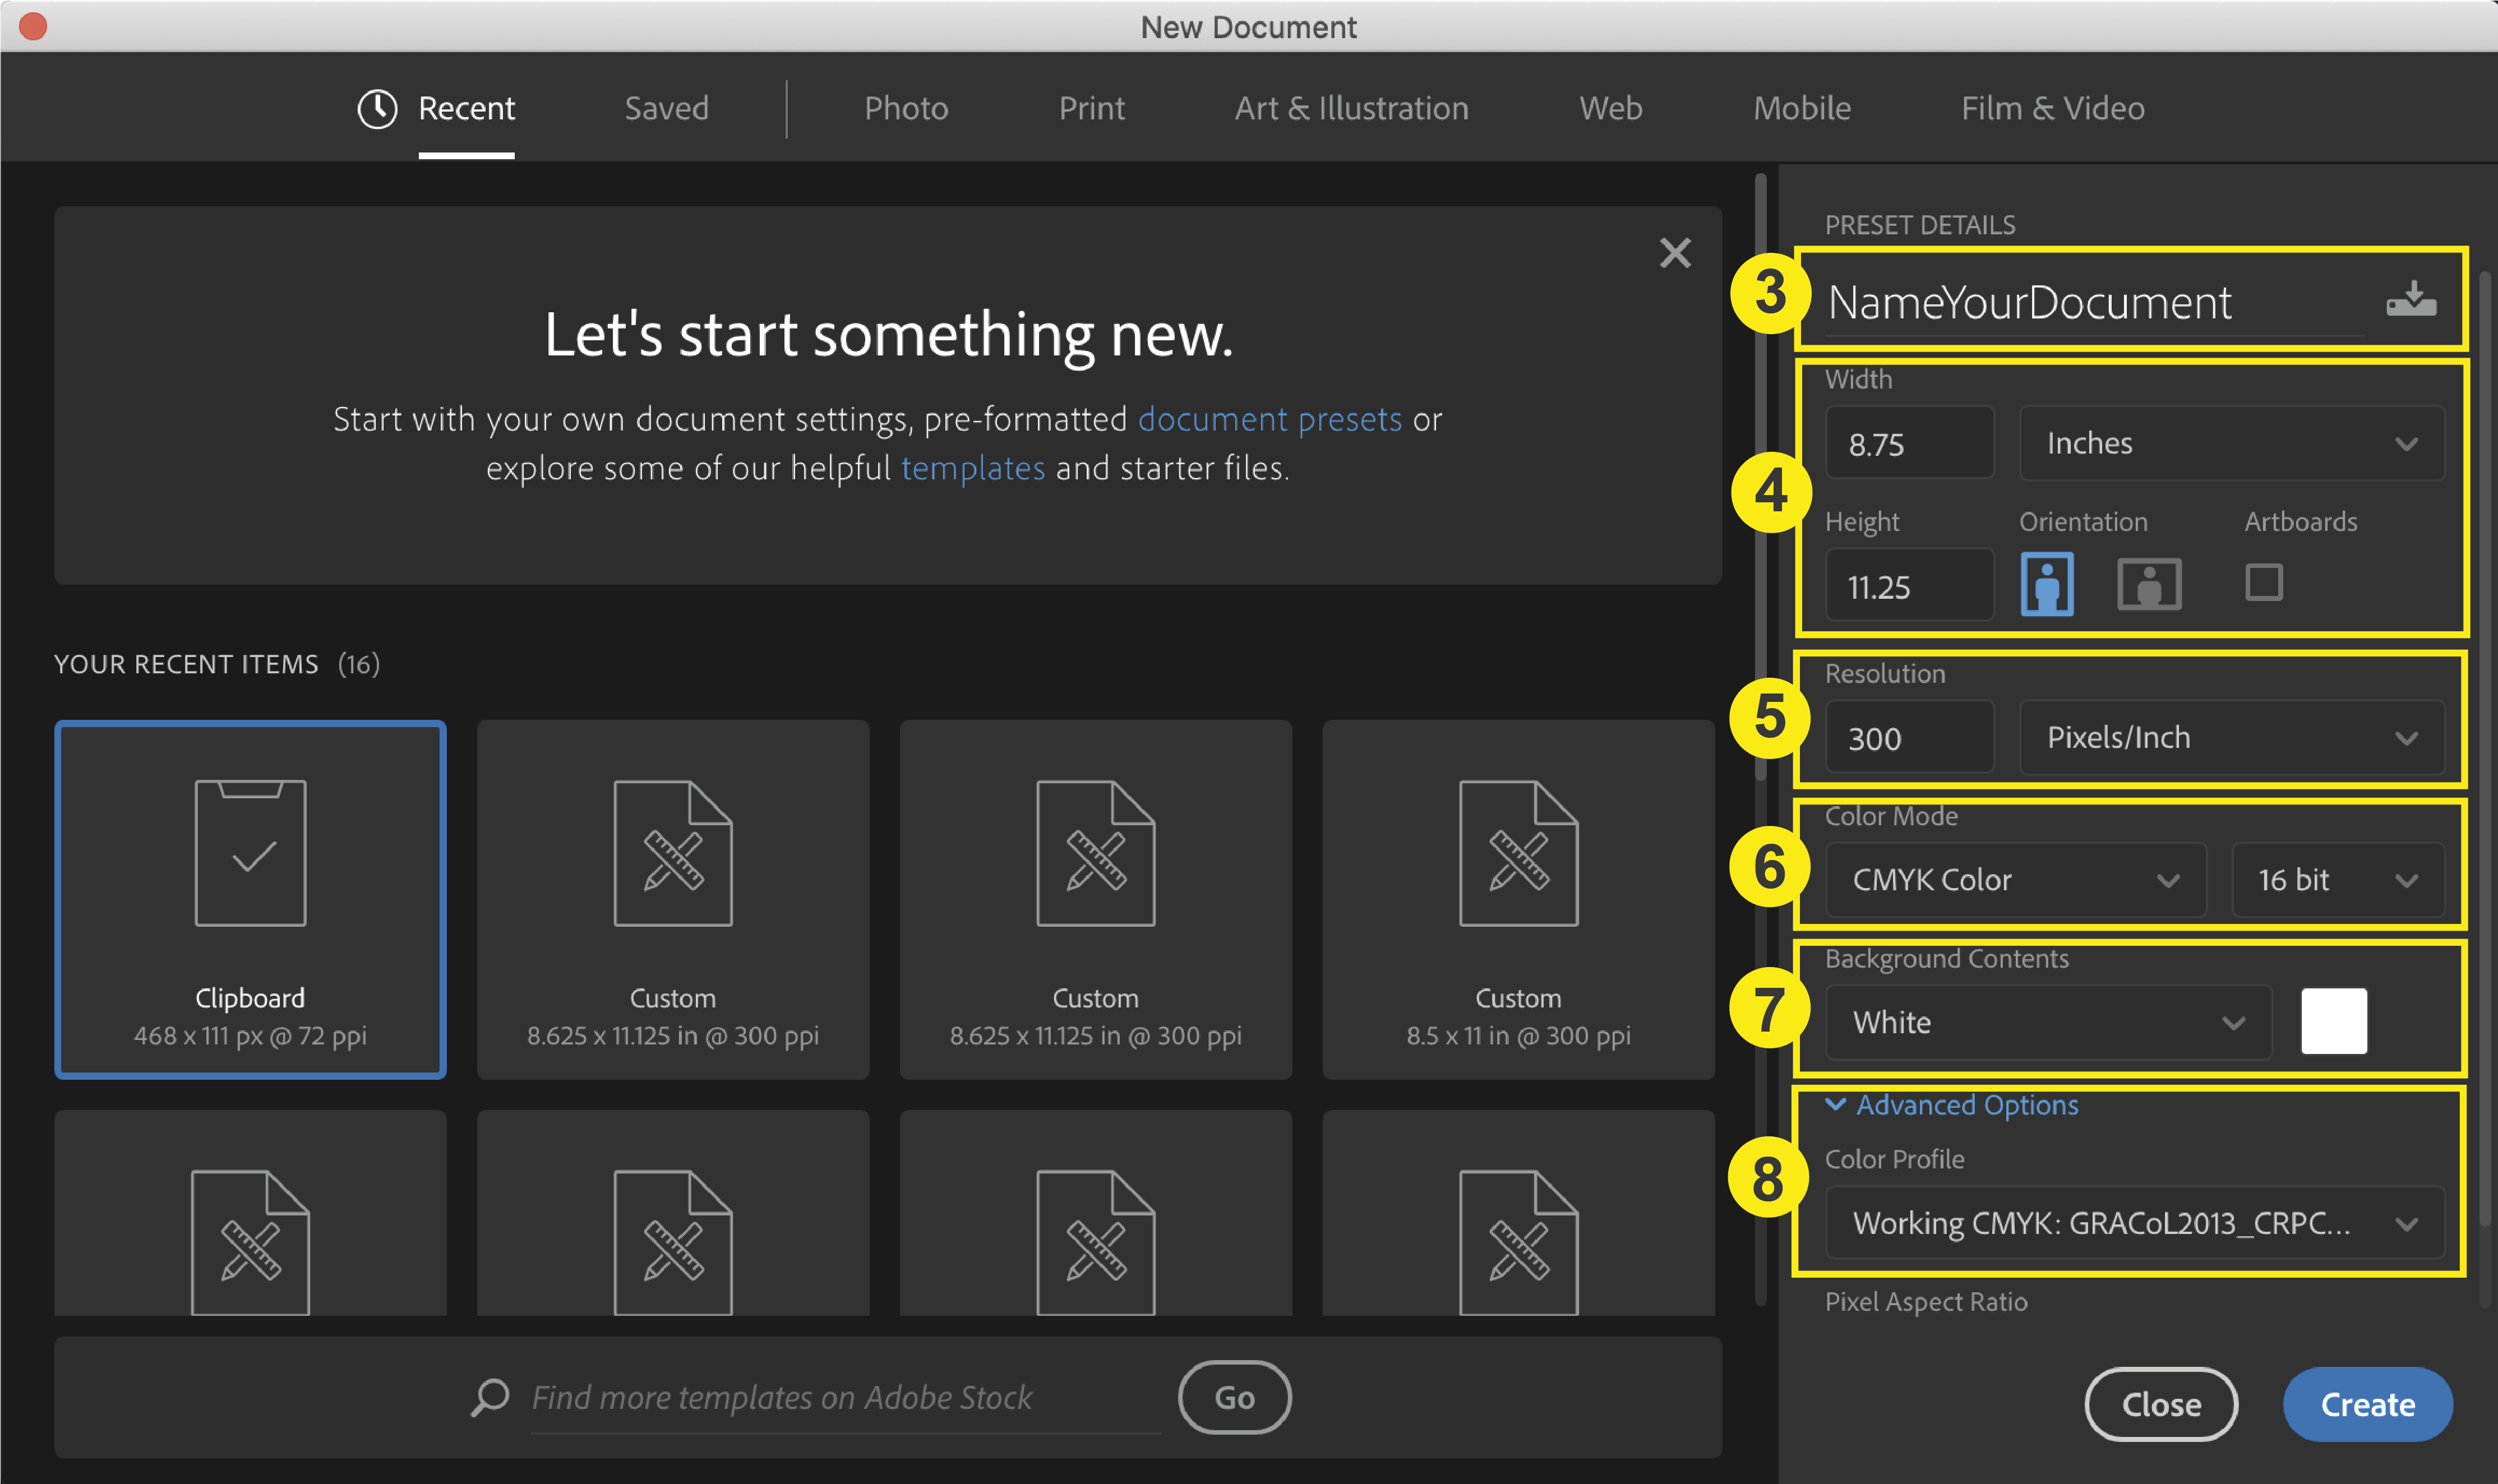
Once you have opened Photoshop, go to the top menu to select File > New. This will prompt a “New Document” window to open where you will define your document settings.

Photoshop_CreateNewDocument

3. Name

First, you should always name your project in the name field.

4. Size

There is no section in Photoshop’s document setup to set your bleeds. You must add bleeds by adding .25 inches to both your width and height of the final trim size of your document. This is how you make room on your canvas for .125 inch bleeds on each side.

Example: For an 8.5” x 11” Letterhead, your document size should be 8.75” x 11.25”

5. Resolution

Input your resolution to 300 dpi to ensure your document and images will not be pixelated after printing.

6. Color Mode

Set the color mode to CMYK and ensure 8-bit is selected (not 16-bit).

7. Background Contents

Set your background contents to white.

8. Color Profile

Select the GRACoL2013_CRPC6.icc. If you have not already downloaded our color profile, click here to download and install after creating your Photoshop Document.

Once you have double checked steps 2-8, click “Create” and your Document will open.

Photoshop_NewDocumentWindow

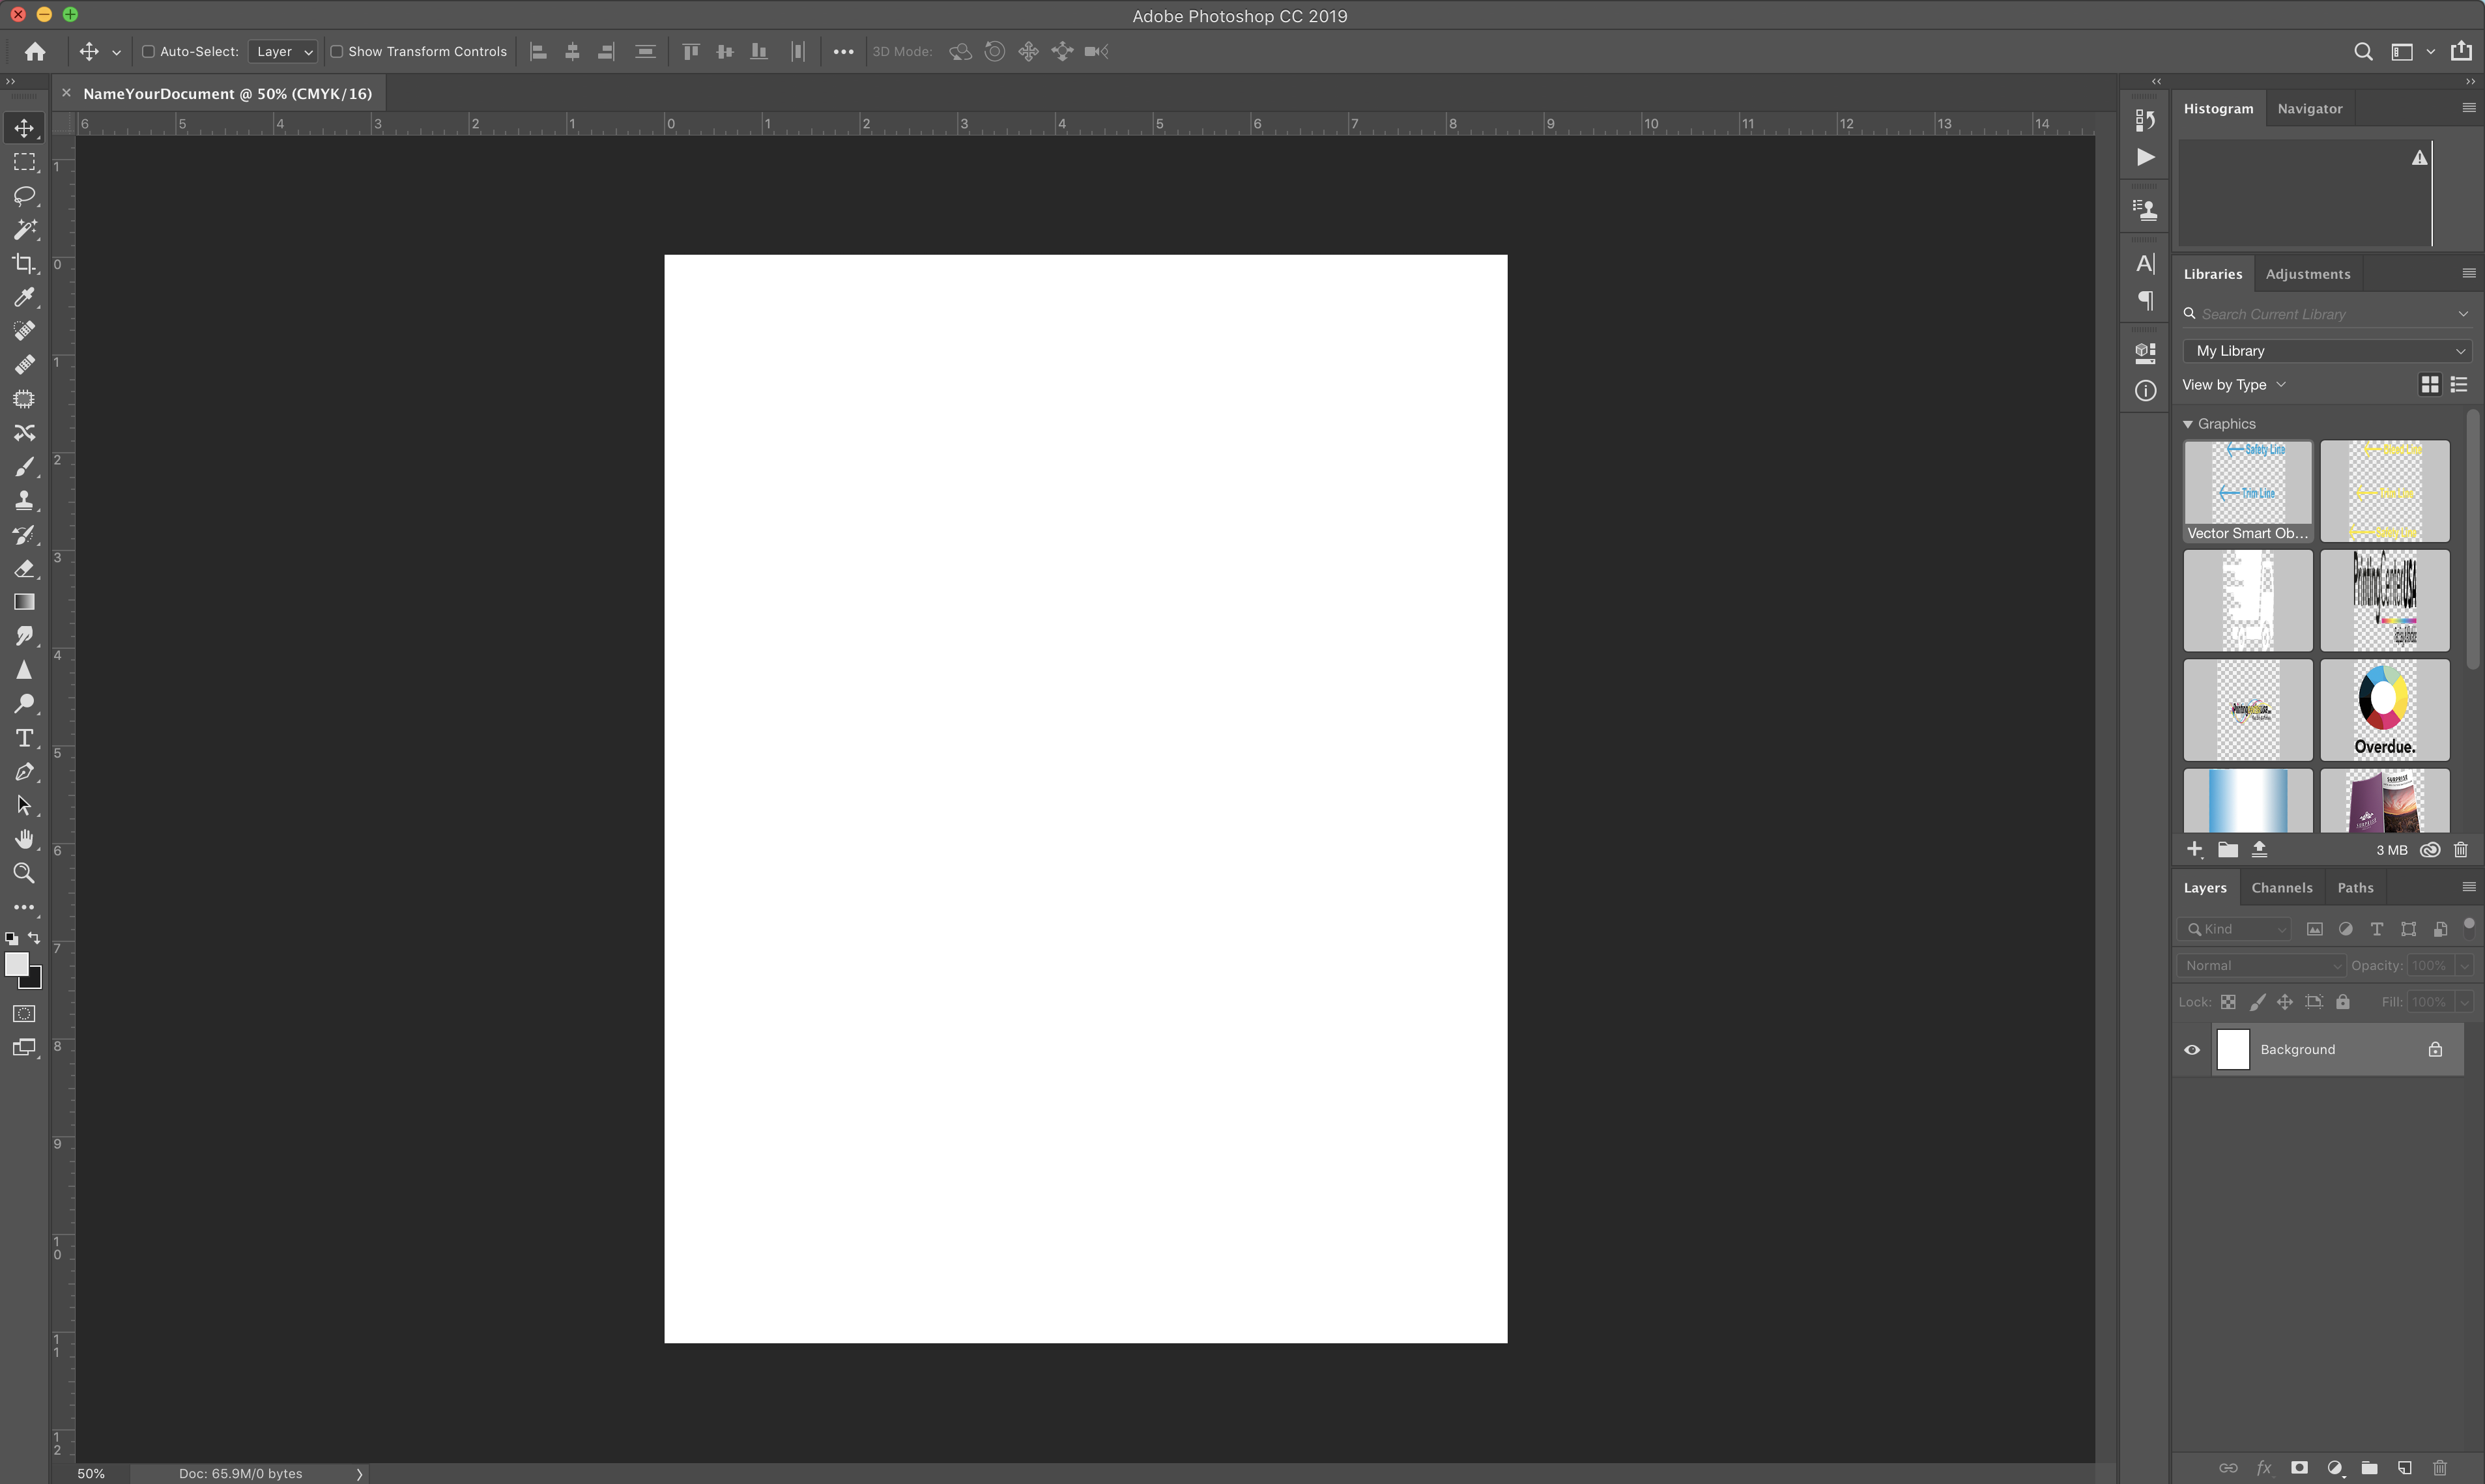
After clicking “Create,” your document with bleeds and your safety line set up will appear.

Photoshop_NewDocument

9. Trim + Safety

Now you are almost ready to design! To ensure you are designing with your bleed, trim line, and safety line in mind, it is important to set guides for yourself.

a. Go to View > Rulers to turn on your rulers.
b. Then, click + drag your mouse from the rulers to create a trim line that is .125″ from each edge of the document.
c. Repeat this step to create the safety line, but set it .25″ from each edge of your document.

Photoshop_Safety_Trim_Bleed

When you are done, your document should look similar to this:

Photoshop_NewDocument_withGuides

Now you’re ready to begin designing your product for print!

Please refer to our File Saving section for a tutorial on saving your project once you are finished.